1. Neon Arcade Couple with Coin-Cell Puck Hearts
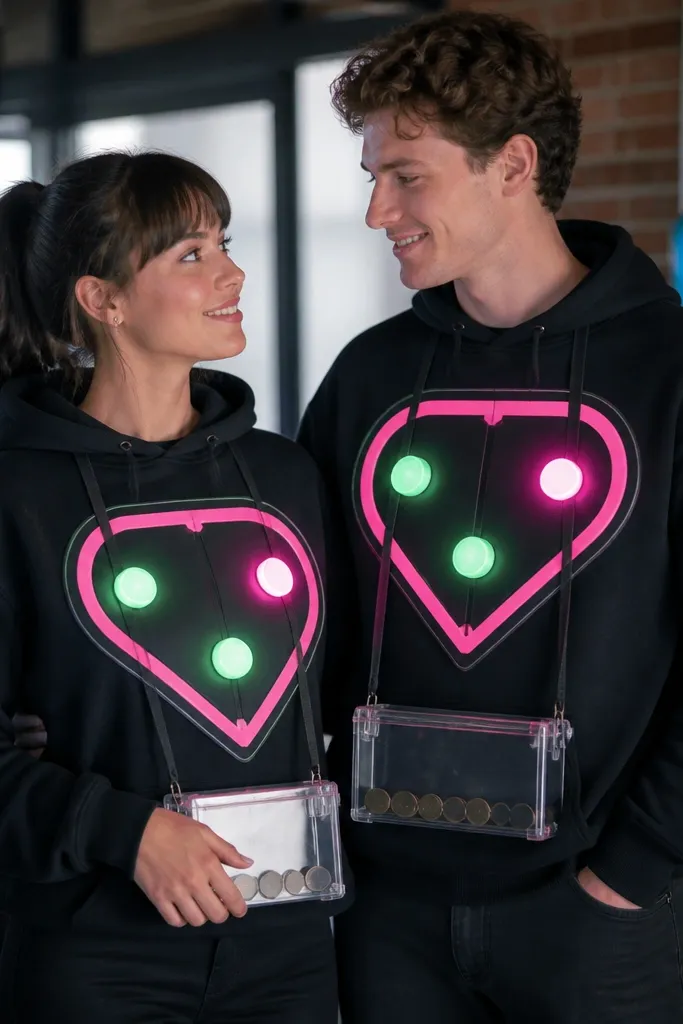
This one works because the lights sit on a heart shape that reads instantly, and the rest of the outfit stays simple so the glow is the hero. I used black cotton hoodies and added a layered heart template cut from craft foam, then glued puck LEDs behind it so the heart edges glow without making the whole hoodie look “floodlit.” Pink and green are high-contrast against black, so it photographs well in dim venues. It flatters most body types because the heart sits at mid-chest and you can scale it smaller for petite frames or larger for a dramatic look. For skin tones, the neon glow acts like a soft highlight — it doesn’t wash out darker complexions the way white LED can.
Start by drawing a heart on craft foam (about 10 inches wide for an adult chest) and cut two layers. Attach puck LEDs behind the foam using fabric-safe hot glue, then sandwich the heart between two thin foam layers so the light is focused. Sew or hot-glue a narrow fabric channel from the inside edge to the battery pocket, then place a coin-cell battery holder in a zippered pouch on the inner seam. Finish by adding a small “arcade label” patch on the sleeve and thread the on/off switch to a spot you can reach without digging into the costume.
Quick tipUse frosted craft film over the LED openings if your puck lights are too harsh — it turns point light into a smooth glow.
One warningDon’t glue LEDs directly onto stretchy fabric without a channel — the strip lifts and looks messy fast.
2. Glow-Trace Witch Hats with Clip-On LED Bands
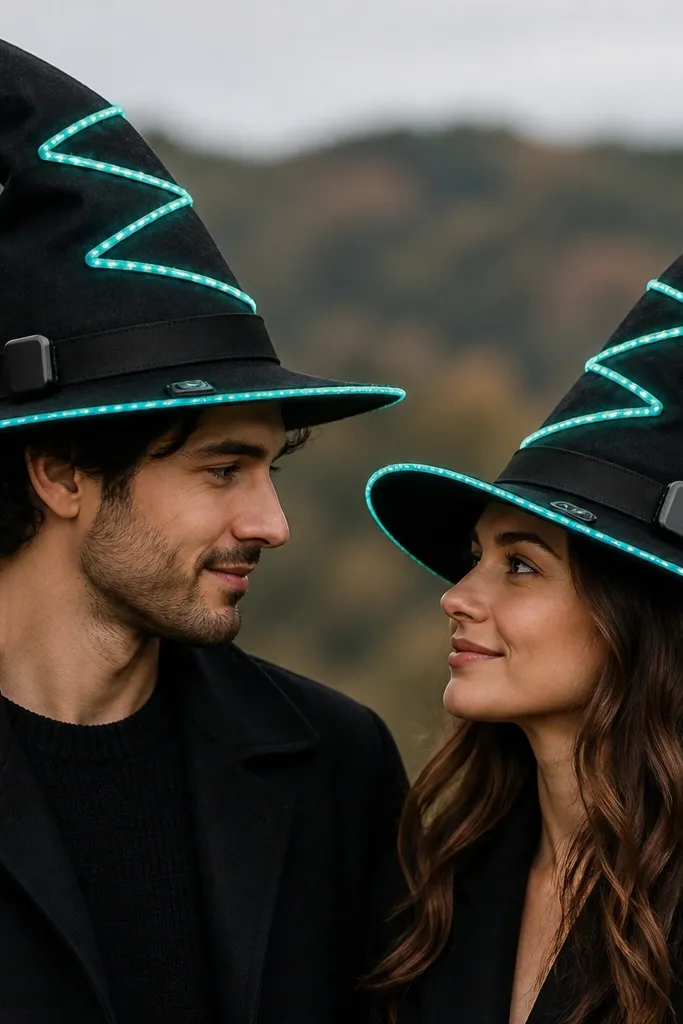
Hat lights are the easiest way to make a couple costume look intentional because hats naturally create an outline. I made the hats from stiff black felt and used a teal LED strip cut into short segments, then spaced them so the zigzag reads like a spell. The brim glow frames the face and makes hair and cheekbones pop in photos, especially if you keep the rest of the outfit matte. This flatters most face shapes because the light follows the hat silhouette instead of floating randomly. If you have lighter hair, teal looks icy; if you have darker hair, teal looks electric.
Start by building a tall cone hat from felt and adding a 2-inch brim ring. Cut LED strip segments and test the brightness at full power against your lighting — you want it bright, not blinding. Glue the strip to the inside edge of the brim and up the cone in a zigzag line, then hide the wire in a folded felt channel stitched with straight seams. Make a removable hat band pouch from black fabric with Velcro so you can swap battery packs without opening the whole hat.
Quick tipClip the battery pack with a small binder clip-style clasp so you can remove it for charging and still keep it secure during dancing.
One warningSkip clear hot glue blobs on the outside — they catch light as shiny lumps and look cheap.
3. Star Map Superheroes with Washi Tape Light Constellations
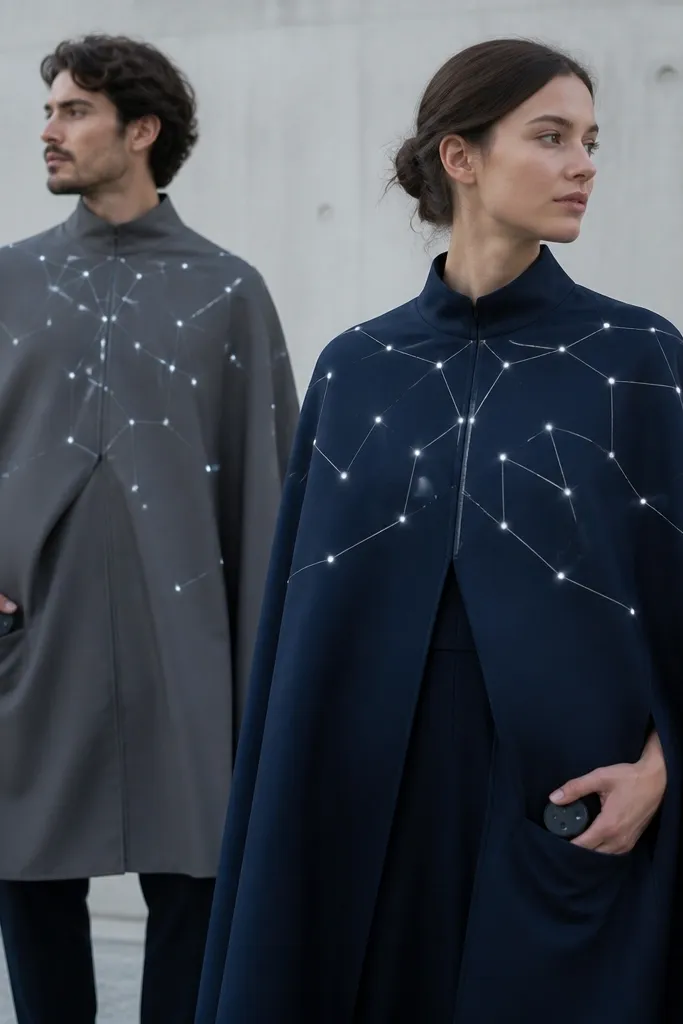
Constellation lights look artistic because they’re scattered and connected in a pattern, not just a single strip. I used gray and navy capes made from lightweight polyester so they drape, then placed tiny warm-white LED micro dots at star points. Silver washi tape draws the connecting lines, so even if a few LEDs are off, the design still reads as a star map. This flatters taller bodies because cape length extends the silhouette, and it flatters curvier bodies because the drape hides midsection bulk. Warm-white LEDs also flatter a wide range of skin tones since they don’t turn everything blue.
Start by sketching a constellation layout on paper and pinning it to the cape so you know the spacing before you glue anything. Press washi tape lightly first as a guide, then place micro LEDs at the tape “star” intersections. Route wires to a single inside corner pocket where you stitch a small fabric “cable runway” so it stays flat. Add a snap-closure controller pocket so you can remove the controller for battery changes and keep the wires from tangling.
Use warm-white LEDs with diffused lenses if you want a softer look under phone camera flash.
Don’t connect LEDs with thick tape lines — it makes the cape look like a craft project instead of a planned design.
4. Paper Lantern Couple Skirts with RGB Edge Glow
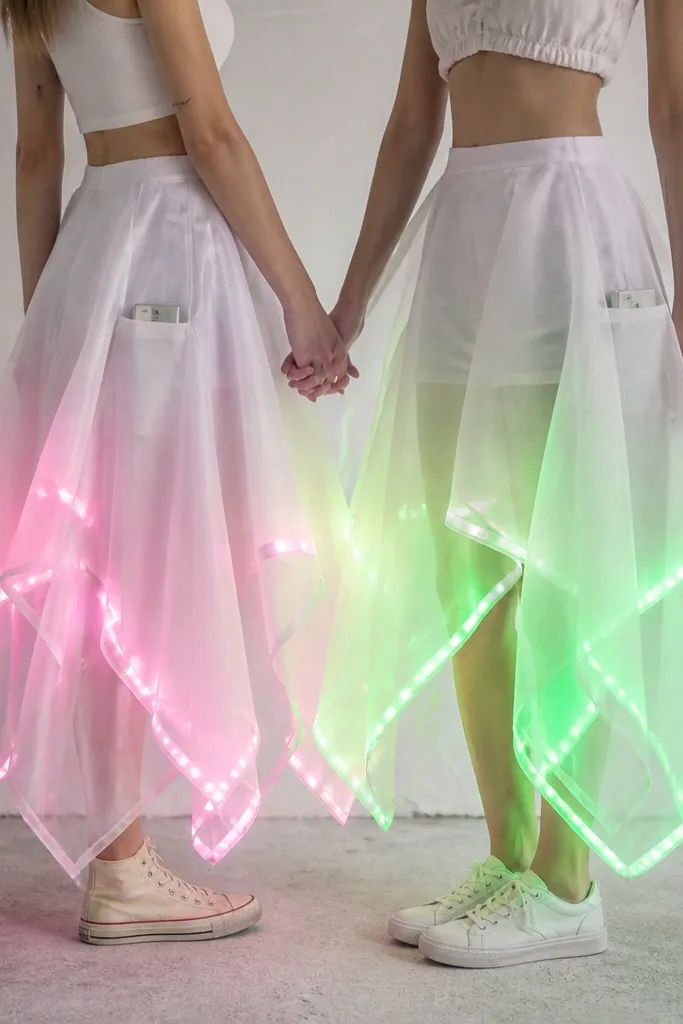
Hem-edge lighting is flattering because it draws a line down your legs and makes movement look magical. I built lantern-style skirts with translucent organza panels and a matte underskirt so the RGB glow has something to reflect. The LED strip sits inside a folded hem channel, so you see a clean edge glow rather than a line of individual diodes. This looks good on different body types because you can adjust the panel width: wider panels for dramatic flare, narrower panels for a slimmer silhouette. It also looks great on both warm and cool skin tones because RGB lets you pick a flattering color on the controller.
Start by cutting 6 to 8 organza panels (each about 18 inches long) and gathering them onto a waistband with basting stitches. Sew an underskirt layer from black cotton or matte knit to prevent full transparency. Create a 1-inch folded hem channel and insert an RGB LED strip so the light faces inward toward the fabric layers. Add side pocket tabs for battery packs and route the cable to the pocket using a zigzag stitch so it stays flexible.
Set the RGB mode to a single color for photos — “steady” looks cleaner than flashing.
Don’t let the LED strip hang loose in the hem — movement will twist it and the glow line warps.
5. Supermarket Self-Checkout Couple with Light-Up Barcode Belts
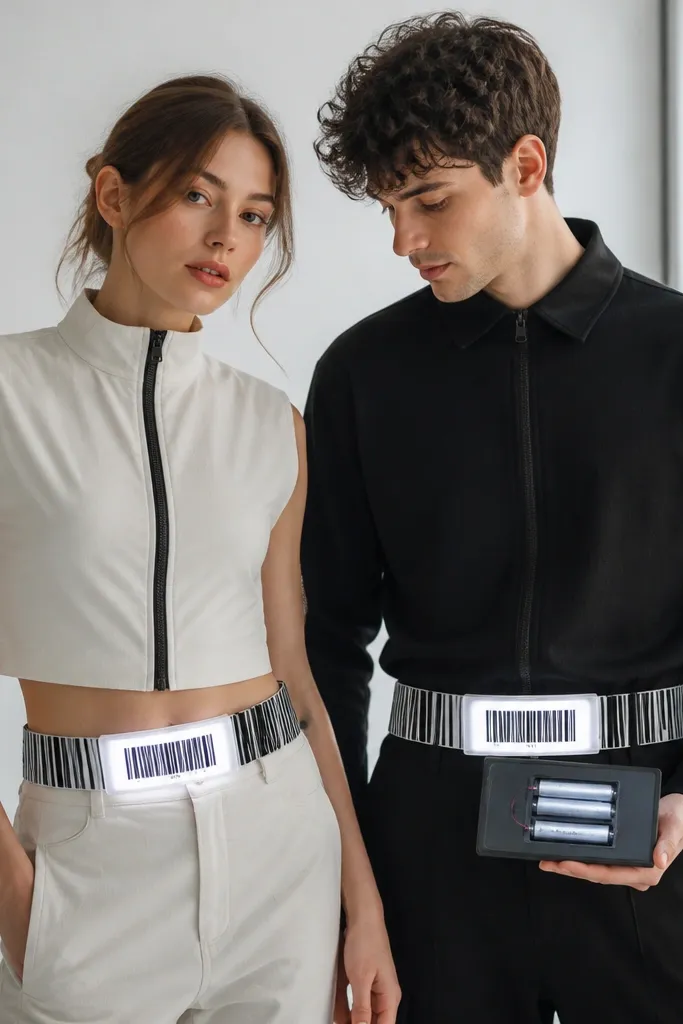
This is funny because the barcode is instantly recognizable, and lights make it look like it’s scanning. I used pre-printed barcode label sheets and taped them onto a strip of black faux leather, then hid a thin white LED strip behind the paper so the bars glow. The belt sits at the waist, which flatters most figures and keeps the light away from the face so it doesn’t wash out skin in photos. For couples, I recommend one person wears a “price check” style belt with a taller barcode and the other wears a “coupon” belt with a shorter, blocky label design. It works in both casual and costume-heavy parties because it reads as playful even without full armor.
Start by measuring your waist and cutting a faux leather strip 2 inches wide and long enough to overlap by 1 inch. Cut barcode label strips to cover the front area, leaving a 1/4-inch border so light doesn’t leak out at the edges. Glue a thin white LED strip to the inside of the leather and test brightness before covering it with labels. Add a velcro strap closure and a small inner pocket with a zipper for the battery pack and switch so you don’t have a dangling controller.
Quick tipPrint barcodes with varying line thicknesses, not just stripes — it looks more real when the camera blurs the edges.
One warningSkip cheap paper-only labels without a backing — they crinkle and fold when you move.
6. Undersea Couple with LED Seaweed Hair Clips
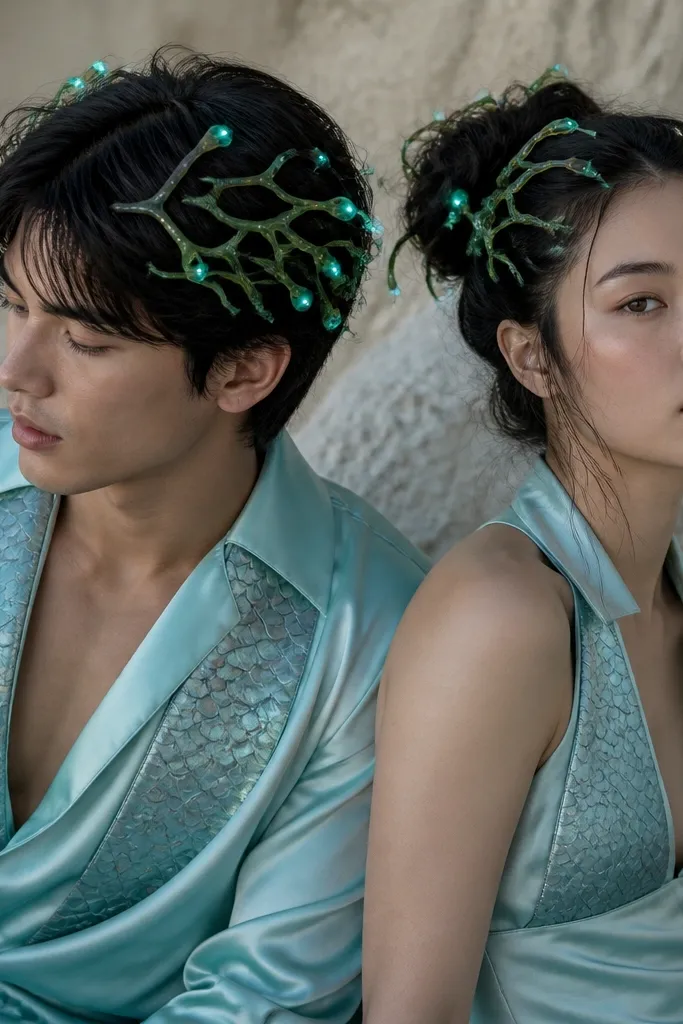
Hair lights are underrated for couples because they frame the face and move with you, so the effect feels alive. I used green craft filament and wired tiny teal LEDs into the tips, then clipped them into small comb bases so they don’t slip. The outfits pair well with aqua satin or matte jersey so the seaweed glow contrasts against smooth fabric. This flatters people with longer hair the most since you can fan the clips along the sides, but it also works for short hair if you place two clips near the crown and one behind each ear. Teal looks great on both warm and cool undertones and makes eyes pop under party lighting.
Start by cutting filament strands in lengths from 4 to 9 inches and shaping them into slightly curved tendrils. Attach a small LED tip to each strand using heat shrink tubing, then glue the base to a mini hair clip comb. Place clips in a “V” pattern along your hairline and secure with bobby pins if you need extra hold. For the battery pack, use a small hidden pocket inside a headband or tuck it into a belt pouch, then run a thin wire through a seam channel so it doesn’t snag.
Quick tipKeep LED blink frequency slow — fast strobing looks chaotic in photos and makes people squint.
One warningDon’t use bright white LEDs for seaweed — it turns into a Christmas vibe instead of undersea.
7. Candy Corn Couple with Layered LED Tiers
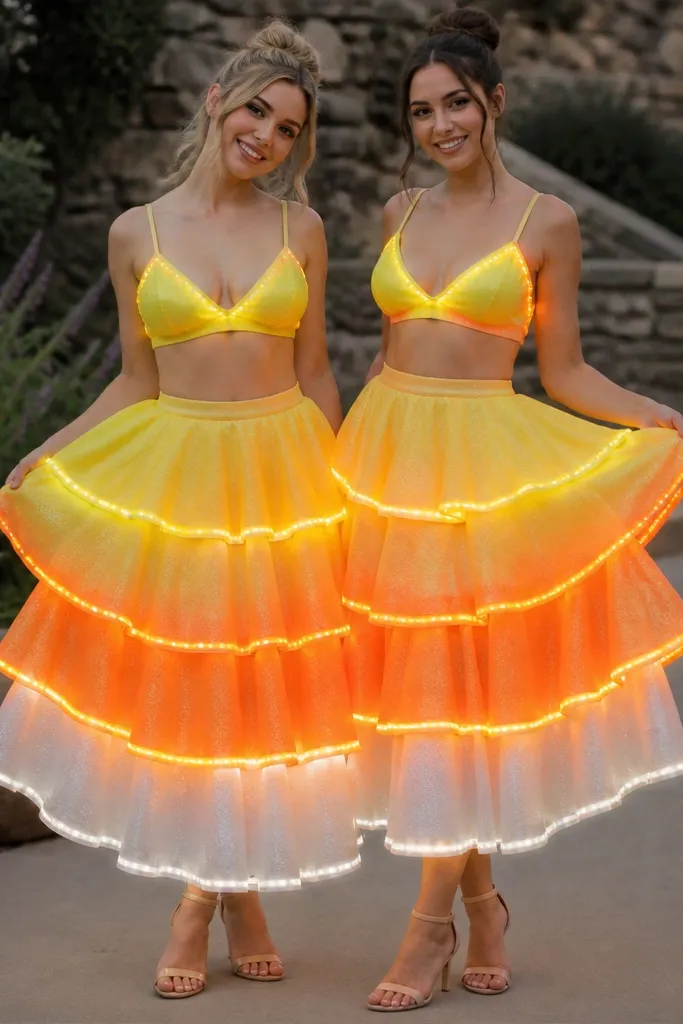
Candy corn costumes look funny because they’re already a clear color story, and lights make the color bands feel like candy glass. I built tiered skirts using fabric in three tones: sunflower yellow, burnt orange, and cream white, then added warm LEDs to each tier edge. Keeping LEDs warm-white makes the colors look like real candy corn under flash. This flatters a lot of body types because tiering adds vertical structure and you can keep the top fitted to balance the skirt. If you’re pale, the orange reads warm instead of harsh; if you’re deeper skin tone, the yellow pops without looking neon.
Start by cutting three skirt tiers with equal width and slightly increasing circumference for a gentle flare. Sew each tier to a waistband with a 1/2-inch seam so the layers sit clean. Fold a thin hem channel on each tier and slide in a warm LED strip, then stitch the channel shut around the wire route. Use a hidden zipper pocket at the side seam for the battery pack and tuck the cable along the inside so it stays flat while you dance.
If your tiers look too flat, add a light stiffening layer on the underside of each tier so the light edge stays crisp.
Avoid using blue LEDs — they make orange look muddy and cheap.
8. Robot Couple with Bender Arm LED Tracers
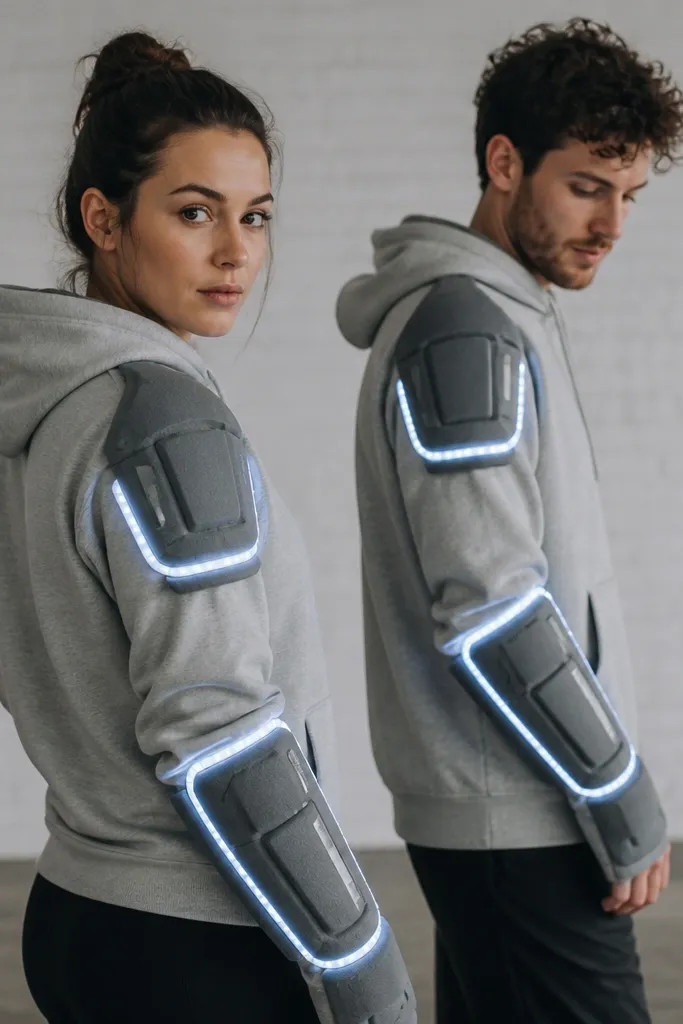
Robot costumes always read well, but lights make the arms look like they’re moving even when you stand still. I made forearm sleeves from gray stretch fabric and added foam “panel” shapes, then ran LED strip tracers along the seams so the glow follows the arm line. The key is using a diffused strip or covering the strip with a layer of translucent plastic so the light is even. This flatters different builds because the tracer lines guide the eye down the arms and create structure. For skin tones, the gray base keeps the LED color from overpowering your complexion.
Start by cutting foam panels (about 3x5 inches) and gluing them onto stretch sleeves with fabric glue. Then measure your forearm circumference and make sure the sleeves fit without squeezing — you want comfort first. Place LED strips along the seam lines and cover with a thin translucent film strip, then stitch around the film edges so it won’t shift. Route wires to a pocket at the wrist seam and place the battery pack in a small inner hoodie pocket with a Velcro strap.
Quick tipUse reflective tape for panel lines so the LEDs look brighter even at lower brightness settings.
One warningDon’t twist the LED tracers around joints — keep straight segments and let the seam turn the line.
9. Movie Projector Couple with Light-Beam Cape Bands
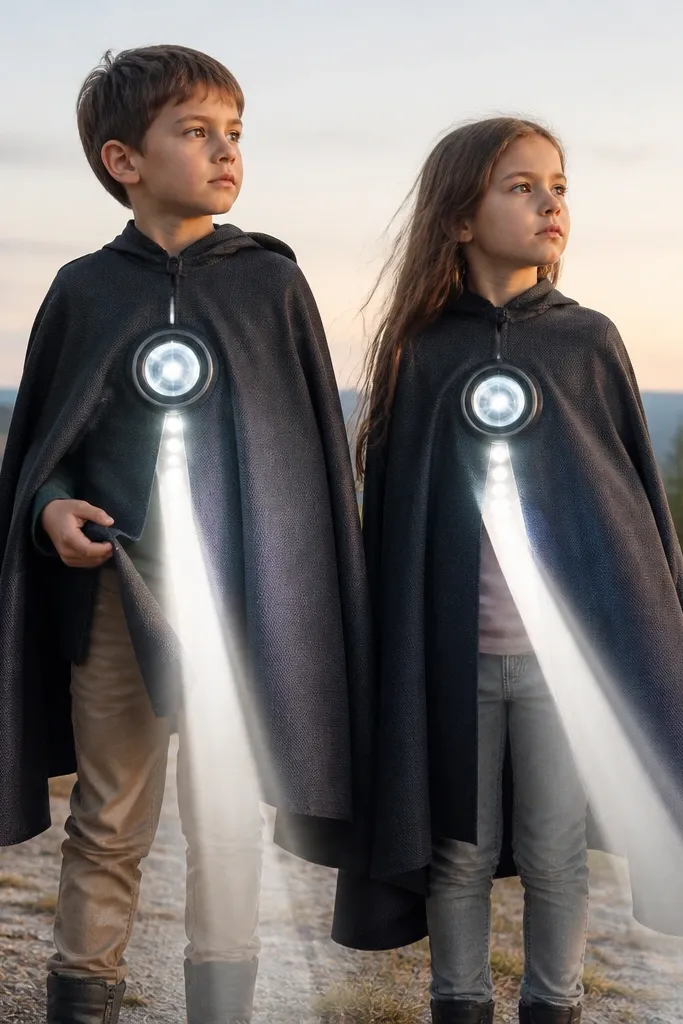
A projector theme looks cinematic because the light beam gives you an instant “story” in one glance. I used a cape made from black fabric and attached a white LED strip inside a slanted channel so it looks like light spills down. The chest lens is made from a round plastic frame with layered foam and a small frosted window so the glow looks like a lens, not a flashlight. This flatters most body shapes because the cape drapes and the beam points toward the center of your torso. It also looks great for different skin tones since the light is neutral and doesn’t skew pink or green.
Start by cutting a cape from black polyester with a slight A-line shape, so it falls away from your body. Create a diagonal light channel on the front panel and insert a white LED strip behind a frosted plastic sheet. Build the chest lens from a plastic embroidery hoop ring or a thick foam circle and glue a small frosted window over the LED source. Put the battery pack in a hidden pocket at the inside back seam and run the cable through a stitched cable guide so it doesn’t swing.
Test the beam angle in your bathroom mirror under overhead lights — adjust until it looks like a spill, not a straight bar.
Don’t let the LED sit directly against fabric — it creates hot spots and uneven brightness.
10. Karaoke Duet Couple with Light-Up Microphone Props
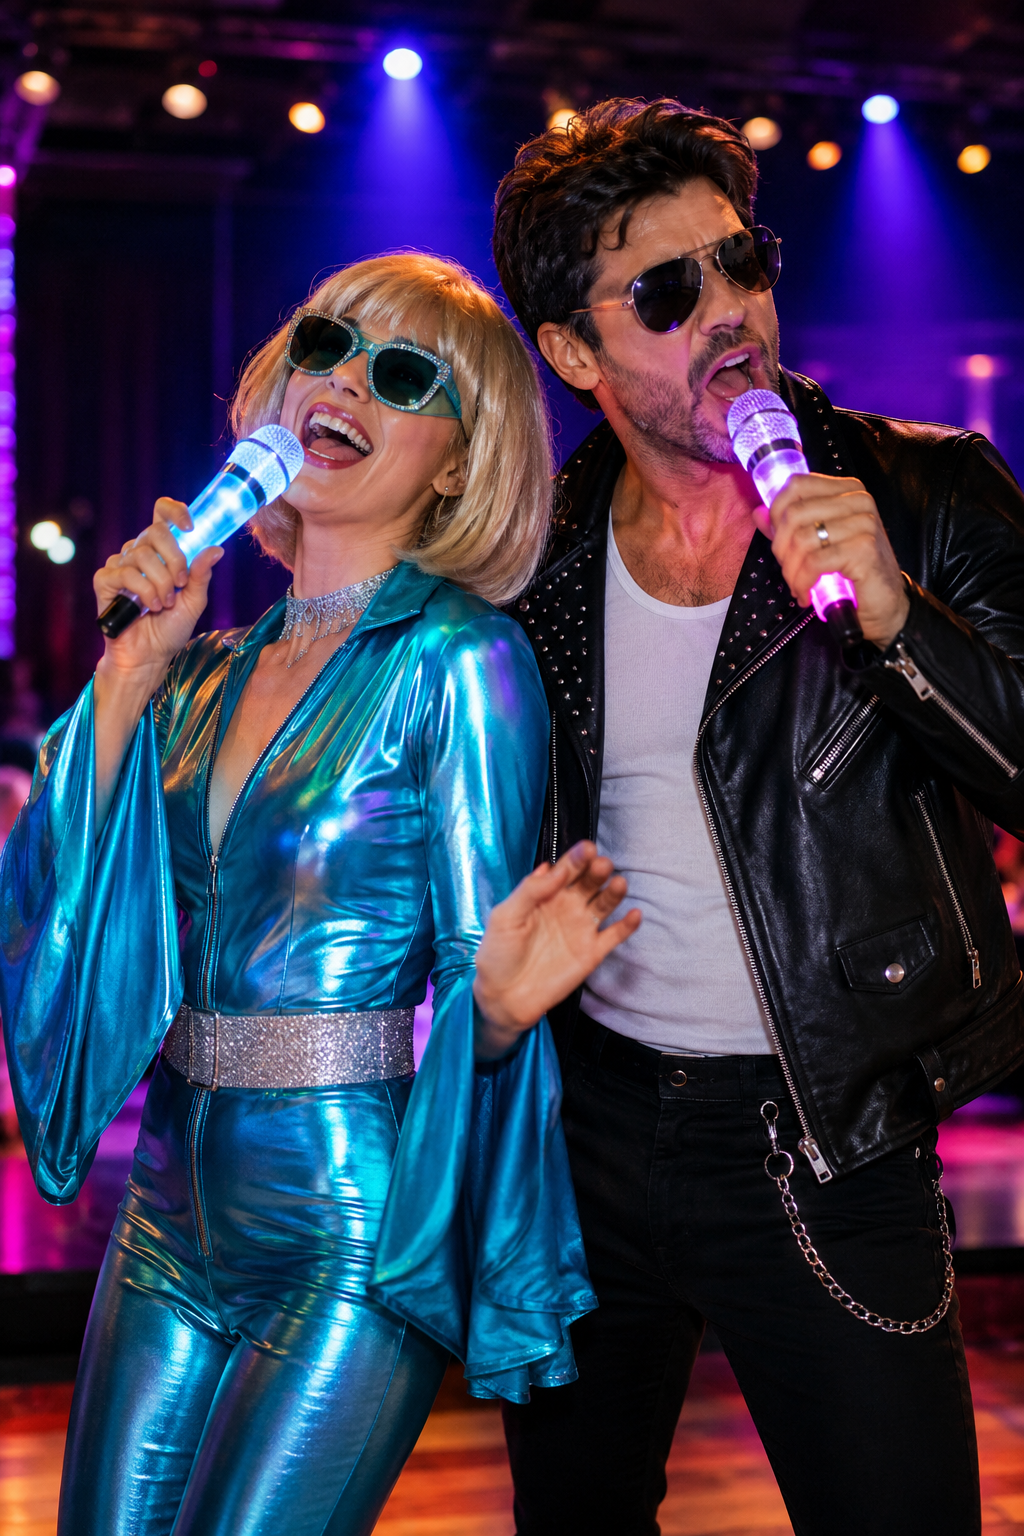
Handheld props give the best “movement glow” because the light travels with your wrists and camera framing. I built microphones from cardboard tubes wrapped in black fabric and then added a small warm LED ring inside the mic head so it looks like a stage spotlight. The warm tone reads more flattering than cool white and makes skin look softer under flash. This fits most body types because you’re not relying on tight clothing, and it works for couples because each person can have a slightly different mic color — one pink accent, one blue accent. For photos, keep the mic head facing forward so the glow hits the camera.
Start by making a tube base and wrapping it in black felt or fabric so it doesn’t look like plain cardboard. Cut a mic head shape from foam, then add a grid pattern using craft mesh or perforated plastic, leaving space for LEDs. Glue tiny LEDs behind the grid and connect them to a battery pack held in a clip-on pouch around the tube base. Add a switch button on the side of the battery pouch so you can turn it on without holding the prop upside down.
Quick tipUse a foam “safety diffuser” layer between LEDs and the front grid for a softer glow.
One warningDon’t use bare LED points behind a wide-open head — you’ll see harsh dots instead of a smooth stage effect.
11. Festival Fairies with LED Wing Ribs and Zip Storage
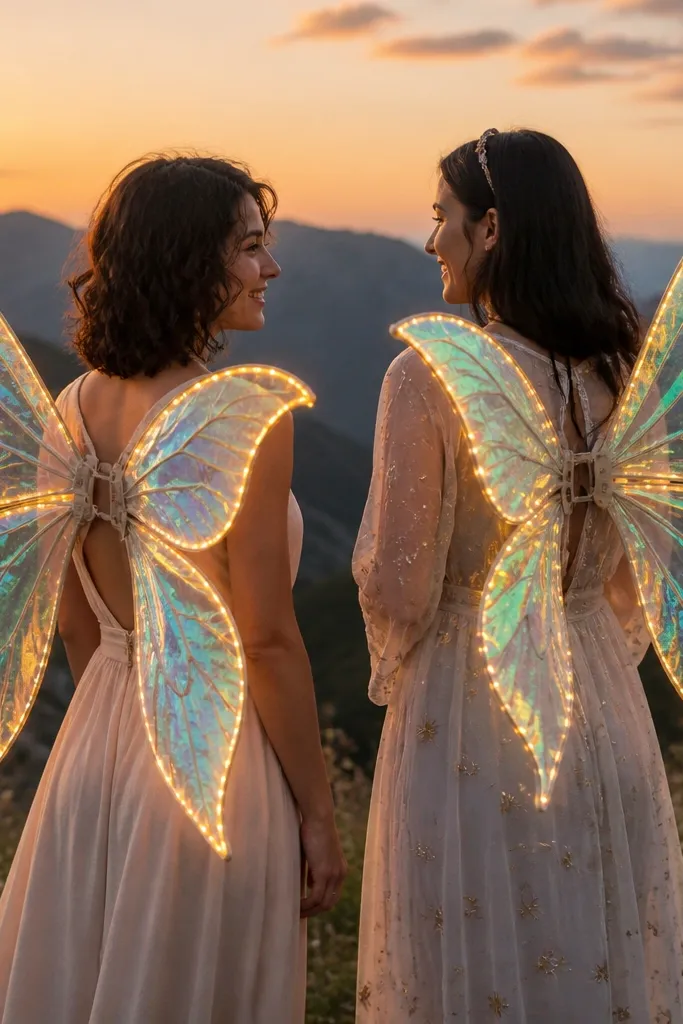
Wings are always photogenic, and LED edge lighting makes them look like real sci-fi fairy wings instead of a craft kit. I built wing frames from thin wire and covered them with lightweight iridescent organza, then ran warm-white LEDs along the rib edges. The warm tone looks magical with skin and doesn’t turn your face blue under party lights. This flatters most body types because wings add shape around your shoulders and upper body, and you can adjust size by using narrower ribs for petite builds. If you have darker hair, warm-white edges look like fireflies; if you have light hair, they look like soft stars.
Start by shaping wire ribs into a wing outline and tying joints with thread so they don’t wobble. Cover with organza and stitch the fabric to the wire at rib points using small hand stitches. Insert LED strip along each rib edge and secure with heat-resistant tape inside the wing so it doesn’t poke through. Sew a zippered pouch onto the inner wing seam for the battery pack and controller, then route the wire to the pouch with a cable guide so it stays untangled when you fold the wings.
Quick tipFold wings for packing — wrap them in a towel before zipping so the LEDs don’t snag on fabric edges.
One warningDon’t attach LEDs with super glue that seeps — it can stiffen fabric and create uneven tension.
12. Cyber Sailor Couple with Light-Up Knot Belts
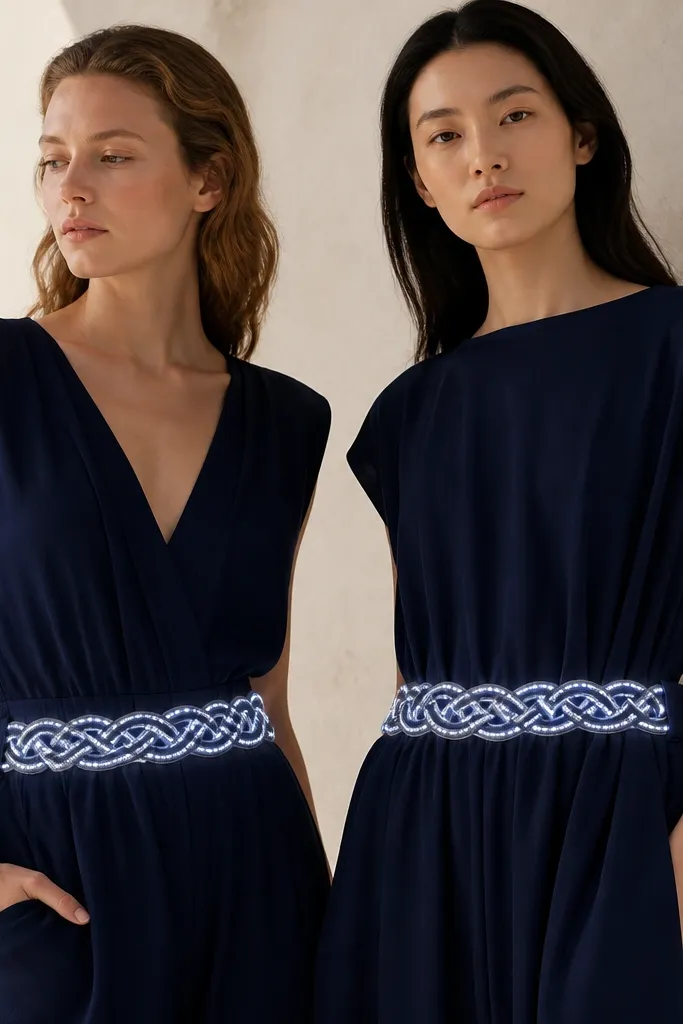
Knot patterns look detailed, and lights make the braid grooves pop without needing heavy armor. I used faux rope braid and stitched it onto a navy belt base, then ran thin white LED strips into the grooves so the light follows the knot lines. The effect looks like a glowing nautical signal. It flatters most builds because a belt defines the waist and the braid texture hides minor fit issues. For skin tones, navy + white glow stays neutral and doesn’t shift your complexion color like red or green lighting can.
Start with a belt base from sturdy fabric or faux leather and measure for a comfortable overlap. Stitch rope braid onto the front in a knot layout, leaving channels for LEDs. Place thin LED strips inside the grooves and cover with a thin translucent fabric layer so you don’t see individual diodes. Add side pockets with Velcro for battery packs and route the switch to the front underside of the belt so you can turn it on quickly.
Use white LEDs with a diffuser wrap so the grooves glow evenly and you don’t get bright pinpoints.
Avoid placing the battery pack on the back of the belt — it digs in when you sit.
13. Moonlight Matchmaker Couple with LED Veil Headbands
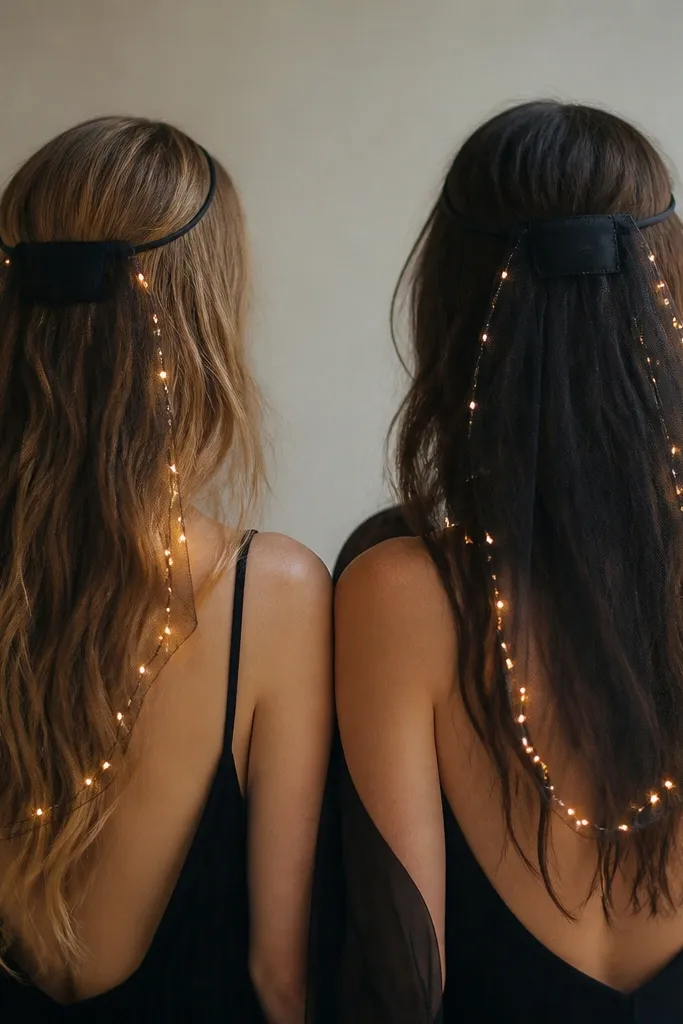
Veils with tiny lights look soft and romantic without turning into a full “glow costume.” I used thin black tulle veils and added micro LED dots along the edge, then kept the rest of the outfit simple: fitted black dresses, or a black top with a satin skirt. The glow stays near the hairline, which frames faces and makes eyes look brighter. This flatters almost everyone because it adds a gentle vertical line around your face and hides flyaways. For skin tones, micro warm-white LEDs look best — they don’t cast harsh blue shadows.
Start by measuring a headband and sewing a narrow fabric pocket on the back for the battery pack. Attach tulle veil pieces to the headband with small hand stitches so the veil drapes evenly. Place micro LEDs along the veil edge, spacing them about 1 inch apart, then secure wire inside a thin stitch channel. Test the placement with the headband on before finalizing, since veil LEDs can shift when you move your hair.
Place the switch under the hairline so it disappears in photos and you don’t see a plastic toggle.
Skip large LED strips on a veil — they look like a ribbon, not like moonlight.
14. Light-Up Dino Hoodie Couple with Ribbed Tail Strips
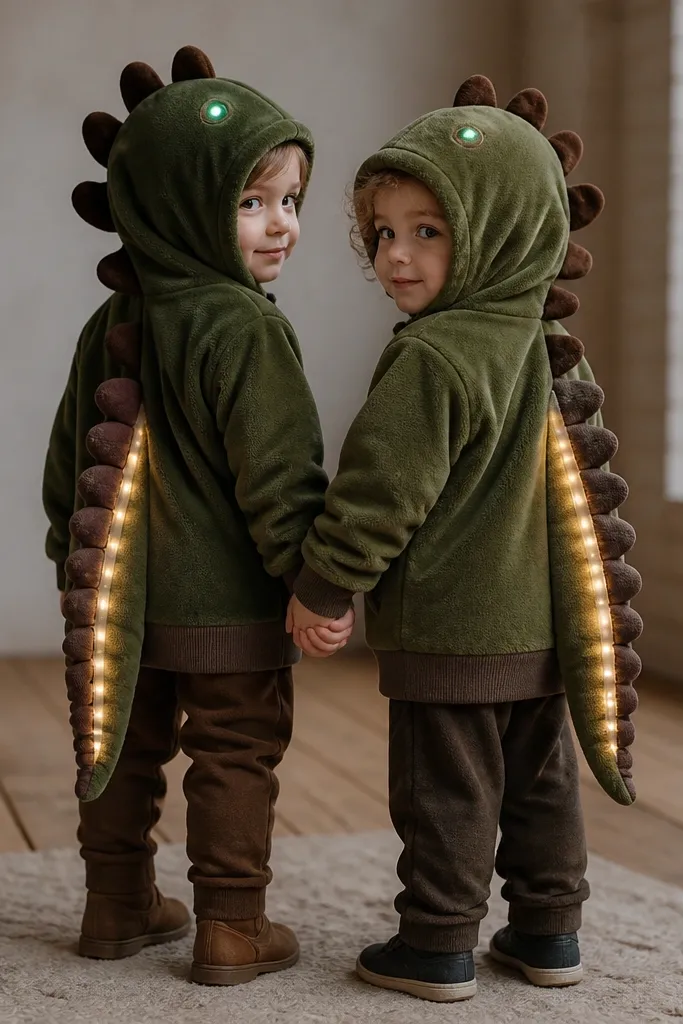
Dino costumes are funny, and adding lights to the tail makes the movement part feel alive. I made dino hoodies using thrifted green fleece and added a foam tail tube with a warm LED strip inside a ribbed channel. The hood has two small LEDs for eyes, but the tail glow is the main effect because it shows when you turn or dance. This flatters people with different heights because the tail can be adjusted in length and still read clearly. Warm LED eyes look cute without turning spooky, and the green base works with many skin undertones.
Start with a fleece hoodie that fits comfortably; add a foam tail tube attached at the back hem with reinforced stitching. Cut a ribbed channel inside the tail using foam strips so the LED strip is held in the center. Place two small LEDs in the hood eye area and route the wires into the hoodie’s inside seam. Put the battery pack into a hidden pocket at the waistband, then secure the wire using a few short stitches so it doesn’t swing.
Quick tipIf LEDs look too bright, lower brightness using a dimmable controller or cover the tail channel with a thin translucent fabric layer.
One warningDon’t run wires outside the tail seam — they snag on chairs and ruin the look.
15. Cactus Lovers with LED Flower Buds and Side Pockets
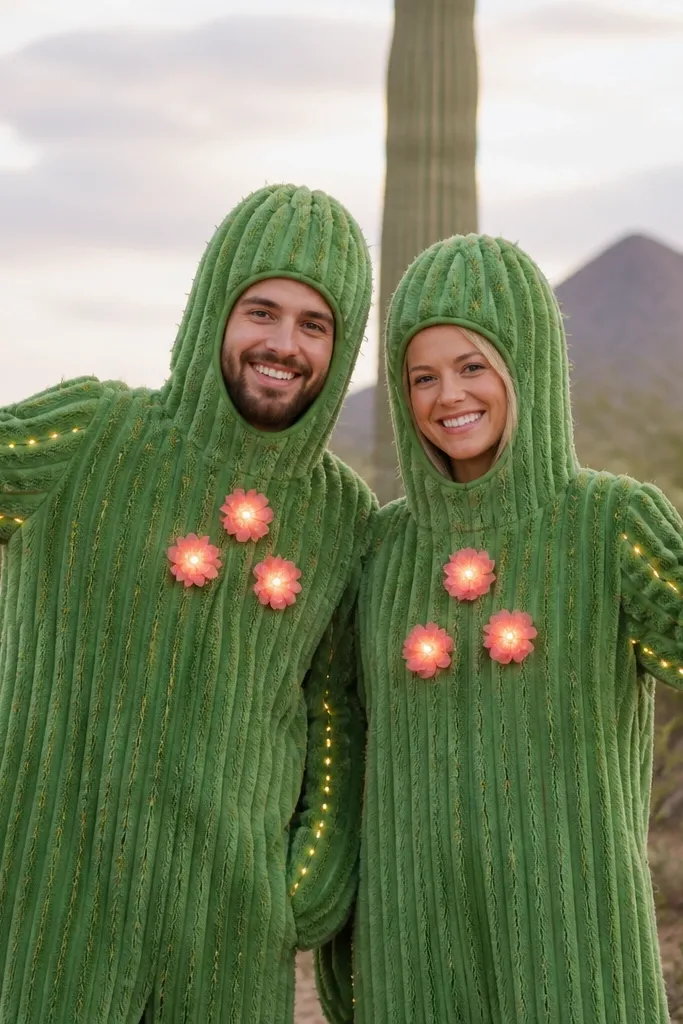
Cactus costumes are instantly cute, and light-up buds make the design feel alive instead of flat. I used stretch green fabric with a raised texture (like upholstery suede) and added foam “spines” using small triangles. The LED buds sit inside translucent foam flowers, so the glow spreads softly. This flatters a wider range of bodies because the cactus texture hides bumps and the glow draws attention to the center chest area. For photos, green + warm light looks friendly, not eerie.
Start by making a cactus body panel from stretch green fabric with a slightly fitted silhouette. Add foam spines on the front using fabric glue, then cut small flower shapes from translucent foam and glue them over LED sources. Place a thin LED strip along each arm panel edge and route all wires to the side seams. Sew a side pocket with a zipper or Velcro for the battery pack and keep the switch near the pocket edge so you can reach it without lifting the costume.
Quick tipUse warm-white LEDs for the flower buds so they look like they’re blooming, not like a scanner light.
One warningAvoid using glittery green fabric — it reflects LED in random spots and looks messy.
16. Ghostbusters-Style Couple with LED Proton Belt Rings
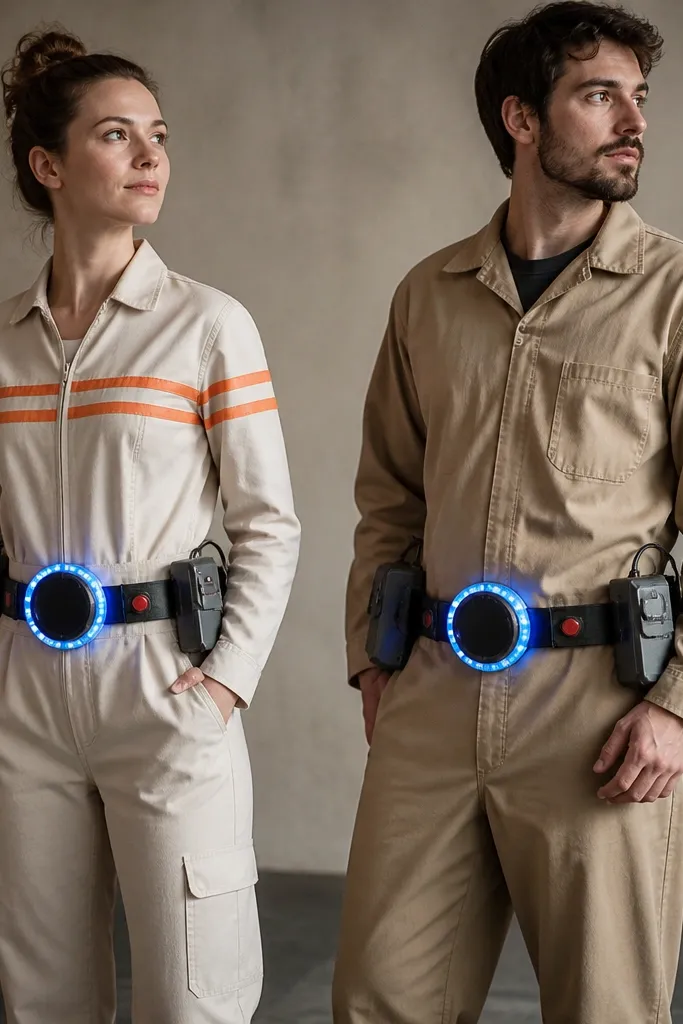
Proton belts look funny and techy, and the circular ring glow reads clearly even in busy party backgrounds. I built waist rings from foam and wrapped them in matte black fabric, then placed blue LEDs behind a frosted plastic ring so the glow is even. The belt keeps the battery pack at the waist, which is comfortable and stable. This flatters most bodies because you’re not relying on tight clothing — the belt gives structure and the foam hides minor fit differences. Blue light also makes skin look cool-toned and dramatic in photos without turning it sickly.
Start by cutting foam rings in two sizes (about 6 inches and 8 inches diameter) and covering them with matte black fabric. Insert a blue LED strip behind the frosted ring layer, then stitch or glue the ring assembly onto a belt base. Make two foam canister boxes on the belt front and hide wire runs inside them. Place the battery pack in a removable pouch on the belt back and route the switch to the front underside.
Quick tipUse a frosted diffuser layer between LED and ring front — it stops the “hot diode dots” look.
One warningSkip shiny plastic on the ring face — it reflects your room lights and kills the glow.
17. Snow Globe Couple with Clear PVC Light Frames
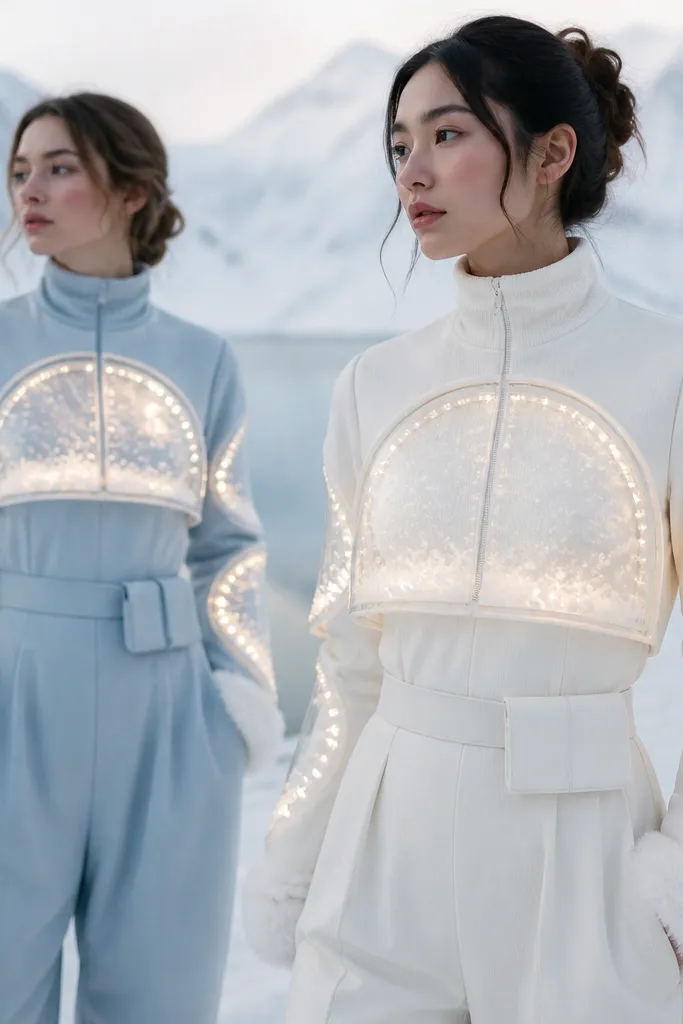
A snow globe effect looks like a prop from a movie, and LEDs inside a clear frame give a contained glow. I used clear PVC half-circles and layered faux snow flakes inside, then placed warm LEDs behind a translucent backing so the light scatters like snow. The outfit base is usually matte white or light gray so the glow looks clean. This works for a wide range of body types because the frame is the focus, not the fit — you can keep the rest of the outfit simple. Warm light makes cheeks look rosy and keeps the costume feeling cozy instead of harsh.
Start by making chest frames from clear PVC or a clear plastic sheet cut into a half-circle, then sand the edges lightly so they don’t snag fabric. Attach a translucent backing panel behind the LEDs so the light spreads evenly. Add faux snow flakes by mixing small craft snow with a thin layer of clear adhesive on a removable backing so you can refill later. Mount the frame using adjustable straps and hide the battery pack in a belt pouch connected with a cable routed along the inside seam.
Add one frame on the chest and one on the forearm for a stronger couple photo — it makes poses feel coordinated.
Don’t crowd the LEDs too close together inside a clear frame — it creates a bright core and dull edges.
18. Rave Dice Couple with Edge-Lit Foam Cubes
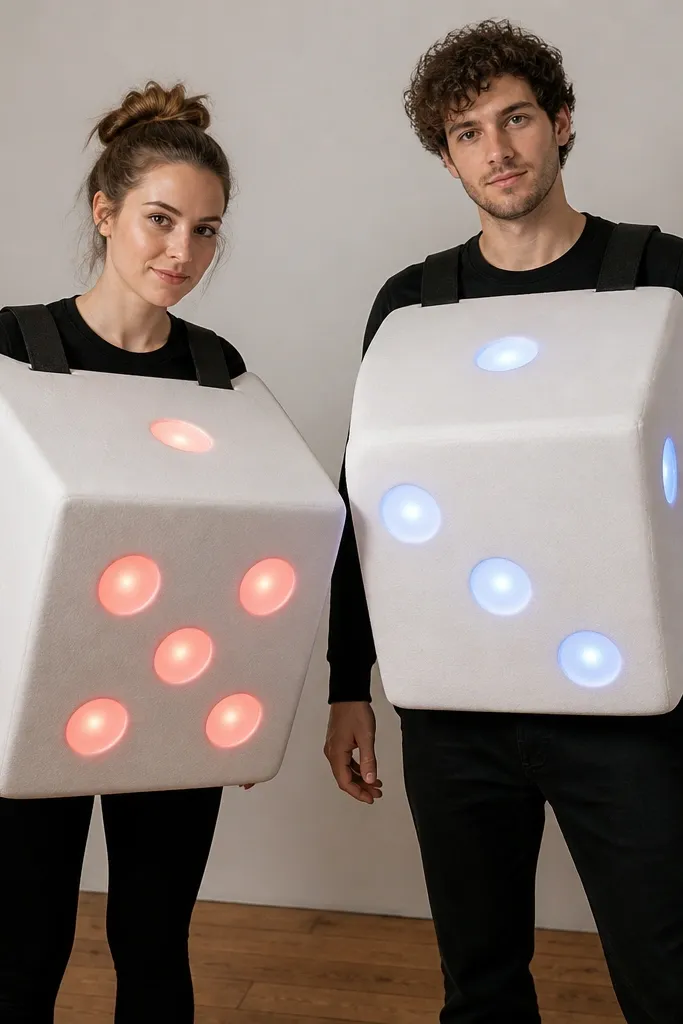
Rave dice are funny because they’re instantly legible as “play,” and edge-lit faces make them pop in dark rooms. I built dice vests by cutting foam cube shapes and covering each face with translucent craft plastic, then placing LEDs behind the dot positions. The result is a glowing die face that looks like it’s floating on your chest. It flatters most body types because the vest shape spreads weight across shoulders and hides stomach fit issues. For skin tones, you get a neutral glow that doesn’t color your face as much as full-body RGB lighting.
Start by cutting a foam cube template and making a wearable vest base from a simple harness or vest panel. Drill or mark dot positions on each cube face and attach LEDs behind translucent plastic patches. Secure wiring through a central channel to a battery pack pocket at the back, then add a zippered opening so you can swap batteries without taking the whole thing apart. Test the dot alignment from eye level — it’s the difference between “cool” and “random craft LEDs.”
Quick tipUse warm-white LEDs for dot faces and a slightly cooler white for edge outlines so the cube looks dimensional.
One warningAvoid using one continuous LED strip across faces — it blurs the die pattern into a glow blob.
19. Halloween Skeleton Couple with Clip-On Rib Panels
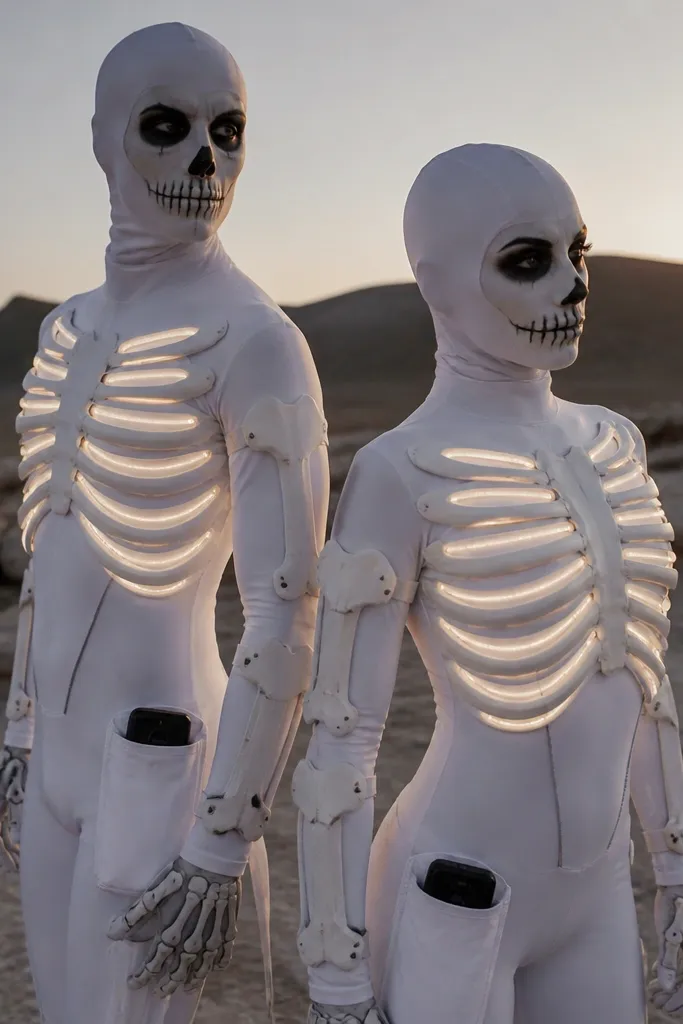
Skeleton costumes usually look either cheap or scary, but glowing rib panels make them look playful and clean. I built rib panels from thin white plastic or EVA foam and clipped them onto a white bodysuit so the pieces stay flat and removable. Thin LED strips run along the rib lines, and the clips let you take the panels off for charging. This flatters most bodies because the panels create a vertical structure down the torso. For skin tones, the white base keeps the glow consistent, and the rib lines highlight the chest without turning your face into a spotlight.
Start with a white bodysuit or fitted top and cut rib panel pieces in curved sections. Glue thin LED strips along the rib line positions and cover with a thin diffuser film so the glow is even. Attach each rib panel with small sew-on snaps or plastic clips so you can remove them quickly. Place battery packs in hip pouches and route wires to a central switch location near the waistband so it stays out of view.
Quick tipUse removable panels if you plan to reuse the costume — you’ll thank yourself when one strip stops working.
One warningSkip permanently gluing LEDs to the bodysuit — stretching fabric breaks connections.
20. Puppet Show Couple with Light-Up Hand Control Bands
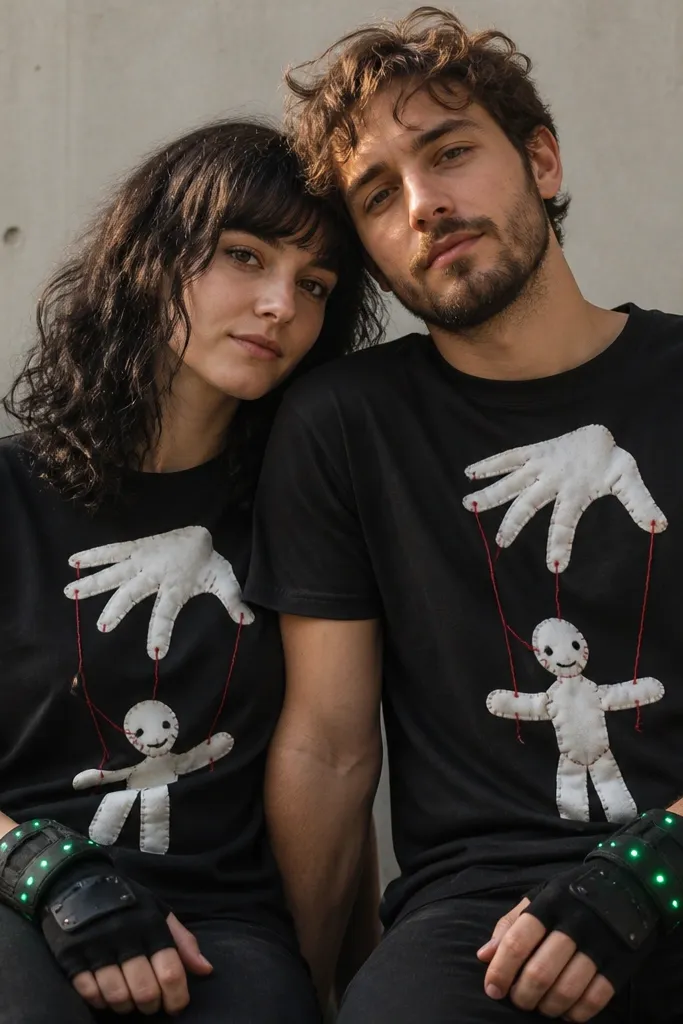
This is a fun couple concept because it turns your hands into the “controller” for the puppet show. I made fingerless gloves from black knit and stitched a control band across the wrist, then embedded green LEDs into a thin felt strip. The green glow looks like a control system and stays close to where cameras focus when you pose. It flatters most builds because gloves add shape and you don’t need a bulky costume. For skin tones, green can be tricky, so I stick to diffused LEDs and keep the rest of the outfit matte black and neutral.
Start by sewing a felt strip band to fit your wrist snugly but not tight. Mark LED positions along the strip, then insert diffused LEDs behind the felt so the glow spreads. Route the wire under the glove lining and attach the battery pack to a small elastic pouch tucked under the forearm. Add a low-profile switch on the side of the battery pouch and test the pulse speed in a dark room before the event.
Pose with hands closer to the chest for photos — wrist LEDs show up best and look intentional.
Don’t use bright bare LEDs on gloves — they reflect and create glare in camera flash.
21. Chocolate Dipped Couple with Warm LED Drip Panels
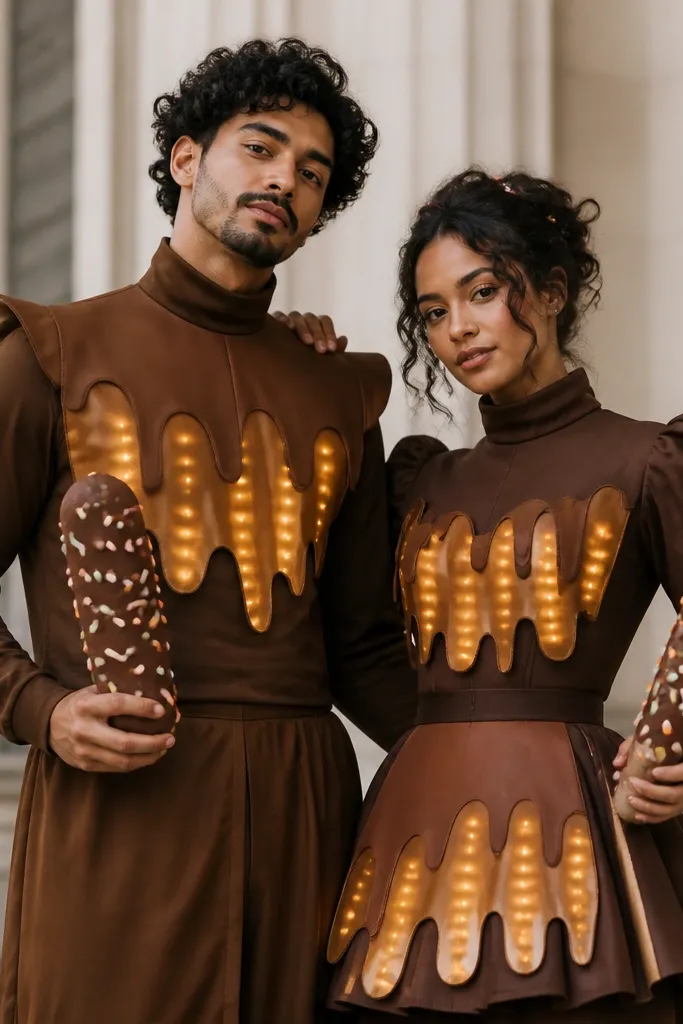
Chocolate dip costumes are funny because they’re silly and sweet, and warm amber lights make the “drip” look glossy. I used brown sweatshirt fabric for the base and added drip-shaped panels from translucent brown organza, with warm amber LEDs behind the fabric. The glow shows through like melted chocolate under a lamp. This flatters most bodies because the drip shape draws the eye down the torso and creates a focal point. For skin tones, amber warmth makes cheeks look healthy and avoids the harshness of white LEDs.
Start by cutting drip panels with a paper template and pinning them to the front of a hoodie or dress. Attach translucent organza over the drip shape, then mount warm amber LEDs behind the organza using fabric-safe hot glue. Sew a hidden pocket at the waistband for the battery pack and run the wire through a seam channel. Finish by adding small “sprinkle” props from foam circles or paper cones and keep the switch reachable from the side.
If your amber LEDs look too orange, use warm-white LEDs and tint the diffuser with thin brown fabric dye.
Skip shiny satin diffusers — they reflect room lights and make the drip pattern look uneven.
22. LED Lantern Jester Couple with Bell Switch Pouch
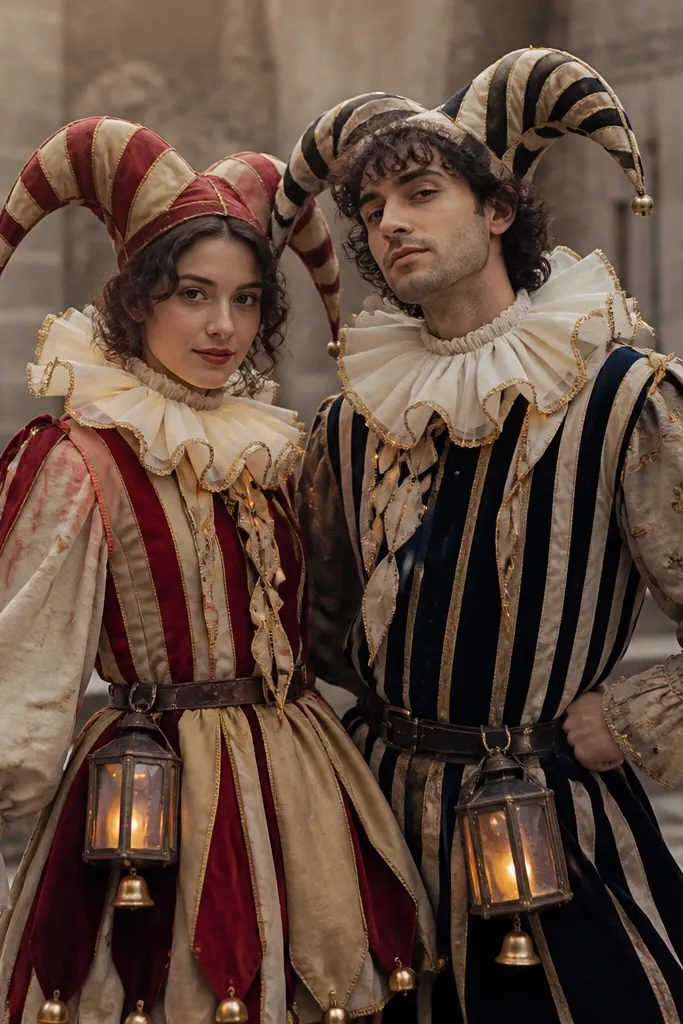
Jester costumes are already playful, and lantern glow adds a story you can see in motion. I made striped jester hats and added warm LED dots along the ribbon ties so the costume sparkles when you move. The waist lantern pouch is where you store batteries, and the bell charm is a fun detail that also helps you locate the switch pocket quickly. This flatters most bodies because the hat pulls attention upward and the lantern glow stays at the waist. Warm LEDs look friendly on everyone and don’t create harsh blue shadows.
Start by building the jester hat with stiffened fabric bands and a pointed tip. Sew ribbon ties onto the hat sides and attach tiny warm LED dots along the ribbon edge, wiring them into a single cable path. Make a lantern pouch from felt with a clear plastic front window panel and place the battery pack inside a removable inner bag. Add a bell charm to the outer pouch zipper pull so you can find it instantly, then test the glow in dim lighting to check ribbon visibility.
Quick tipUse Velcro inside the lantern pouch so the battery pack doesn’t slide and pinch wires.
One warningDon’t put the switch on the outside of fabric — it catches on clothing and looks messy.
23. Robot Heartbreaker Couple with Flashing LED Chest Panels
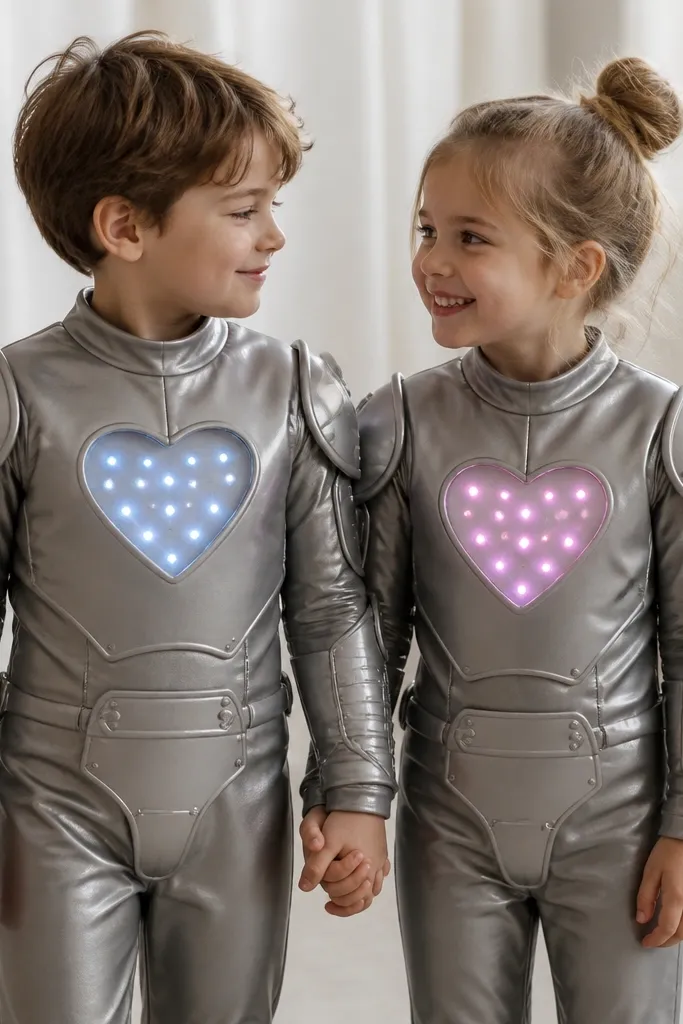
Flashing chest panels are dramatic, and the heart shape makes it funny rather than scary. I used metallic gray stretch fabric and added a heart-shaped chest plate from EVA foam, then put translucent plastic over the front. Inside, I mounted LEDs so the heart window glows and flashes in a controlled pattern. This flatters most body types because the heart sits at the center of the torso and the metallic fabric gives structure. For skin tones, the translucent window keeps the glow from blasting directly onto your face.
Start by drawing a heart template that matches your chest width and cutting an EVA foam plate with a window opening. Place translucent plastic over the window and secure it with fabric glue so it stays tight. Mount LEDs behind the plastic and connect them to a small controller housed in a back armor segment. Wear a simple harness or jacket base so the chest plate sits flat; add a removable panel to access batteries without tearing the costume apart.
Use a slow flash mode for photos — fast strobe turns eyes into glare.
Avoid random flashing modes — pick one pattern and keep it consistent across both people.
24. Campfire Couple with LED Ember Vests and Charcoal Outfits
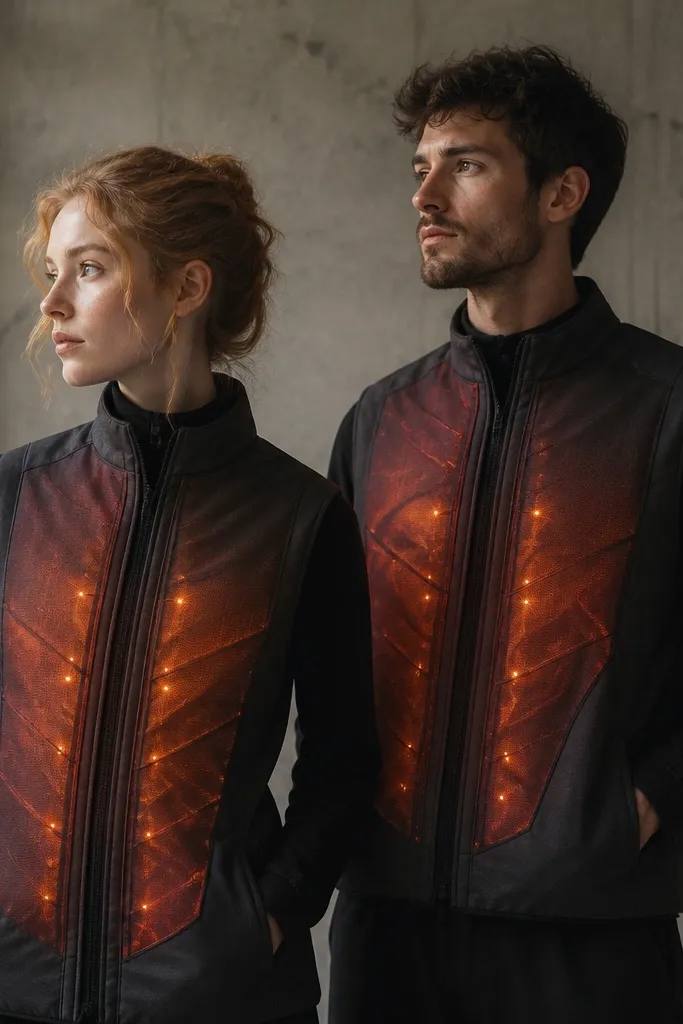
Ember lights look cozy and also read well in night photos. I made ember panels using translucent red-orange fabric layered over a base, then inserted warm orange LED dots behind so they look like heat spots. Keep the rest of the outfit charcoal or black so you don’t compete with the glow. This flatters because the vest shape narrows the torso and the ember panel draws attention to the center chest. Warm orange LEDs make many skin tones look healthy, especially if your undertone is neutral or warm.
Start by cutting an ember panel shape like a rounded flame on a vest front. Layer translucent fabric over the panel area and attach warm orange LEDs behind the fabric using fabric-safe hot glue. Route all wires to a single inner pocket and place the battery pack with Velcro so it doesn’t shift while you walk. Add a switch on the inside pocket flap so it’s hidden from view but easy to reach.
Quick tipAdd a thin layer of black felt behind the LED panel to prevent light from shining through the back of the vest.
One warningSkip bright white LEDs for embers — they look like fireworks, not campfire.
25. Roomba Couple with Light-Up Home Base Storage
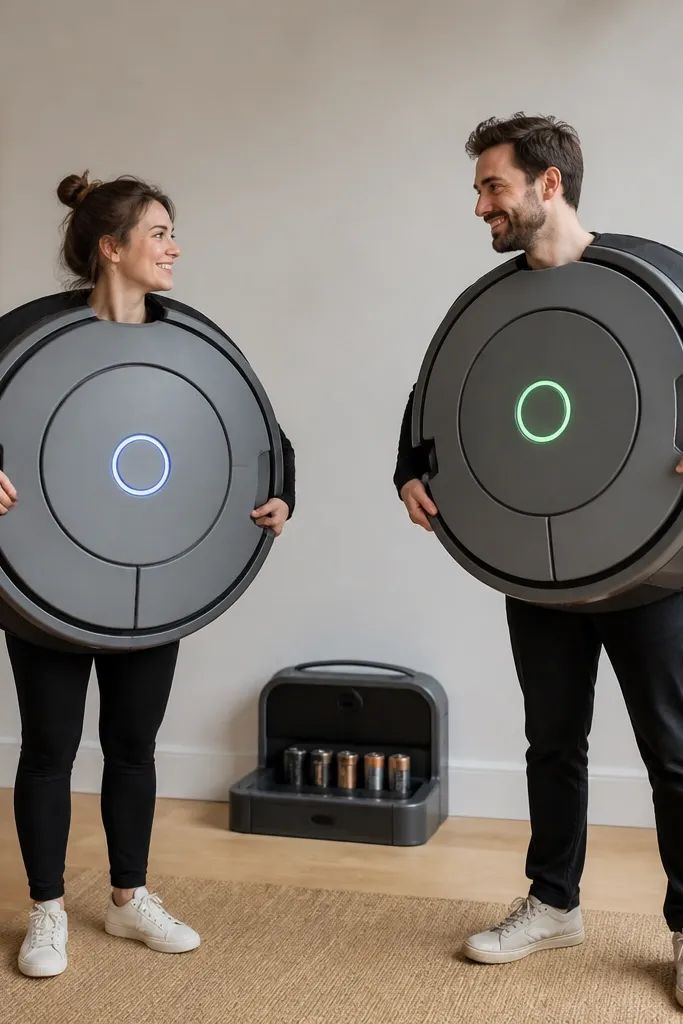
This is funny because it turns you into the robot vacuum, and the lights make the “status” clear. I made round Roomba bodies from stacked foam panels and painted them matte gray, then added a glowing ring around the front sensor area using warm-white LEDs. The couple effect is better when one Roomba has a “charging” look and the other has an “active” look, so you can set different LED modes. It flatters because the round body hides torso shape and you can keep your legs covered with simple black leggings. Warm-white status lights also look good on all skin tones and don’t wash out faces as much as cool blue.
Start by constructing a round foam shell and attaching it to a comfortable harness so it sits on your chest and shoulders, not your arms. Cut an opening for the front ring and insert warm LEDs behind a frosted plastic circle. For the battery pack, use a removable pod inside the shell that sits in a foam slot with Velcro. Build a “home base” prop from a flat box with a storage compartment and snap-in cable clips, then place each Roomba battery pod into the base for charging and quick swaps.
Quick tipLabel each battery pod with a tiny piece of colored tape so you grab the right one fast at the party.
One warningDon’t skip a harness — foam shells on straps alone slide and the light ring ends up at your stomach.