1. Neon Roller Skater Duo From Thrift Denim
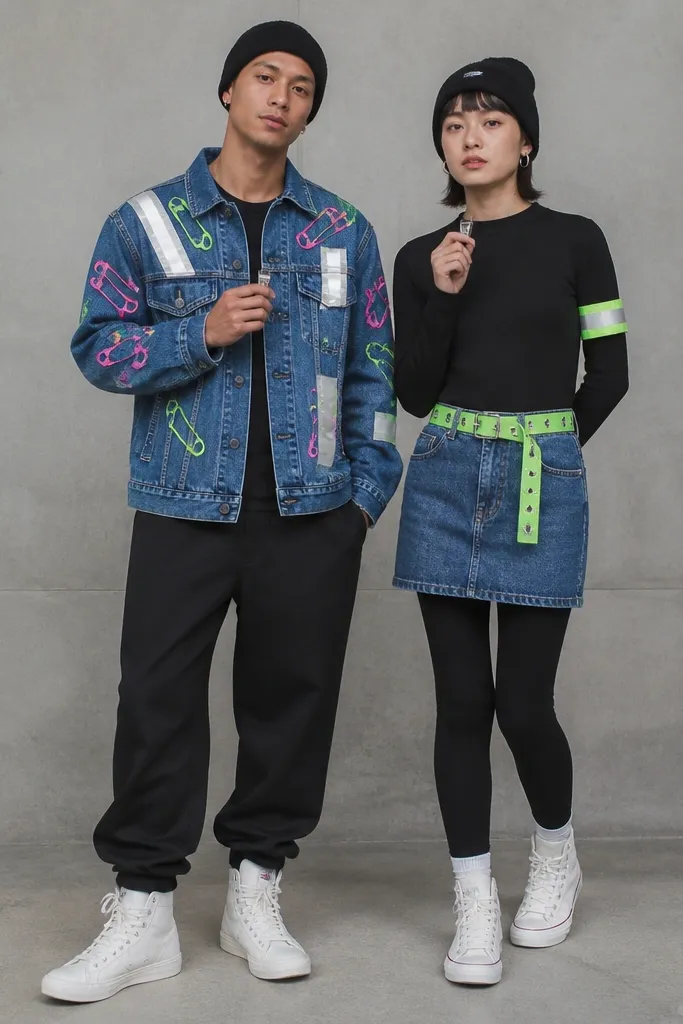
This look works because denim gives you shape and weight, so the neon accents read clean instead of floating. I start from a thrift denim jacket and a denim skirt because both hold seams well and take paint or fabric marker without soaking through. The neon pink and lime look bright in daylight and still pop under camera flash, which is what you want for costumes. It flatters a wide range of body types since you’re using the jacket’s existing structure and defining the waist with a belt. For skin tones, the neon works best when you keep the base dark — black leggings or a dark skirt — so the color stays the focus.
Start by washing the denim and letting it dry fully, then lay the jacket flat and mark two reflective tape bands: one across the chest and one across the upper sleeve. Add neon details by painting small triangle shapes or using fabric marker to draw lightning bolts on scraps of felt, then stitch or fabric-glue them to the denim. For the skirt partner, hem the skirt if needed so it hits mid-thigh or just above the knee, then add a neon belt over the waist seam. Finish by matching accessories: black beanies and one reflective armband each, cut from reflective fabric strips and secured with a safety pin. Wear white sneakers so the whole set looks intentional instead of costume-y.
Quick tipIf your reflective tape curls after glue, press it under a heavy book for 30 minutes so it stays flat.
One warningSkip cheap metallic spray on denim; it flakes in photos.
2. Old Bedsheet Space Couple With Star Map Hemlines
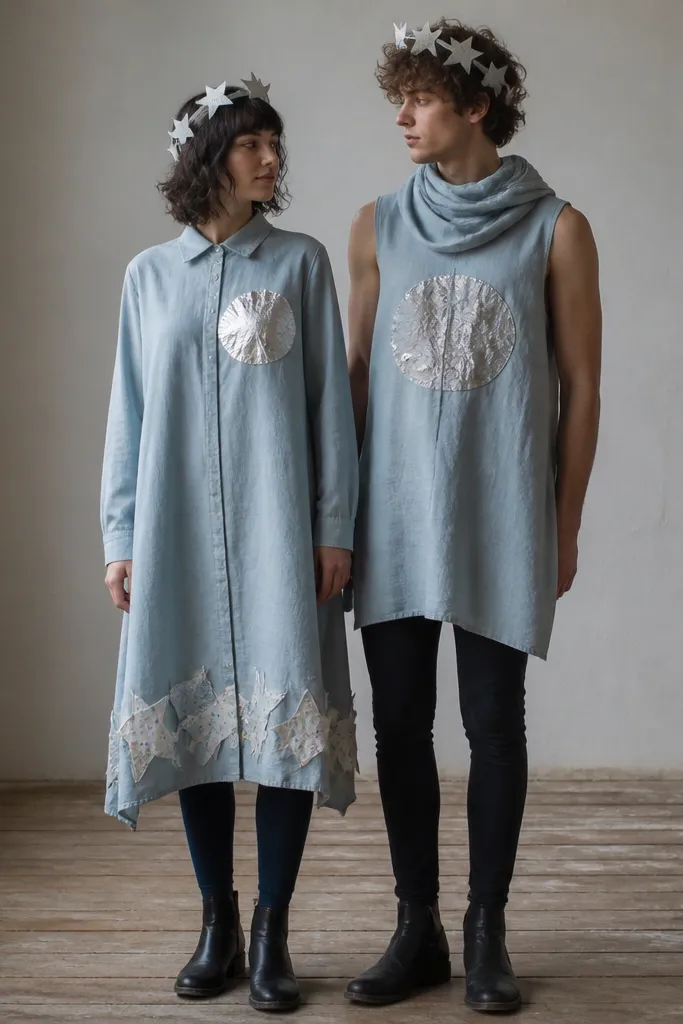
Bedsheets are the best thrift costume hack because they drape and breathe like real fabric, not flimsy costume cloth. I use a faded blue or dusty indigo sheet because it looks like a sky without needing dye. The star map hemline detail makes the costumes feel crafted, and it reads clearly even from a distance. This is flattering for different heights since tunics can be adjusted by hem length, and the dark leggings keep the silhouette grounded. The silver duct-tape planets add a cool highlight that looks good on all skin tones because it reflects light rather than tinting.
Cut your bedsheet into two patterns that match in shape: one shirt-dress for the taller partner and one tunic for the other. Hem the bottom edges first so the fabric stops fraying, then mark a curved line about 4 inches from the hem for the star map strip. Stitch star map scraps or printed paper stars onto the hemline strip, then seal the edges with a thin line of fabric glue so nothing lifts. Add a silver duct-tape planet circle on each chest, sized to about the palm of your hand, then finish with a scarf collar made from leftover sheet fabric. Top it off with paper star crowns and dark ankle boots.
Use a zigzag stitch on paper scraps only if you have a sewing machine; otherwise, tack with fabric glue and light hand stitching.
Don’t use glossy craft foil; it looks like school project under flash.
3. Thrift Suit Pirate + Captain's Faux Tricorn
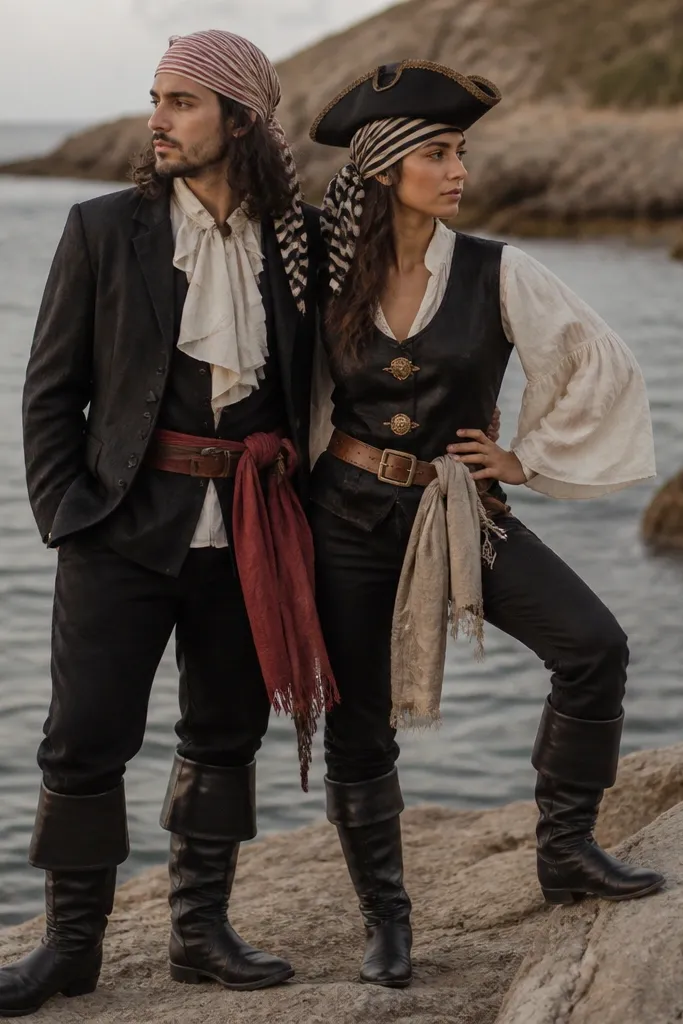
This is one of my favorite ways to do Unique DIY Costume Ideas vs buying because thrift suits already have the structure that costumes usually fake. The pirate theme works because you can keep the base tailored and add only the pirate signals: sash, ruffles, and hat. The black suit reads sharp, while the red sash and white ruffle give you that classic pirate pop. It flatters almost everyone because suit tailoring creates a clean shoulder line and a defined waist. For lighter skin tones, the red sash looks bold; for deeper skin tones, the white ruffle gives a crisp contrast.
Start with a thrift suit jacket and remove any shoulder padding only if it makes the shoulders bulge; otherwise leave it. Add a red sash by cutting a wide strip from a red curtain or blanket and tying it at the waist with a pinned knot. Make the ruffle by cutting a thrift scarf into strips, then hand-gather the strips and stitch them to a neckline band. For the captain, use a thrift vest and add gold fabric buttons by sewing them in a vertical line down the center. Build a tricorn from a stiff felt hat base: cut three equal flaps, glue or stitch them around a round crown, and add a black ribbon band. Finish with striped bandanas and a small leather belt bag.
Quick tipStiffen your hat brim by sandwiching felt between two layers of fabric and letting it dry pressed under something flat.
One warningAvoid thin felt hats that flop; they ruin the “pirate” silhouette.
4. Bookish Librarian Witch With Card Catalog Pockets
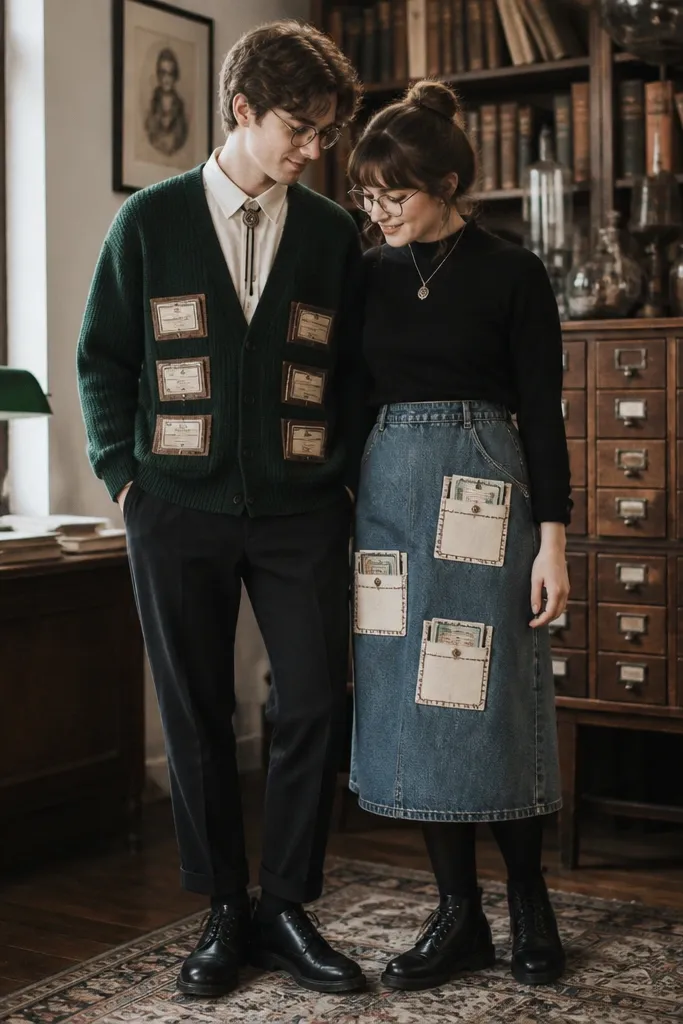
This costume looks expensive because it uses real thrift textures: cardigan knit, denim, and paper-like labels. The card catalog pocket idea gives you a clear story without needing elaborate props, and it photographs great because the labels create visual lines. I like green and deep charcoal for the witch librarian combo since they read magical but grounded. It flatters most body types because cardigans drape and the pockets add structure at the center. For skin tones, the white blouse keeps your face bright, while the dark greens frame it.
Start by finding a dark green cardigan or a long cardigan in thrift. Sew or fabric-glue small pocket squares onto the front — I use leftover denim rectangles, each about 5 by 6 inches, then add label strips cut from cereal boxes painted beige. Type the “spells” text with a black marker in a straight line and seal it with clear matte Mod Podge. For the partner, use a long denim skirt and add the same label pockets on the hips, spacing them like the cardigan pockets. Add matching glasses and a belt made from a thrift leather belt with a charm key. Wear black tights and low boots to keep the look cohesive.
Quick tipSeal paper labels with matte medium, not glossy, or they reflect harshly in photos.
One warningDon’t use flimsy paper directly against fabric; it tears at seams.
5. Floral Apron Garden Detectives
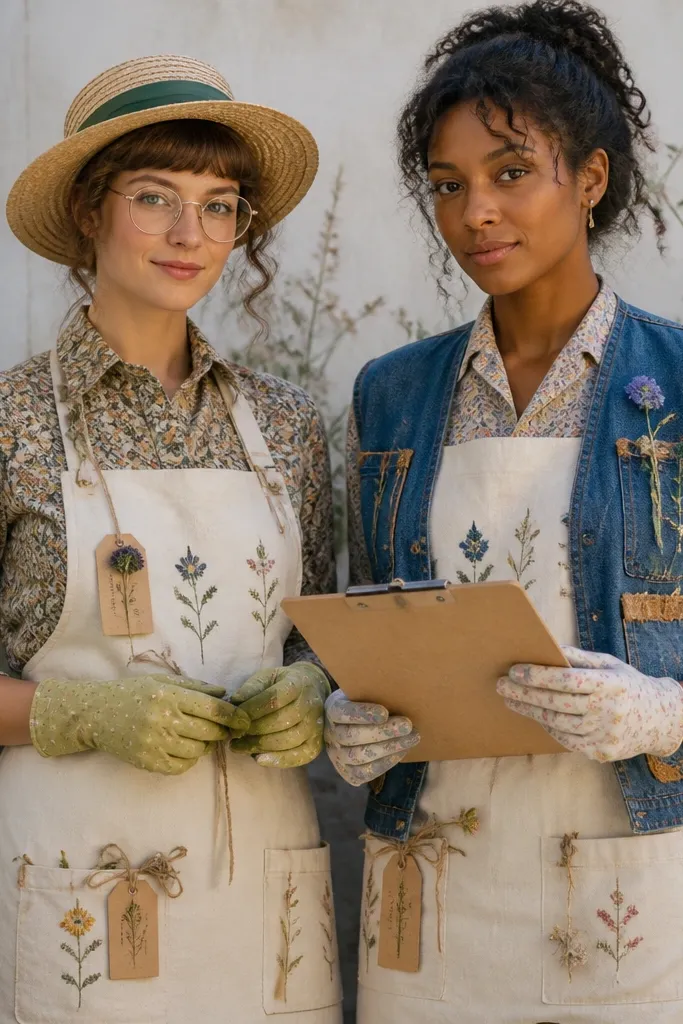
Aprons make costumes look instantly believable because they’re functional and structured, not costume costume. The floral motifs give you personality, and the evidence tags add a funny twist that still reads clear in photos. I build this pair with white aprons because it lets your colorful patches stand out without clashing. It’s flattering for different body types since aprons sit at the waist and hide or smooth the midsection. If you’re fair-skinned, the white base makes your face pop; if you’re deeper-toned, the white still creates contrast and keeps the look fresh.
Find two thrift aprons that are similar in color, ideally white or cream. Cut floral fabric scraps from old tablecloths or dress shirts and stitch them onto the apron corners, keeping the shapes around 3 to 4 inches. Make evidence tags from cardboard strips and punch a hole, then attach with twine so they hang slightly off the fabric. For one partner, add a straw hat with a green ribbon tied at the front; for the other, add a denim vest with patch pockets and a small clipboard prop. Wear dark pants under both outfits and choose one shared accessory color like brass or gold-toned buttons. Finish with tiny gardening gloves tucked into a pocket so the theme feels hands-on.
Quick tipUse a fabric pen to draw neat leaf veins; it makes the patchwork look deliberate.
One warningAvoid mismatched apron colors; cream and bright white can clash under flash.
6. Cozy Sherpa Werewolf and Moon-Guard
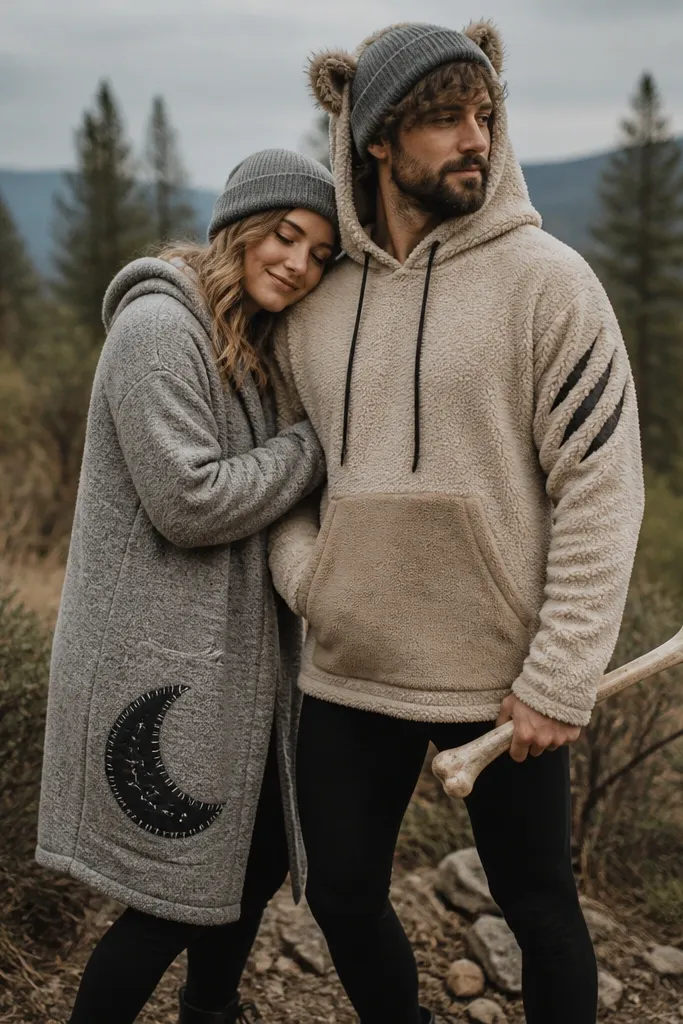
Sherpa is the cheat code for “werewolf” because it already looks fluffy without you buying a full costume suit. For the moon-guard partner, a gray cardigan with felt patches keeps the theme consistent but softer. The trick is contrast: fuzzy texture on one person, flat felt shapes on the other. This flatters a range of body types since sherpa hides seams and the cardigan can be belted or left open. For skin tones, the gray cardigan frames the face nicely, while the sherpa’s warm neutral fur works with both cool and warm undertones.
Start by turning your sherpa hoodie inside out and reinforcing weak seams with a simple backstitch where the cuffs connect. Add ears by cutting two triangles from faux fur or thick felt and stitching them to the hood corners. For the claw-mark detail, stitch or fabric-glue a dark gray patch shaped like a handprint on the sleeve. For the moon-guard, find a long cardigan and sew a large crescent moon patch on the chest, then add smaller stars by punching felt circles and sewing them in a line. Add matching beanies and a belt made from a thrift leather strip. Wear black leggings and gray boots so the look stays cohesive.
If you use fabric glue on faux fur, stitch the edges anyway; glue alone lifts when people move.
Skip glitter stars; they scratch skin and look messy up close.
7. Retro Diner Couples in Thrift Striped Shirts
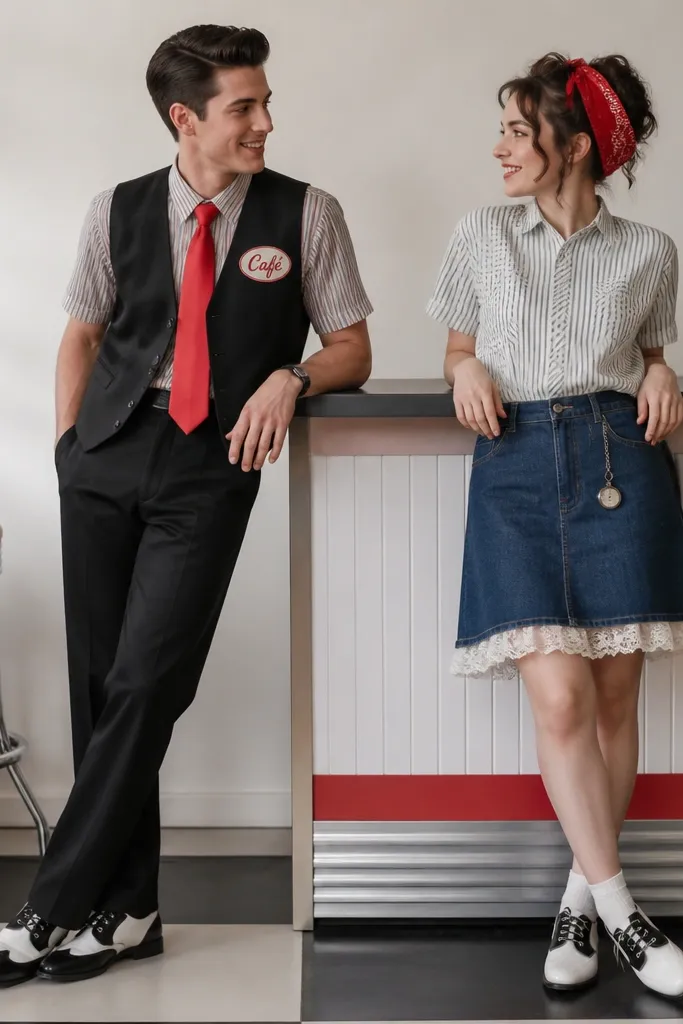
Striped shirts are perfect for diner costumes because the pattern reads “retro” even before you add anything. I like using a vest or skirt to keep the couple silhouettes different but still matching in theme. The red accents — bandana, tie, and sign — create a consistent color story that photographs well without looking like random red fabric. It flatters because stripes create a vertical line and the vest defines the torso. For skin tones, the high-contrast stripes make your face look brighter, especially under warm indoor lights.
Start by choosing two striped shirts with similar stripe widths. For the diner sign, cut a rectangle from black felt and write “Café” in white fabric marker, then stitch it onto a vest pocket area. Add a paper-roller tie by wrapping a strip of red cardstock around a dowel, then hot-glue the end and attach a clip to the shirt collar. For the partner with the skirt, add white lace trim to the hem by pinning it and then hand-stitching around the edge. Add a pocket watch chain from a thrift store and attach it to the vest or belt loop. Finish with saddle shoes and a small cardboard diner counter prop painted light tan.
Press your shirt seams with steam before you pin lace; the trim will sit flat instead of puckering.
Avoid stretchy costume ties that curl; use cardstock or fabric stiffener.
8. Thrift Kimono Ghost and Floating Lantern Partner
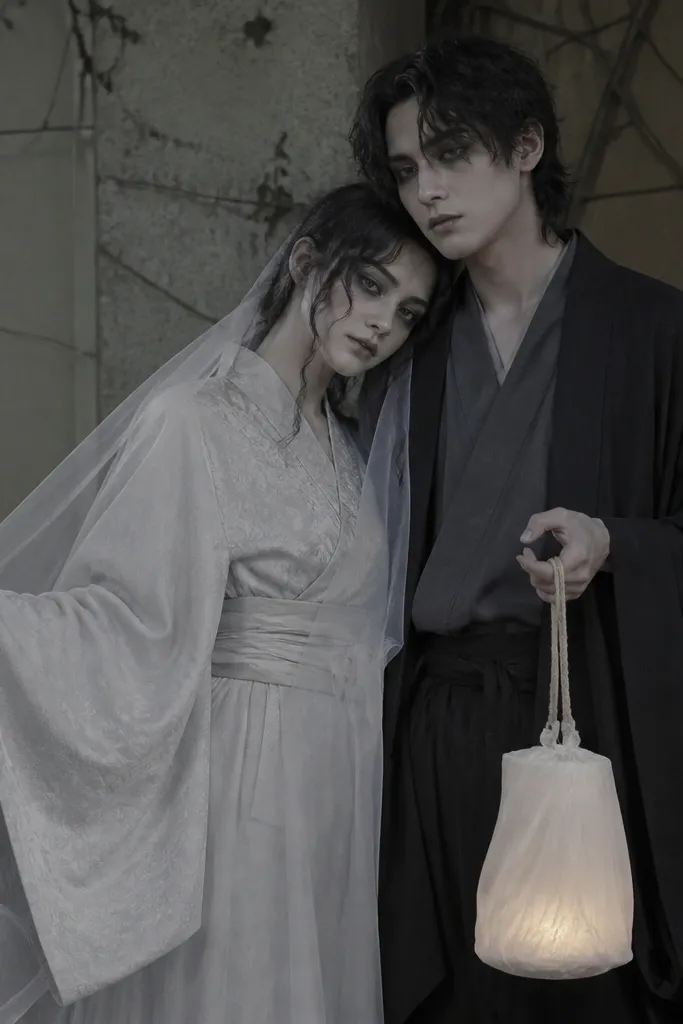
A kimono ghost looks good because the wide sleeves create motion, even when you’re standing still. The tulle overlay makes the ghost effect without needing a full sheet costume. For the lantern partner, a simple lit prop gives the “spirit” vibe without complicated electronics. This pair is flattering because the kimono shape hangs away from the body and the tulle floats at the edges. For skin tones, keep the makeup soft gray and highlight cheekbones so the face stays readable in photos.
Drape white tulle over the shoulders of the kimono and pin it at the underarm so it doesn’t slip when you walk. Add a simple waist tie using the kimono’s belt, then tuck the tulle so it falls evenly on both sides. For the lantern, take a paper bag and wrap translucent fabric around it in one layer, then cut a small opening at the top for a battery tea light. Secure with tape and string, and add a handle from twine. Match the makeup by using a gray face paint wash and setting it with loose powder so it doesn’t smudge. Wear black leggings or dark pants under both looks so the lower half stays crisp.
Test the lantern light angle before the event; place the tea light slightly off-center so it glows evenly.
Skip real candles; the fabric and paper make it a fire risk.
9. Leather Belt Cowboy and Bandana Cowgirl With Spun Rope
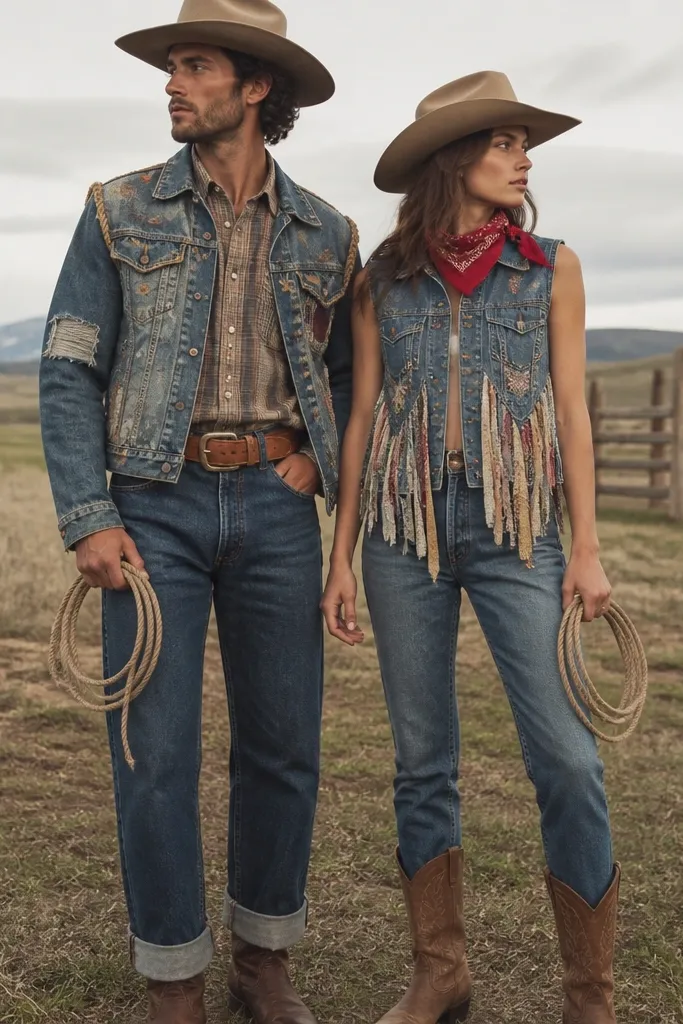
This is a strong Unique DIY Costume Ideas vs buying choice because leather belts and denim already feel Western. The rope trim and fringe are small changes that create big “theme read” in photos. I like using plaid and denim because they look textured, not flat like cheap costume fabric. It flatters since belts define the waist and vests keep the torso in proportion. For skin tones, the warm browns and reds in leather and bandanas work across the board, and the plaid adds a natural skin-tone frame.
Start with a thrift plaid button-down and add a leather belt at the natural waist, not high on the ribs. Cut short strips of thrift fabric for fringe and stitch them along the bottom of a denim vest or jacket sleeve. For rope trim, wrap thick yarn or rope along the shoulder seam and secure with hand stitches or fabric glue, keeping the rope about 1/2 inch from the edge. For the other partner, add rope loops to the belt area by stitching two small loops made from rope on the front. Tie a red bandana at the neck and add a matching hat band made from the same fabric. Finish with boots and one shared prop: a small rope loop held like a lasso.
Use a leather needle or thick needle for denim stitching so the fringe doesn’t pull loose.
Avoid thin, scratchy fringe yarn; it looks messy and sheds.
10. Thrift Tulle Fairytale Couples With Fabric Flower Corsages
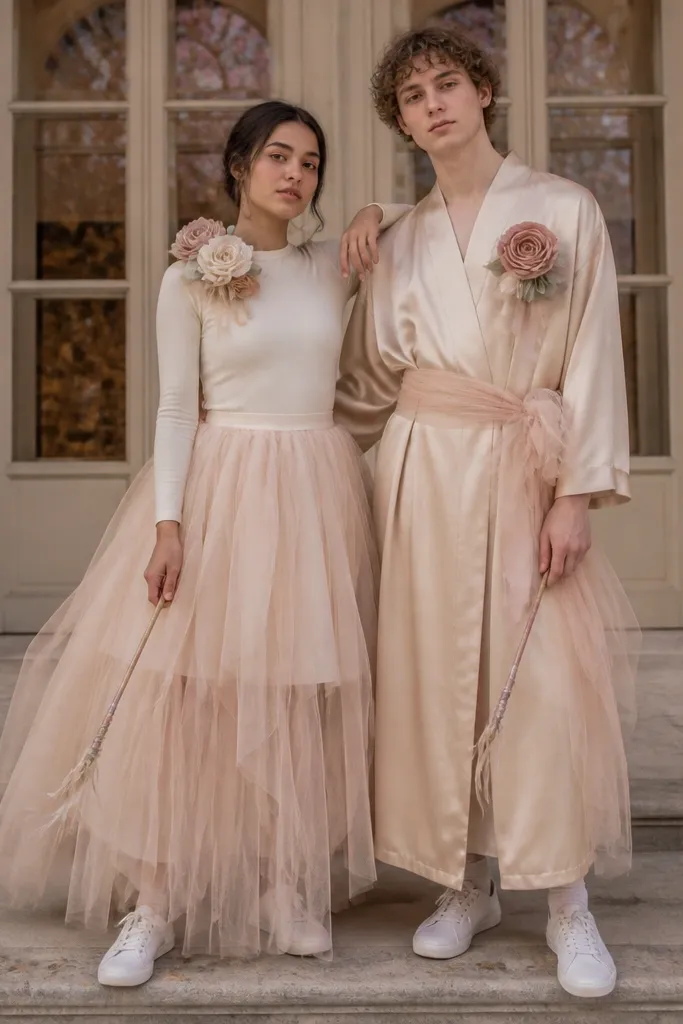
Tulle looks magical when it has structure. I use a thrift tulle skirt or tulle scarf because you can layer it without buying expensive costume tulle rolls. Fabric flower corsages make the pair feel coordinated and they photograph well because they sit near the face. This flatters because tulle creates volume at the skirt while the top stays fitted, and corsages draw attention upward. For skin tones, choose flower colors that match your undertone: warm undertones look great with peach and coral, cool undertones look better in lavender and icy pink.
Start by finding a tulle piece that already has a hem, then measure how long you want the skirt and tie or re-hem with a simple stitch. Add a fitted base top underneath so the tulle doesn’t cling and twist. Make corsages from fabric scraps: cut petals from felt or cotton, stack them, and stitch a small circle center in a contrasting color. Pin one corsage to each outfit at the same shoulder height. For the robe partner, add a tulle sash tied at the waist, then attach a matching wand made from a dowel with ribbon wrapped around it. Wear simple white sneakers and keep jewelry minimal so the corsage stays the hero detail.
Pin corsages with a safety pin + small fabric loop so they don’t rotate when you move.
Skip paper flowers; they collapse and look flat in photos.
11. Cereal Box Robot Couple With Button Eye Faces
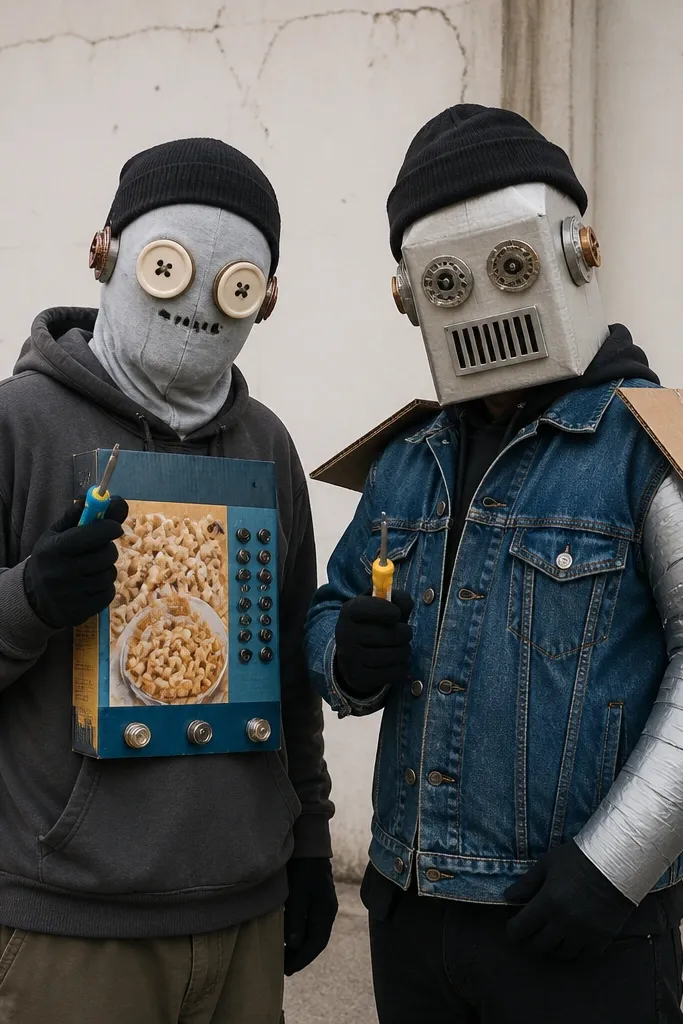
Cardboard panel robots are fun because you get sharp geometry without buying a foam robot suit. Cereal boxes are thin but stiff enough for chest plates, and buttons give you that classic robot face. This look is flattering because it starts with a hoodie or jacket, so you’re not forcing a rigid body shape. The couple coordination comes from repeating the same eye style and metal accents. For skin tones, the robot face draws attention to the head, and the cardboard stays neutral — it doesn’t tint your face like colored plastic can.
Cut two chest panels from cereal boxes and cover them with aluminum tape for a metallic finish, leaving a small matte edge for grip. Place panels on the hoodie and denim jacket, then mark where you’ll stitch or tape them down. Add button eyes by drilling holes through the panel and sewing buttons in place with thread, then attach small black felt for eyebrows if you want extra expression. For one partner, add a duct-tape “arm” by wrapping tape over a strip of cardboard and fastening it to the sleeve cuff with Velcro. Finish with black gloves and matching beanies. Carry a small toy screwdriver prop made from a thrift plastic tool.
Seal cardboard edges with matte tape so they don’t snag while you’re wearing it.
Avoid bare cardboard; it softens and warps when you sweat.
12. Vintage Sports Team Captains Using Thrift Jerseys
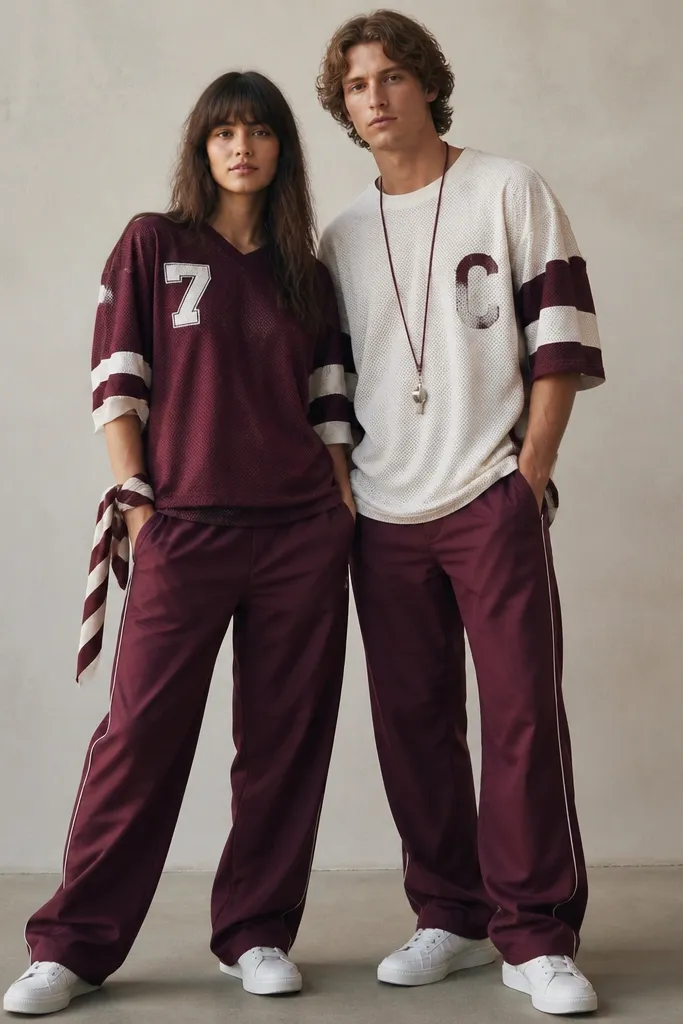
Jerseys are the easiest thrift win because they already look like uniforms. This costume works when you treat it like a real team: matching colors, matching placement, and a clear role for each person. I like making one partner the “captain” with a patch, and the other the “coach’s pick” with a number and a wrist scarf. It flatters because jerseys hang and move with your body, and the scarf adds a vertical accent. For skin tones, keep the jersey fabric bright and don’t cover it with too many dark layers.
Find two thrift jerseys in the same color family, even if the teams differ. Add a captain patch by cutting a circle of felt, painting “C” in white, then stitching it onto the left chest. For the other partner, create a number patch from fabric and sew it onto the center of the jersey torso. Tie a striped scarf around one wrist and tuck the ends so it doesn’t dangle. Add a whistle lanyard by attaching a whistle to ribbon or a thrift keychain strap. Wear track pants in the same color family and choose sneakers with white soles so the look stays clean.
Quick tipWash jerseys first to remove thrift smells; fabric marker and paint stick better to clean cotton blends.
One warningDon’t use iron-on patches on jersey mesh; they peel after movement.
13. Thrift Leather + Lace Vampire Couple With Matching Collars
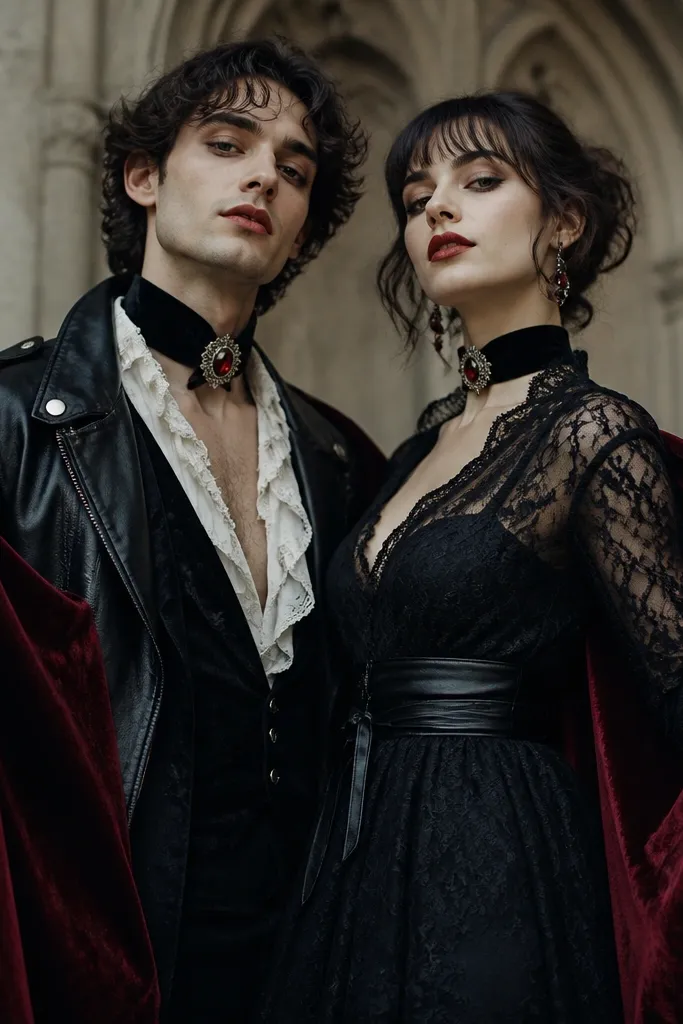
This vampire couple look feels upscale because leather jackets and lace already read “vampire” without cheap plastic accessories. The matching collars tie the pair together, and velvet gives you that deep, light-absorbing texture that looks good in dim rooms. I like doing one partner in leather and one in lace so the couple looks balanced: one sharp, one soft. It’s flattering because leather defines shoulders and lace sits near the neckline. For skin tones, keep makeup in red-brown tones rather than bright cherry red so it doesn’t overpower your face.
Start with a thrift leather jacket and remove any loose lining threads. Add a velvet collar by cutting a strip of velvet and pinning it at the neck over the shirt collar, then stitch the ends to hold position. For the other partner, use a dark lace dress or lace top and add a faux leather belt at the waist using a thrift leather belt or belt substitute. Attach a matching velvet choker and add a small brooch at the center for symmetry. Make mini capes from thrift fabric: cut rectangles, hem the edges, and pin them to the shoulders at the upper back. Finish with black tights and dark boots so the lower half doesn’t compete with the collar.
Quick tipUse a matte setting powder on makeup so the collar area doesn’t reflect and wash out the face.
One warningSkip sparkly vampire contact lenses; they look fake in most photos.
14. Couple Circus Ringmasters From Curtain Panels
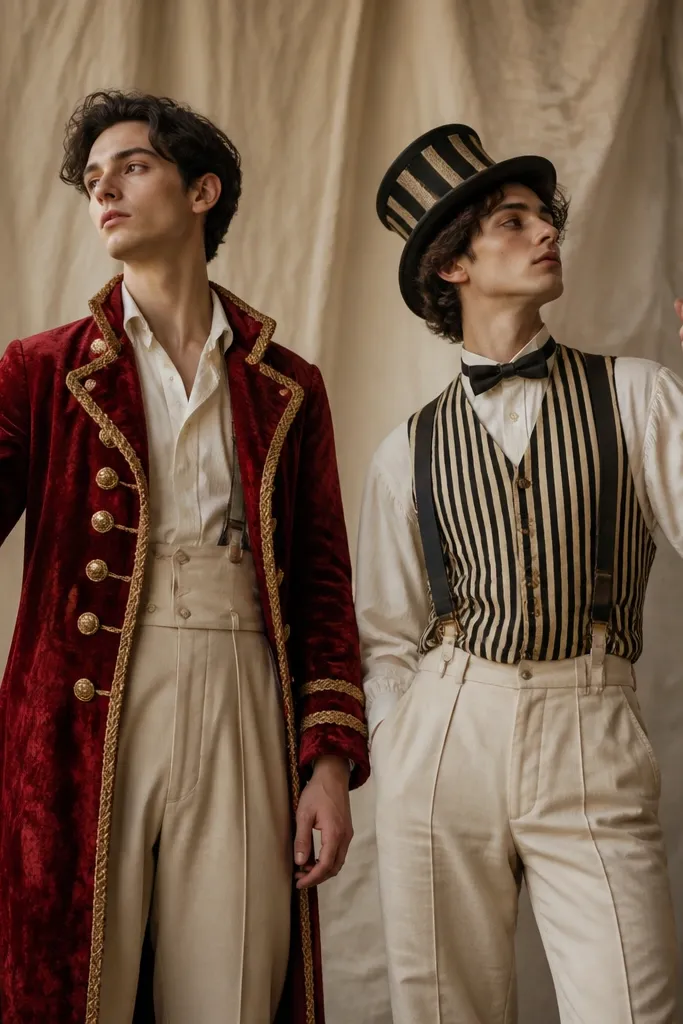
Curtain panels are heavy fabric, which means your coat and vest keep their shape like real costumes. The ringmaster theme looks intentional because you can build it with trim and hats, not complicated sewing. I use red velvet-ish fabric for one partner and black-and-cream stripes for the other so the couple reads clearly from across a room. It flatters because a long coat lengthens the body, while a vest creates torso structure. For skin tones, the gold trim warms faces, and the black-and-cream base keeps it crisp for deeper and fair skin alike.
Cut a simple coat shape from a curtain panel: front opening, sleeves, and a slightly flared hem. Add gold trim by sewing braid along the front edges and around the cuffs, using a thread color close to gold. For the vest partner, cut a vest from a curtain panel or heavy upholstery fabric, then add a bow tie made from matching striped fabric. Build a top hat from a thrift hat base or stiff felt: cover it with black fabric and add a gold band at the brim. Add suspenders from thrift ribbon or old belt straps, then attach a small ringmaster badge on the chest. Finish with black pants and tall boots.
If your coat swings weirdly, add one hidden snap at the waist inside the coat lining.
Avoid thin costume satin; it collapses and looks like a sheet.
15. Thrift Raincoat Superheroes With Glow Tape Logos
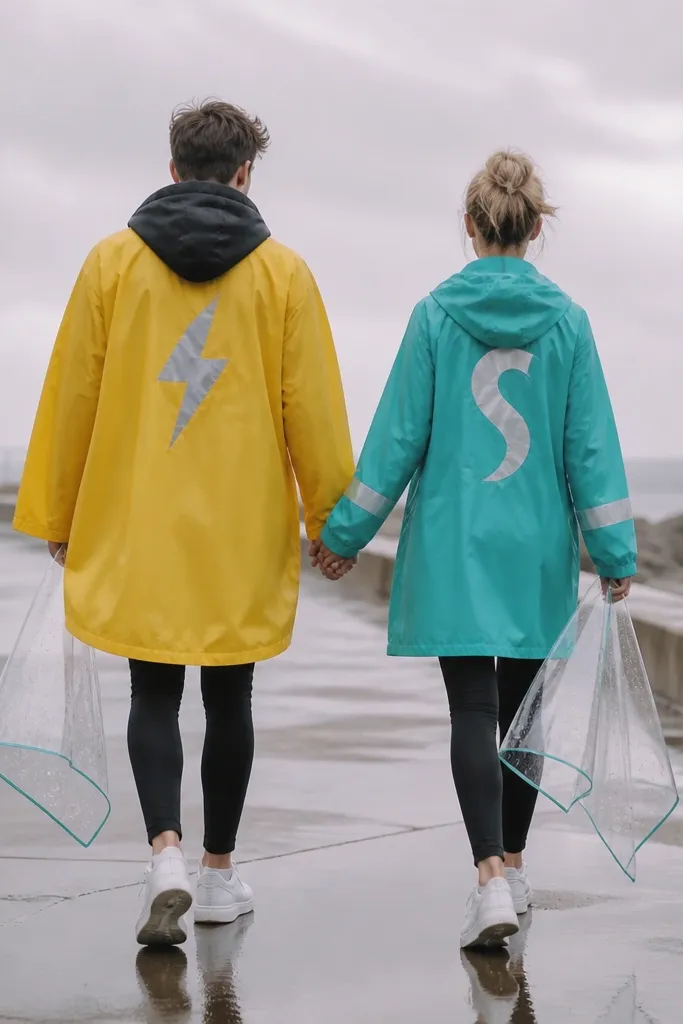
Raincoats are perfect for superhero costumes because they’re already water-resistant and look high-tech. Reflective and glow tape makes the logo read under street lights, which is where most night photos happen. This look is flattering because coats hang straight and cover the torso, and you can define the waist with a belt. The couple stays coordinated by using the same logo style — one lightning shape, one letter mark — in matching reflective colors. For skin tones, bright raincoat colors can be intense, so keep makeup simple and let the reflective logo do the work.
Pick two thrift raincoats with hoods if possible. Clean them and let them dry, then plan one logo per person with chalk — lightning for one, letter or shield for the other. Cut reflective fabric into a logo shape, then stitch it on first for strength and add glow tape as a border. Run glow tape around the sleeve cuffs so it looks like a design, not random tape. Add a belt made from a thrift belt or wide ribbon at the natural waist. For capes, cut clear plastic folder sleeves into rectangles, heat-seal the edges carefully if you have a heat source, and attach with snaps at the shoulders. Wear black leggings and white sneakers so the reflective elements stay visible.
Stitch through raincoat fabric slowly; use a needle meant for thicker layers to avoid skipped stitches.
Don’t glue logos only; raincoat fabric flexes and glue peels.
16. Thrift Scarf Mermaid Couple With Scale Patchwork
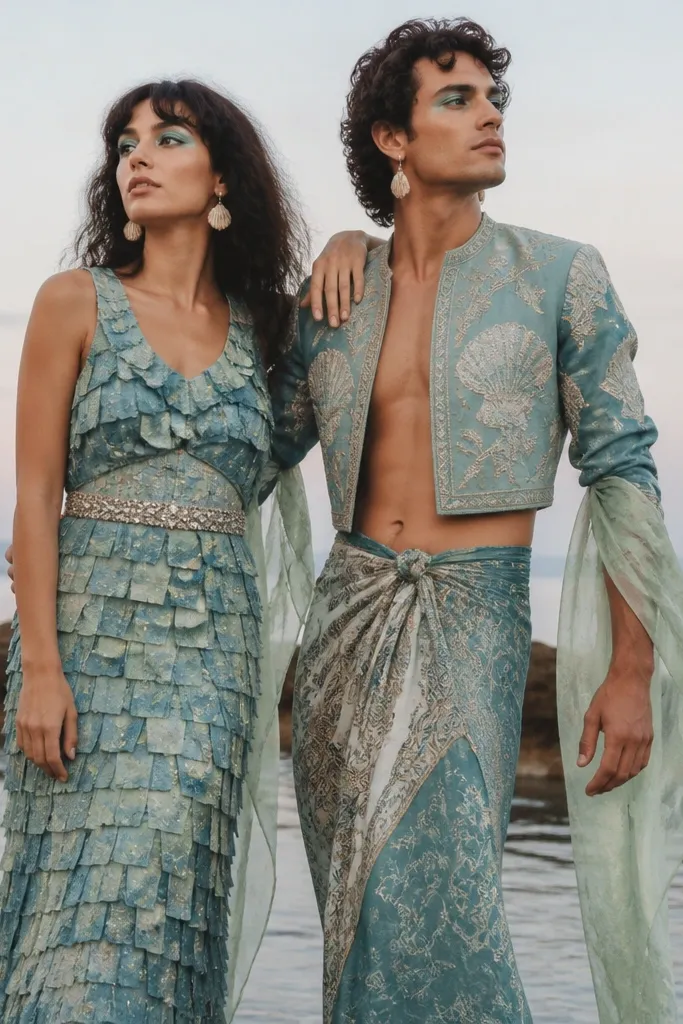
Mermaid costumes look best when you build scales that overlap, even if you’re using thrift scraps. I’ve made scales from old scarves because they already have texture and color variation, which makes the “ocean” effect look real. The partner contrast — full dress scales for one, scarf wrap for the other — keeps the couple balanced. It flatters because the overlap pattern draws the eye down and the belt defines the waist. For skin tones, teal and seafoam shades look great with warm and cool undertones when you keep the base fabric in the same color family.
Start by finding a solid base dress or top, then cut scarf fabric into small rectangles about 2 inches long. Overlap them in rows and stitch onto the dress starting at the hem and working upward, each row slightly covering the previous one. Add a sparkly belt made from thrift ribbon with a line of small beads or sequins sewn on. For the partner, use a cropped jacket and add scarf sleeves by sewing scarf strips to the arm openings. Create a tail-like wrap by tying a long scarf panel at the waist and letting it drape down the side leg. Finish with seashell earrings and teal eye makeup, then wear simple sandals or flats.
Quick tipCut scales with pinking shears if you don’t want frayed edges to show between overlaps.
One warningSkip one-layer scale sheets; they look like costume stickers.
17. Thrift Tartan Highland Couple With Sporran Bags
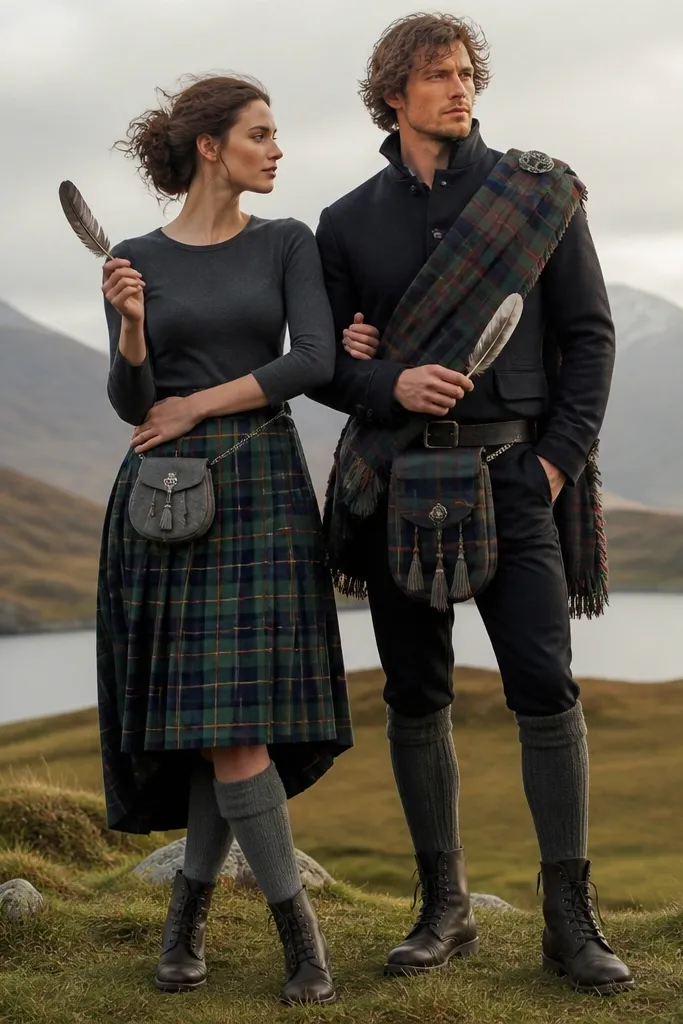
Tartan reads instantly “highland” in photos, and you don’t need a full kilt to pull it off. The sporran pouch is the detail that makes it feel like a real outfit instead of a scarf costume. I like using a skirt for one partner because it gives movement, while the sash works for the other because it’s easy and comfortable. It flatters because the sash defines the waist and the skirt adds a clear line around the hips. For skin tones, tartan colors — red, green, and navy — frame the face well, especially when you keep shirts dark underneath.
Find tartan fabric in thrift form: a skirt, a blanket, or a heavy scarf. For the skirt partner, wear a fitted long-sleeve underlayer and hem the skirt to just above the knee. Add a sporran bag by cutting a small pouch shape from gray felt and attaching it with a belt loop strap at the hip, about 2 inches above the top seam of the skirt. For the sash partner, wrap the tartan sash diagonally across the torso and pin at the waist, then add a matching felt pouch to the belt. Stitch or glue small tassels to the pouch top for texture. Finish with knee-high socks, boots, and a small feather or ribbon in the hair.
Quick tipUse a fabric marker to draw the pouch seam line first, then stitch; it keeps the pouch from turning crooked.
One warningAvoid stretchy satin tartan; it wrinkles and looks like a bedsheet.
18. Thrift Knit Cat Burglar and Guard Duo With Hidden Pockets
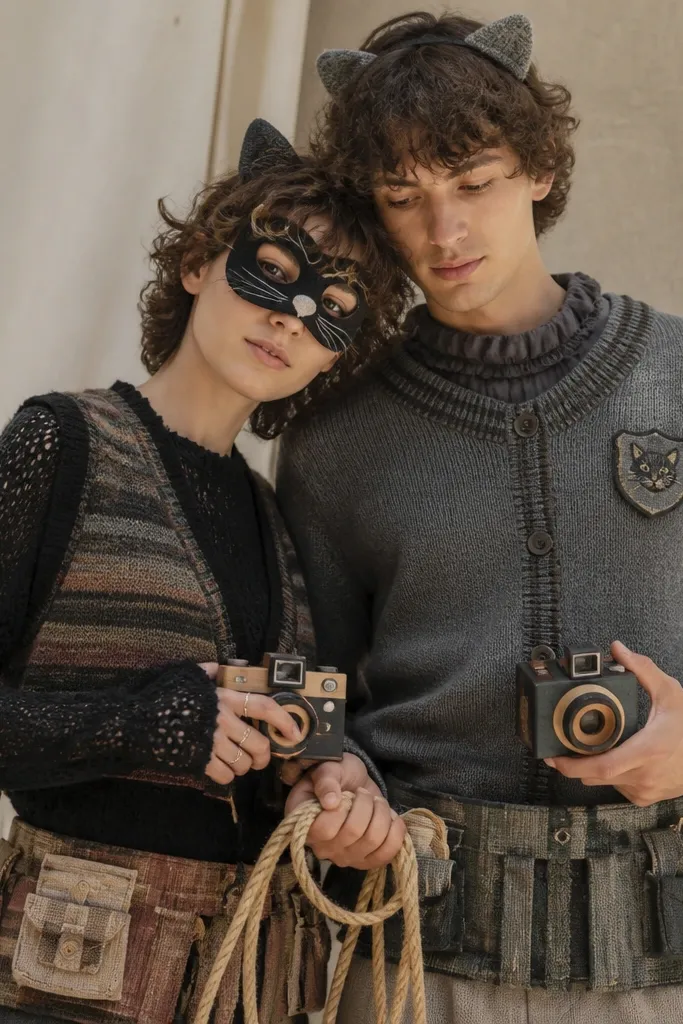
Hidden pockets make this couple look clever, not random. I build the burglar with a knit base because it stretches and stays comfortable while you pose. The guard partner gets a cardigan and patch, so the characters feel different but still match in the same black-gray palette. This is flattering because knit shapes follow your body and the belt adds structure. For skin tones, the black and gray palette lets your face makeup and mask details stand out without clashing.
Start with a black knit top or sweater and add cat details using felt: ears on a headband or mask, plus a small stitched nose. Make the pocket belt by cutting two rectangles of sturdy thrift fabric, sewing them into a pouch, then attaching to a wide belt with Velcro or buttons. For the guard, use a gray cardigan and stitch a felt patch on the chest that reads “GUARD” in simple block letters. Add a matching pocket belt, but make it slightly smaller so the characters look different. Carry props: toy camera for the burglar, small flashlight for the guard. Keep pants dark and shoes simple so the belts and masks are what you notice.
Quick tipTest pocket placement by putting your phone in it and walking around; adjust before you stitch the final seam.
One warningDon’t make pockets from thin fabric; they sag and look like a bad costume.
19. Thrift Band Tee Rock Star Couple With Reworked Back Prints
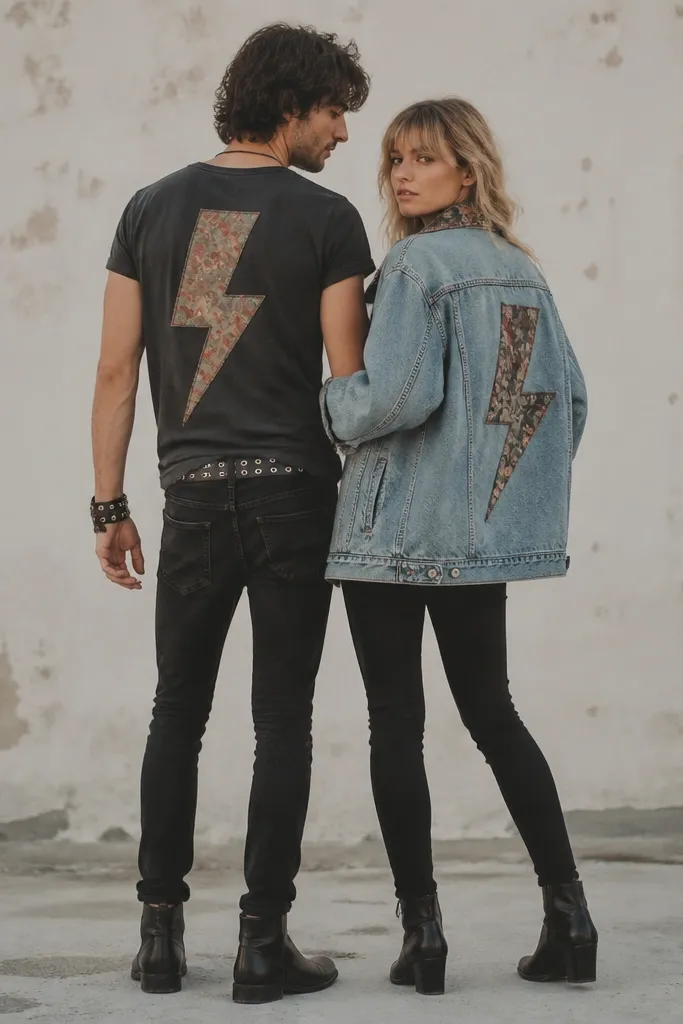
Band tee costumes look best when the graphic sits on the back. I rework the back because it reads clearly when you walk away from the camera — which happens constantly at parties. This is a strong Unique DIY Costume Ideas vs buying option because you’re using thrift shirts that already have the right worn-in look. It flatters because tees keep the torso relaxed and you can add structure with belts or jackets. For skin tones, choose fabric letters in white, cream, or bright yellow so the design stays readable under mixed lighting.
Find two thrift band tees with similar fit. Wash them, then cut out or cover the original back print so you can place your own. Cut fabric letters from felt or cotton and stitch them onto the back in a straight grid, about 10 inches wide total. Add a lightning bolt or symbol below the letters, sized like a hand span. For one partner, add a denim jacket and stitch a patch collar using leftover felt scraps. For the other, add a studded wristband by wrapping a strip of leather-look fabric around the wrist and sewing small metal studs or buttons. Wear black skinny jeans and boots; add one matching accessory like a chain necklace.
Quick tipUse a ruler and masking tape to align letters before you stitch so the back print doesn’t look crooked in photos.
One warningSkip fabric glue letters; they lift at the edges.
20. Thrift Satin Robe Ghost Bride and Skeleton Groom
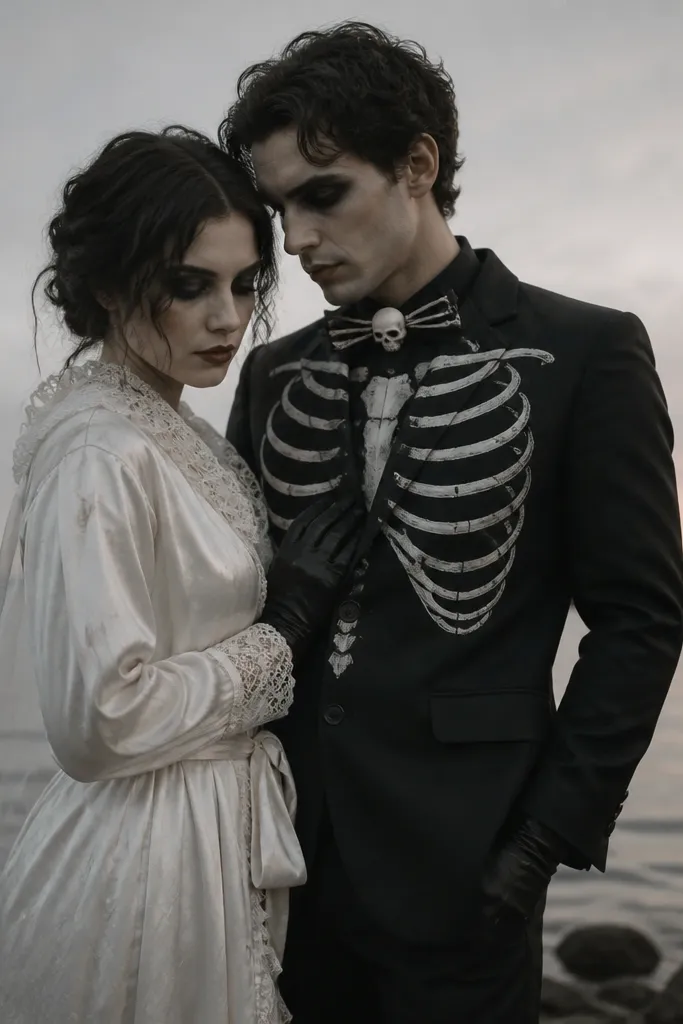
This couple look works because it mixes polished fabrics with spooky line work. Satin robe gives you movement and shine that reads bridal, while the skeleton pattern adds the horror twist. I keep the bride’s ghost effect subtle with painted veil lines, not full face paint overload. The groom stays sharp in a suit jacket, which makes the skeleton ribs look like a “character” rather than a cheap print. It flatters because the robe drapes and the suit jacket creates a clean shoulder line. For skin tones, dusty white satin looks flattering on both fair and deeper tones when you pair it with dark eye makeup and a pale base.
Start with a thrift satin robe and add a lace collar by sewing lace trim along the neckline. Paint ghost veil lines on the robe sleeves or chest using fabric paint diluted with a little water and a fine brush, then let it dry flat. For the groom, stitch a skeleton ribcage pattern using white felt or cotton strips on the suit jacket front, then add a small skull bow tie made from black felt and white fabric triangles. Add black gloves and a tiny hand-held prop like a thrift hand mirror. Match their color palette: pale makeup for both, dark eyeliner for the groom, and a slightly softer eye for the bride. Finish with black trousers and black shoes so the satin doesn’t get lost.
Dry fabric paint under a sheet of parchment so it doesn’t stick to the fabric when you move it.
Don’t use thick permanent marker for skeleton lines; it cracks when the fabric stretches.