
1. Matte Pastel Stripe Case with Tape-Edge Ends
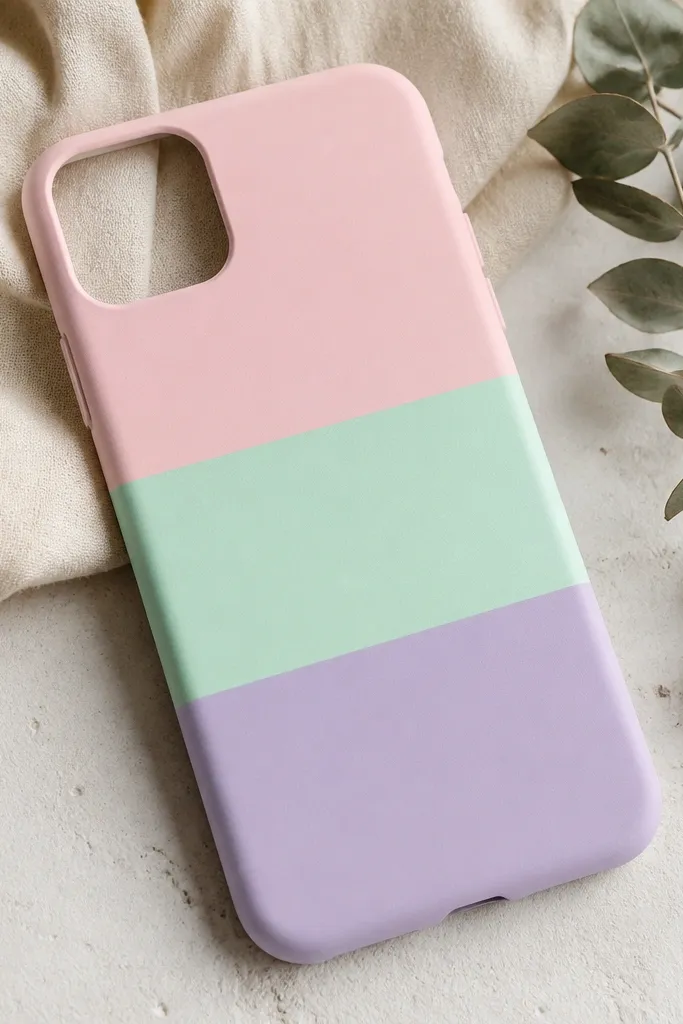
This one looks airy and polished, and it hides small scuffs because stripes read as design, not damage. I used matte pastel acrylics in three bands so the case still looks bright in daylight without looking loud at night. The mint and lavender combo flatters cool undertones and works great with silver jewelry and light neutrals. Keep the stripes angled slightly down toward the camera side — it makes the whole case feel “purposeful,” not flat. For kids, this is beginner-friendly because tape does the heavy lifting.
Start by scuffing the whole case with a 600-grit sanding sponge, then wipe with rubbing alcohol on a lint-free cloth. Mark three stripe areas with low-tack painter’s tape, leaving a thin gap between each stripe so paint doesn’t bleed. Paint one stripe at a time with a small foam brush using thin coats — two coats per color looks best. Pull the tape while the last coat is still a little tacky so the edges stay sharp. Finish with two thin layers of matte clear acrylic sealer, letting each layer dry 20-30 minutes.
Quick tipIf your tape lifts paint, press it down with a fingernail for 10 seconds before painting.
One warningDon’t use glossy clear coat on pastel paint — it makes fingerprints obvious and scuffs look brighter.
2. Sunset Gradient with Sponge-Dab Glow
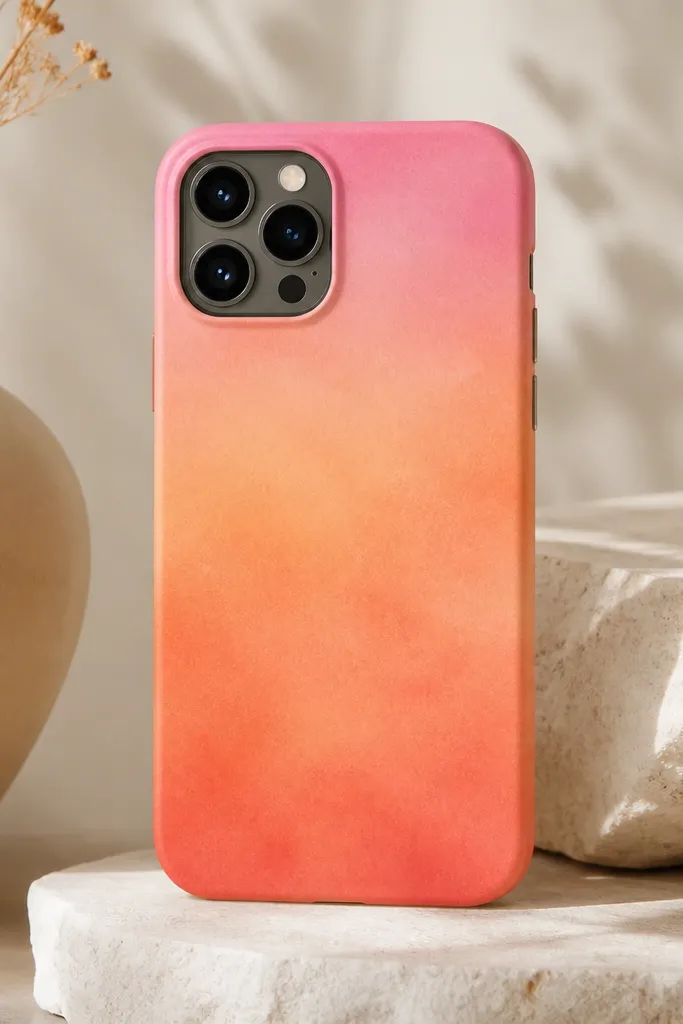
This cover makes the phone look warmer and more “put together” even when the design is simple. The sponge texture hides uneven drying and tiny chips, so it stays cute longer. I like this gradient on cases with a slightly rounded back because the colors wrap softly. It flatters medium to warm skin tones well, especially when paired with gold rings or warm-toned outfits. Kids love this because it feels like painting clouds without needing perfect lines.
Scuff and clean the case, then paint a thin base layer in pale cream or white so the gradient looks bright. Use a makeup sponge and dab coral acrylic at the bottom third, then dab peach in the middle, and pink at the top. Keep reloading the sponge and dab in small overlapping circles — don’t brush back and forth or you’ll muddy the colors. Let it dry fully, then add a second color pass only where the gradient looks patchy. Seal with a satin clear coat so the sponge texture stays visible but protected.
Use a separate sponge for each color so you don’t turn it into one muddy orange-brown.
Skip thick layers — thick gradient paint cracks along the case corners.
3. Black Cat Silhouette with White Sticker-Look Eyes
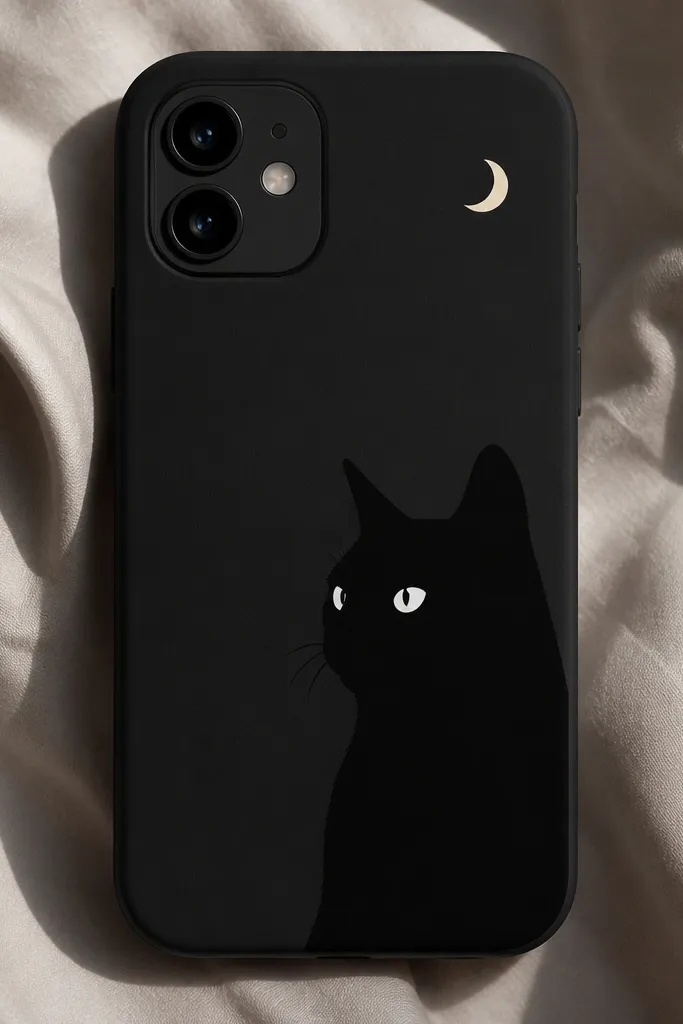
This design looks bold and cute, and the high contrast hides wear because black takes scratches less personally than light colors. The white eyes give it that “sticker” vibe, even after some rubbing. I’ve done versions like this for kids and it still looks clean because the cat shape is simple and the details are minimal. It suits people who like dark outfits and it looks sharp against gold or bronze accessories. If you want a cover that doesn’t show every fingerprint, black is your friend.
Start by painting the whole case with two thin coats of matte black acrylic, letting it dry between coats. Next, sketch the cat silhouette lightly with pencil so you can erase before paint. Fill the cat shape with black paint again, then use a white paint marker or white acrylic + a tiny brush for the eyes and crescent moon. Add a small highlight line under one eye with a thinner brush for a more finished look. After everything dries, seal with matte clear coat in two thin layers.
Quick tipIf your cat edges look wobbly, add a thin white outline around the silhouette with a paint marker.
One warningDon’t add too many tiny whisker lines — they chip first.
4. Galaxy Case with Nail Polish Swirls and Splatter
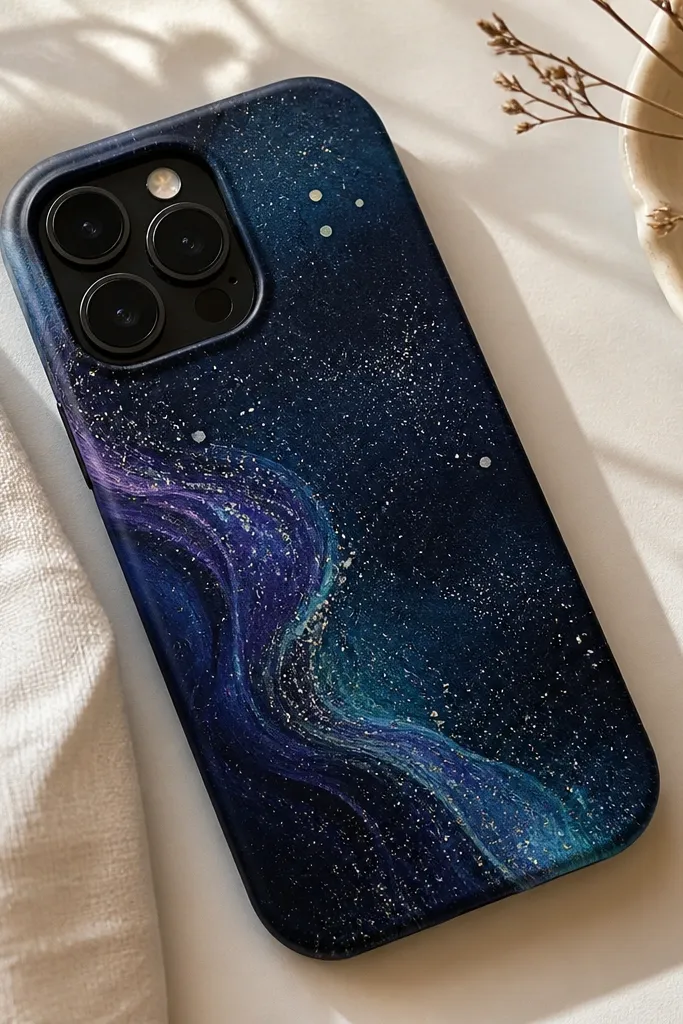
Galaxy designs stay aesthetic even when the case gets scuffed because the pattern is already “busy.” I’ve used nail polish here because it levels itself and creates smooth swirls without brush marks. Navy + teal + purple reads clearly in any lighting and looks great with both warm and cool wardrobes. It also hides finger smudges better than light galaxy bases. For kids, this is the fun mess method — controlled splatter makes it feel special.
Scuff and clean, then base coat the case with deep navy acrylic. Use a sponge to dab on purple and teal in curved patches, blending the edges with light dabs. For the swirls, drip a small amount of teal nail polish onto a plastic spoon and flick it in short strokes across the surface. Then splatter white and silver paint using an old toothbrush — load it lightly and tap over a scrap paper barrier. Let it dry completely, then seal with a satin or matte clear sealer to protect the splatter texture.
Quick tipDo splatter outside or over a box — the tiny dots are impossible to clean off a table.
One warningDon’t shake nail polish hard — it creates thick globs that dry into chunky bumps.
5. Floral Linework Border Using Paint Marker
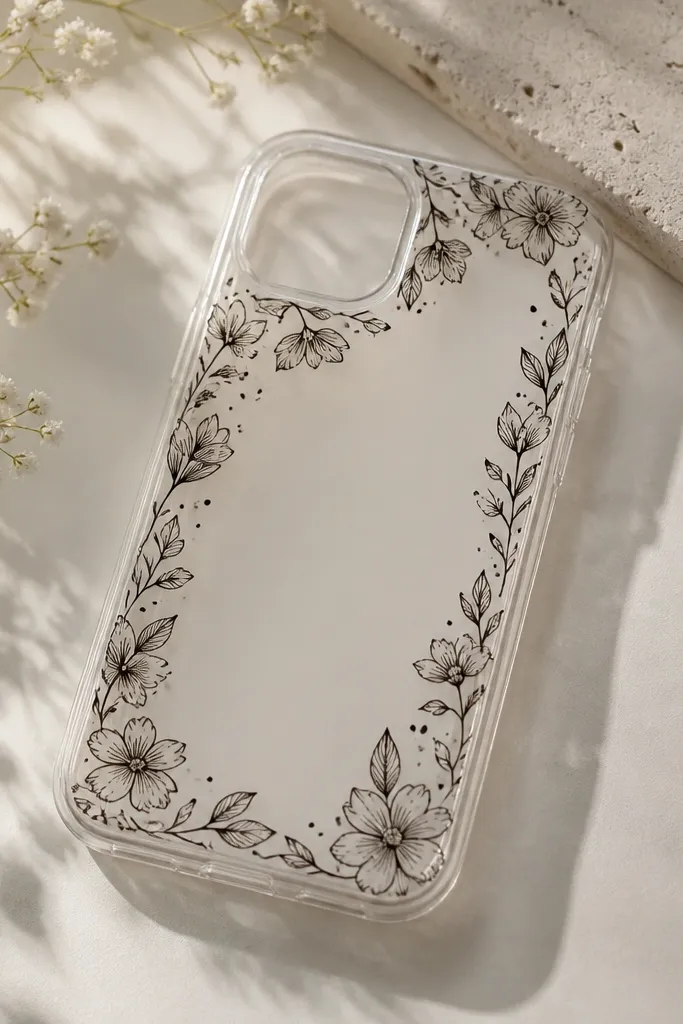
This looks classy without being fragile because the border structure keeps the design away from the phone’s most rubbed spots. Thin linework can get beat up, so I keep it to a border and add dot clusters that blend if scuffed. The black ink look on a light base looks clean with any outfit and makes the phone feel more “grown.” It flatters people who like minimal style and it also works for kids who want pretty shapes without coloring large areas. If you’re worried about mess, paint markers are your friend.
If your case is clear, scuff it lightly and wipe clean; if it’s colored, use a light base paint first so the marker stays readable. Draw a simple border on three sides only, leaving the camera area mostly bare so it doesn’t get crowded. Use a fine paint marker to sketch flowers with five petals, then add tiny dot centers and small leaf curves. Let the marker ink dry 30-60 minutes. Seal with a clear topcoat carefully — spray from far away in light passes so you don’t smear the lines.
Quick tipPractice the flower shape on scrap paper first so your border looks consistent.
One warningDon’t press hard on the marker — it dents soft cases and creates fuzzy edges.
6. Mushroom Cap Collage with Matte Mod Podge
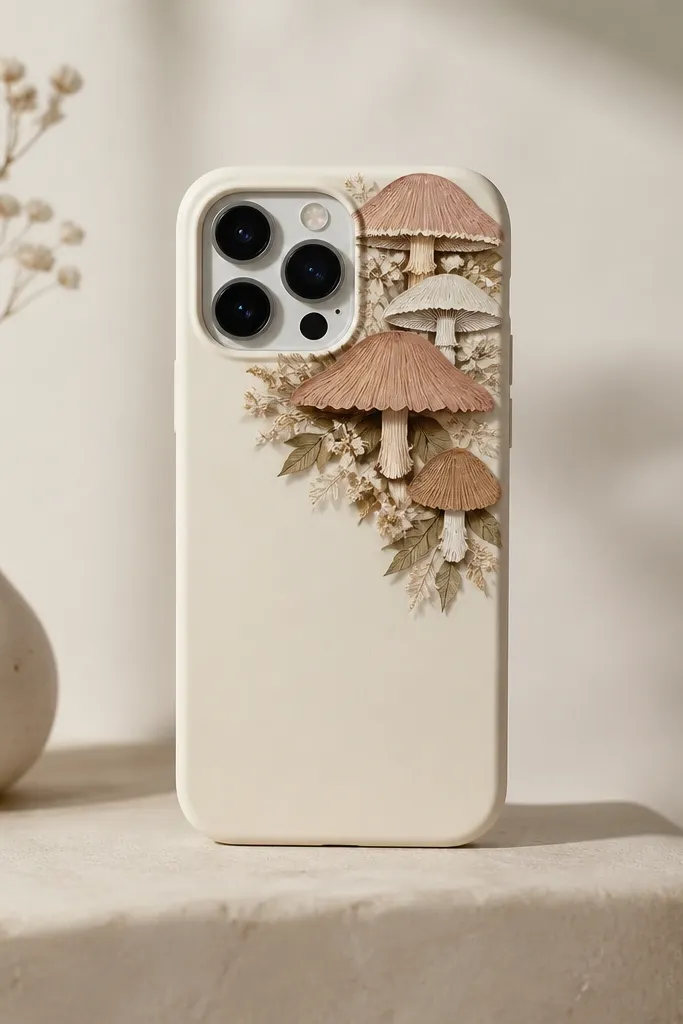
Paper collage is low maintenance because it hides small scratches under layered fibers. Mushrooms also look great on phone cases because the shapes naturally fit corners and camera cutouts. I chose a cream base and muted red-brown caps so it looks cozy without turning into a loud theme. This style works well with warm skin tones and earthy outfits. Kids can do it too if you use pre-cut shapes or thicker paper so it doesn’t tear.
Start with a cream acrylic base coat on the case, two thin layers. Cut mushroom cap and stem pieces from scrapbook paper or printed craft paper, then decide where they sit so they don’t cover the camera. Brush a thin layer of matte Mod Podge on the case, place the paper, then cover with another thin layer on top. Use a damp sponge to gently smooth edges so they look blended. After it dries fully (at least 2 hours), add one more protective matte Mod Podge layer.
Quick tipUse paper with a slightly textured finish so the collage edges look intentional.
One warningDon’t soak the paper — too much Mod Podge makes it wrinkle and lift.
7. Pastel Checkerboard with Edge-Only Sealing
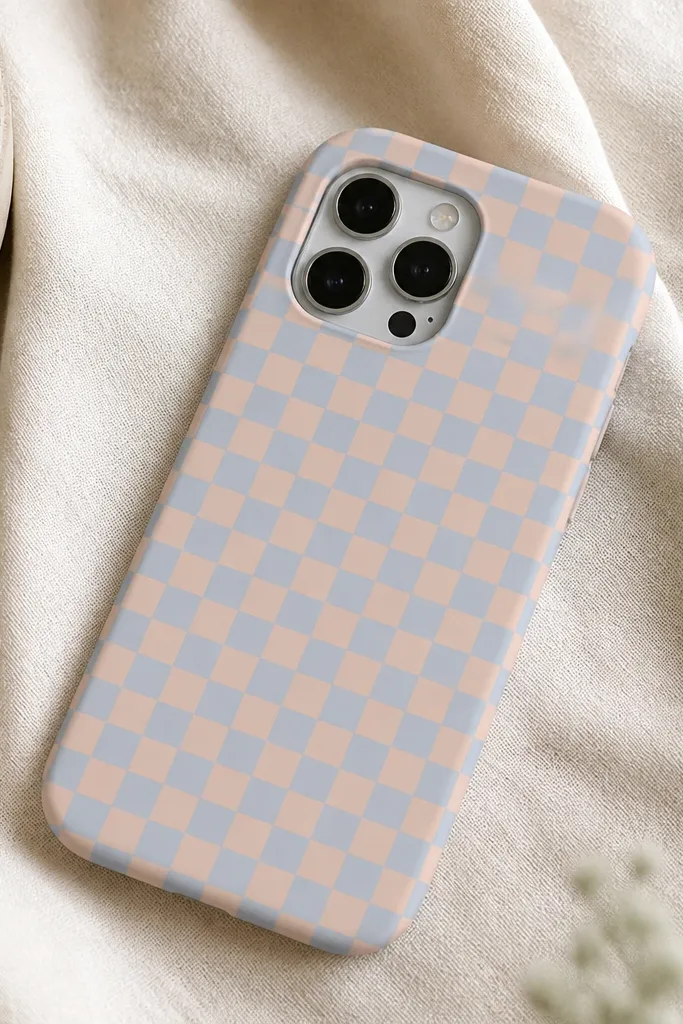
Checkerboards look playful, but they still read clean when the squares are small and evenly spaced. I like this because even if one square gets scuffed, the pattern makes it feel like part of the design. Pastels keep it soft and kid-friendly, and the small grid doesn’t overpower the phone. It flatters people who like sweet colors without going full cartoon. This also pairs well with neutral phone accessories like beige straps.
Scuff and clean the case, then paint a light base color that matches one of the checker colors. Use a ruler to mark a grid with pencil, then apply painter’s tape strips to create consistent square boundaries. Paint the alternate squares with a second pastel and let dry, then remove tape carefully. If you want extra crisp edges, do a tiny touch-up with a fine brush after the tape comes off. Seal with satin clear coat in two thin passes to keep the pattern sharp.
Make your squares about 6-8 mm for a cute phone scale, not big “craft project” squares.
Don’t freehand the grid — crooked checks make it look rushed.
8. One-Color Ombre Corner (No Full Coverage)
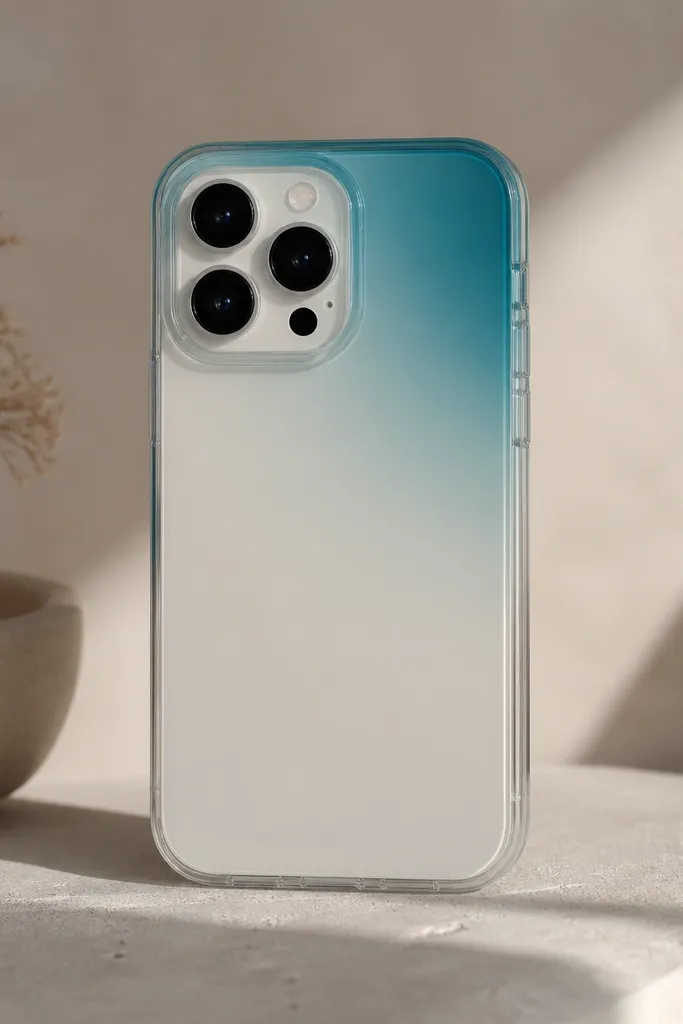
This is low maintenance because you’re not painting the whole case — fewer coats, less chance of peeling, and the design stays strong even if the phone gets scratched. The corner placement hides wear since most scuffs happen at the center when you set your phone down. I used teal because it pops on white, cream, and clear cases without needing extra decorations. It looks great with both casual and dressy outfits. Kids love it because it looks like “paint magic” but you’re really just blending one area.
Clean and scuff the case, then paint a small base corner gradient starting with a medium teal. Use a makeup sponge to dab deeper teal at the corner edge, then lightly dab lighter teal outward in a fan shape. Blend by dabbing a little more lightly each time so the transition stays soft. Let it dry, then add one more ombre pass for stronger color. Seal with a matte or satin clear coat, focusing on the painted corner so it stays protected.
Keep the ombre edge at least 1 cm away from camera cutouts so paint doesn’t get scraped.
Don’t try to blend with a brush — it streaks and looks uneven.
9. Rainbow Dot Cluster Using Paint Marker Caps
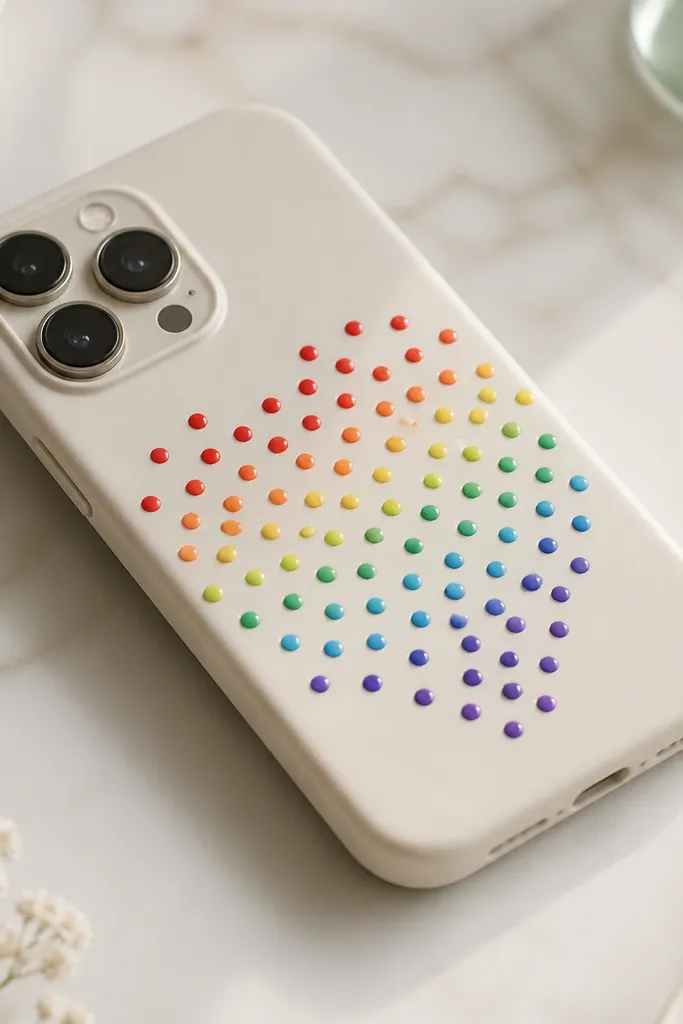
Dot clusters look adorable and they’re forgiving because dots hide edge wear better than thin lines. I like using marker caps to stamp dots because the circles come out uniform without fancy tools. It also reads as intentional art, not random speckles. Rainbow colors brighten up a plain case and make it feel kid-sweet without looking childish if you keep the dots grouped in one area. This style looks good on warm or cool outfits — the colors carry the vibe.
Scuff and wipe the case, then paint a solid base if your case is clear or too dark. Decide on a shape for the cluster, like a small cloud near the top or a heart outline near the center. Dip the paint marker cap lightly or press the cap onto acrylic paint on a scrap palette, then stamp dots one color at a time. Leave small gaps between dots so the pattern breathes. After dry, seal with a clear coat in two thin layers.
Start with the lightest color first so darker dots don’t stain the base through the seal.
Don’t press too hard — it smears the dot edges and makes them look oval.
10. Baked Clay Look with Acrylic + Sponge Texture
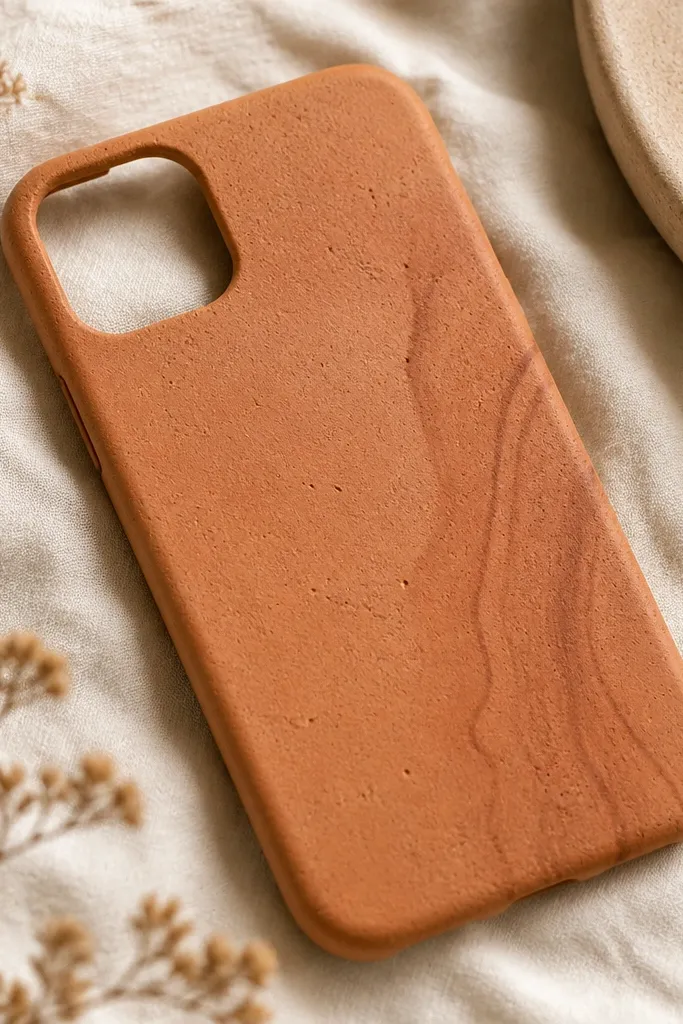
This one makes a phone case feel like it has a real material texture, not just paint. The sponge texture hides scuffs because it breaks up shine, so scratches don’t catch light as hard. Terracotta looks amazing with gold hardware and warm makeup tones, and it’s a cozy alternative to pastel. I also like it for older kids because it feels “adult” without being complicated. The darker swirl adds interest while keeping most of the case simple.
Scuff and clean, then base coat the case with terracotta acrylic in two thin layers. To create the baked texture, dab a dry sponge lightly with a slightly darker terracotta and tap over the whole surface. For the swirl, paint a curved line in the darker shade, then soften its edges with a barely damp sponge. Let it dry fully, then seal with matte clear coat so it stays non-glossy. If you want extra sand vibes, sprinkle a tiny pinch of fine baking-soda grit on the wet glaze, then seal again after it dries.
Quick tipUse fine grit only if your case is in a soft sleeve — grit can scratch if it rubs hard surfaces.
One warningDon’t seal before paint fully dries — trapped moisture causes cloudy clear coats.
11. Fabric Transfer Hearts (From Cotton Scrap)
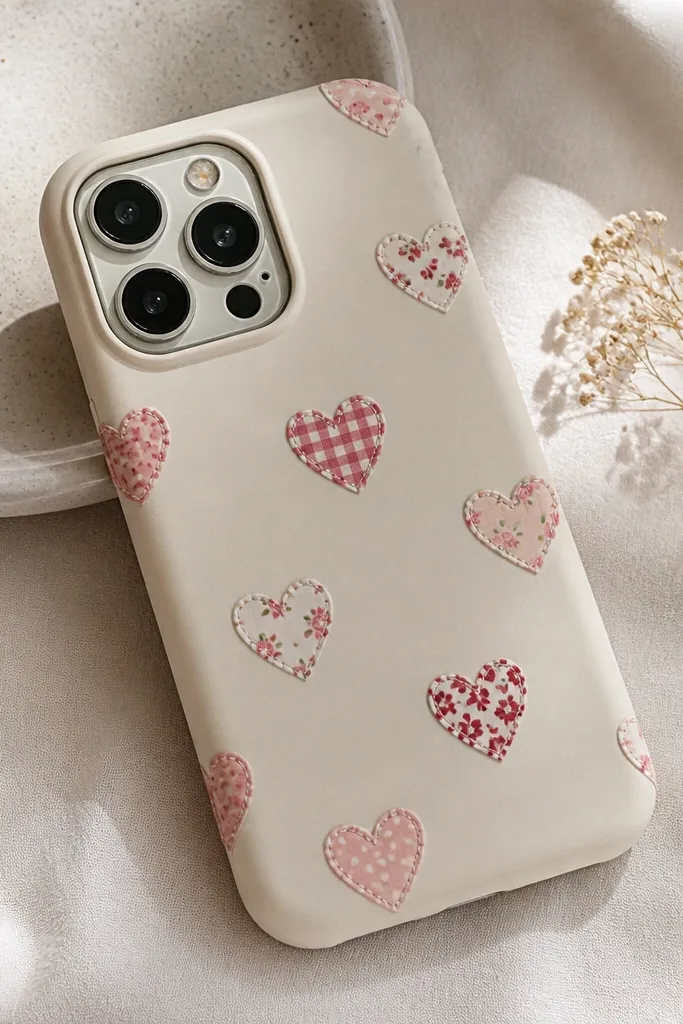
Fabric hearts look soft and expensive, and they stay looking good because the design sits under a protective layer. I’ve used this with cotton scraps from old tees because the weave gives the heart shape a gentle texture. It flatters people who love cozy aesthetics and it looks great with denim, cardigans, and warm-toned bags. Kids can pick their favorite fabric scraps and it feels like “real crafting,” not just painting. The hearts also hide tiny chips because the fabric absorbs nicks rather than showing bare plastic.
Cut heart shapes from cotton fabric, then iron them flat. Brush a thin layer of matte Mod Podge on the back of each heart and press onto the scuffed, clean case. Add more Mod Podge over the top, smoothing from the center outward so no bubbles form. After it dries, paint a thin cream outline around each heart using a small brush so the fabric edges look intentional. Seal the entire case with matte clear coat to protect the transfer.
Choose fabric with a tight print so the heart doesn’t look blurry after sealing.
Don’t stretch the fabric while pressing — it warps the heart edges.
12. Monochrome Marble with White Veins
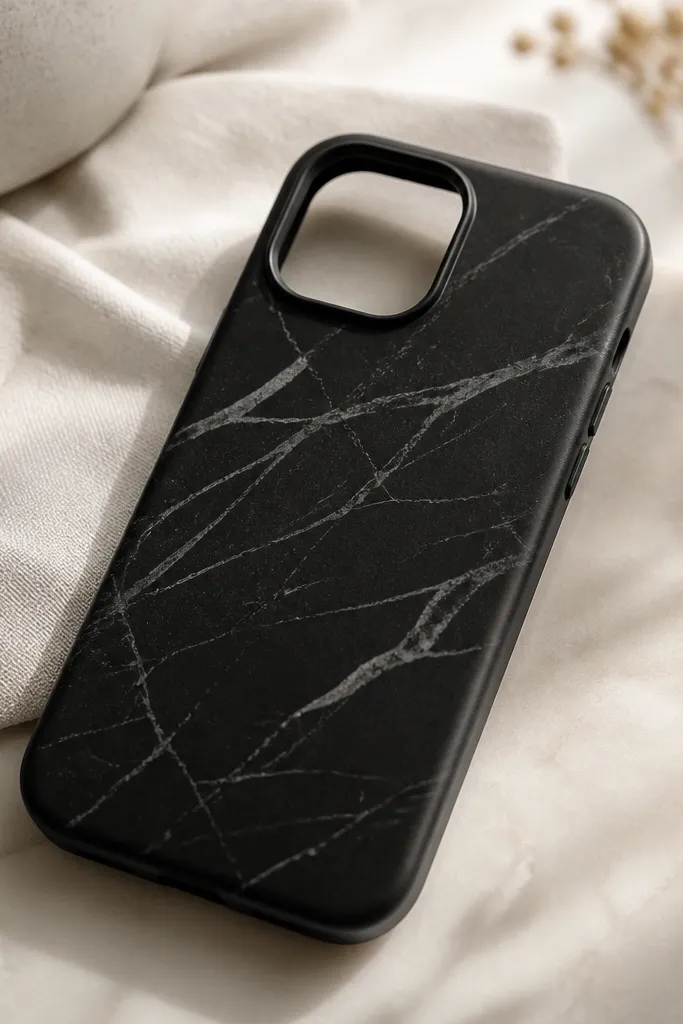
Marble looks fancy, but it’s low maintenance because the pattern already contains variation. If the case gets scraped, the vein lines make it less obvious than a solid color. I’ve done monochrome versions because they match everything and don’t clash with phone accessories. Black marble also looks crisp and clean in photos, which matters if you show your phone case often. Kids like it too because the veins feel like drawing clouds with a ruler-free approach.
Scuff and clean the case, then base coat it in matte or satin black acrylic. For marble veining, water down white acrylic slightly and use a fine brush to drag thin lines in curves. Add gray veining by mixing a little black into white and repeat with fewer lines. Blend edges by lightly tapping with a damp sponge so the veins don’t look like stickers. Seal with satin clear coat and let it cure fully overnight for the smoothest finish.
Keep vein lines thin — thick veins look like paint drips and chip faster.
Avoid overworking the marble — too many passes turn it into a flat gray mess.
13. Color-Block Frame with Negative Space
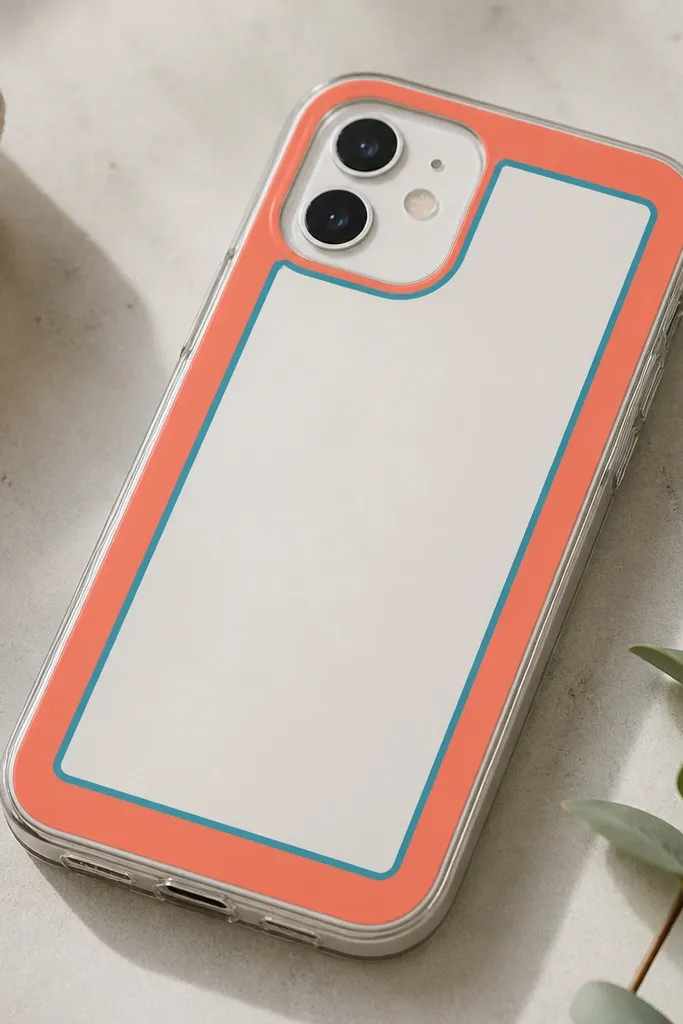
Color-block frames look modern and stay looking sharp because you’re not relying on tiny details. Leaving negative space in the center helps the design look clean even as the case gets handled. I like coral + teal because it hits that sweet spot between warm and cool, so it works with lots of outfits. It flatters people who like geometric aesthetics and it also makes a phone case look intentional without being busy. This is a great “kid craft” because tape makes straight lines easy.
Scuff and clean the case, then paint the center area the original case color if needed (or leave it if it’s already light). Use painter’s tape to create a thick outer frame and a thinner inner frame, leaving the middle exposed. Paint the outer frame coral, let dry, then paint the inner frame teal. Remove tape carefully, then touch up edges with a small brush. Seal with satin clear coat so the frame stays protected but not too glossy.
Use two layers of tape for thick borders — one layer leaves uneven thickness on curved cases.
Don’t paint under loose tape edges — it bleeds and makes the whole frame look sloppy.
14. Chocolate Drizzle with Brown Gel Pen Lines
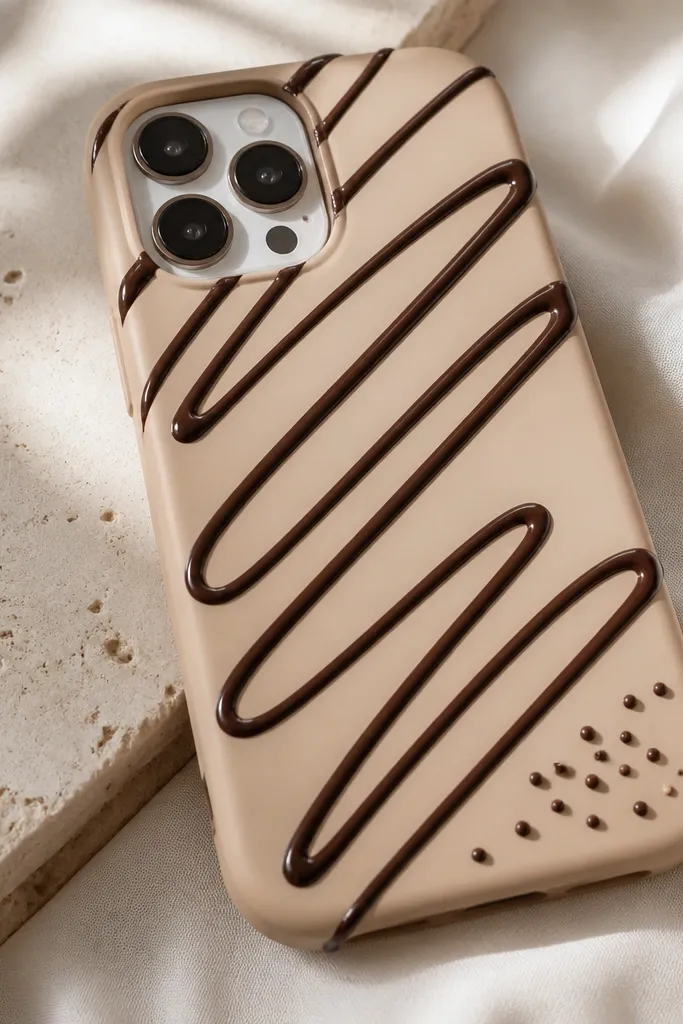
This looks cute and a little funny, and it’s low maintenance because the pattern is bold and forgiving. The drizzle idea hides scratches because the lines create texture and visual noise. I used a beige base so the brown shows up clearly without turning harsh. It looks great with warm-toned accessories and cozy outfits. Kids love the “dessert” theme, and it’s quick to do because you only need a few curved lines to make it look intentional.
Scuff and clean, then paint the case beige or light cream with two thin coats. Draw drizzle lines with a brown gel pen or paint pen, then add small dots like sprinkles using the same pen. If you want a more realistic shine, go over the drizzle lines with a thin clear dimensional paint or clear nail polish and let it level. After it dries, seal the whole case with a compatible clear topcoat, keeping the drizzle area protected. Let cure overnight so the dimensional lines don’t get tacky.
Quick tipKeep drizzle lines thicker than you think — thin lines disappear after sealing.
One warningDon’t use watery paint for drizzle — it sinks into the surface and looks streaky.
15. Neon Outline Stickers with Black Base
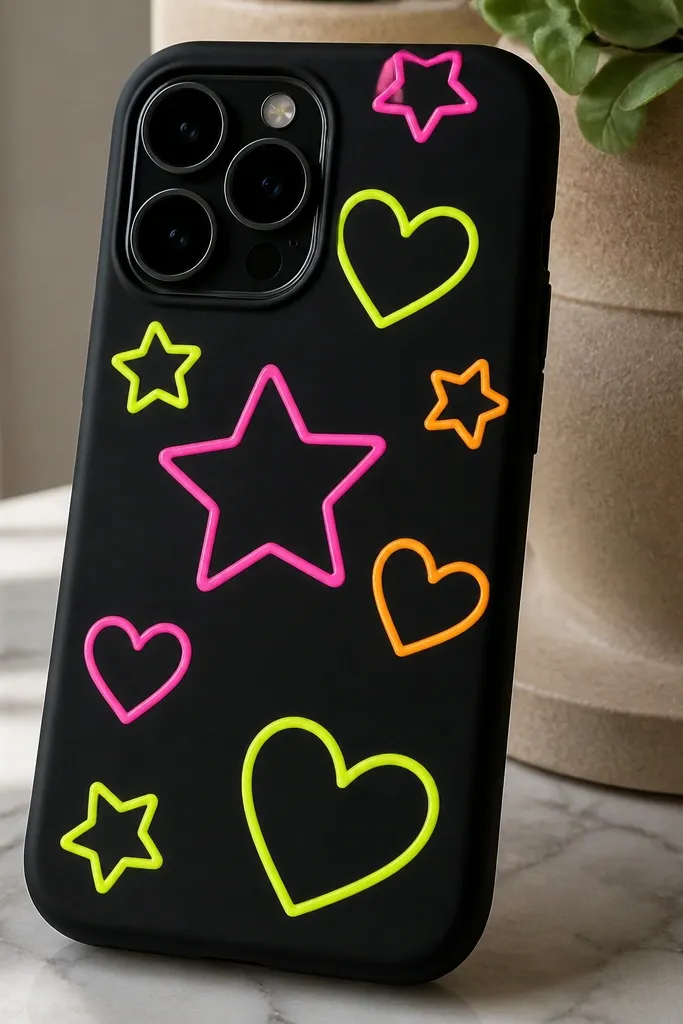
Neon outlines look like tiny stickers without needing actual sticker paper. The black base hides grime and makes neon colors pop, so the case stays looking clean even when you handle it a lot. I like this for night-out outfits and for kids who want something loud but not childish. The design works because outlines are thick and don’t require fine detail. It also photographs really well because the contrast is sharp.
Scuff and clean, then paint the case matte black in two thin coats. Use neon paint markers to draw simple shapes — stars, hearts, and lightning bolts — around the top half of the case. Keep lines consistent and thick, then add a second pass to boost brightness. Let dry for at least 45-60 minutes. Seal with matte clear coat lightly sprayed from a distance so you don’t dull the neon too much.
If the neon looks dull after sealing, do a second neon outline pass once the first seal layer dries.
Avoid drawing tiny details — they fade first under clear coat.
16. Vintage Postcard Frame with Tear-Edge Background
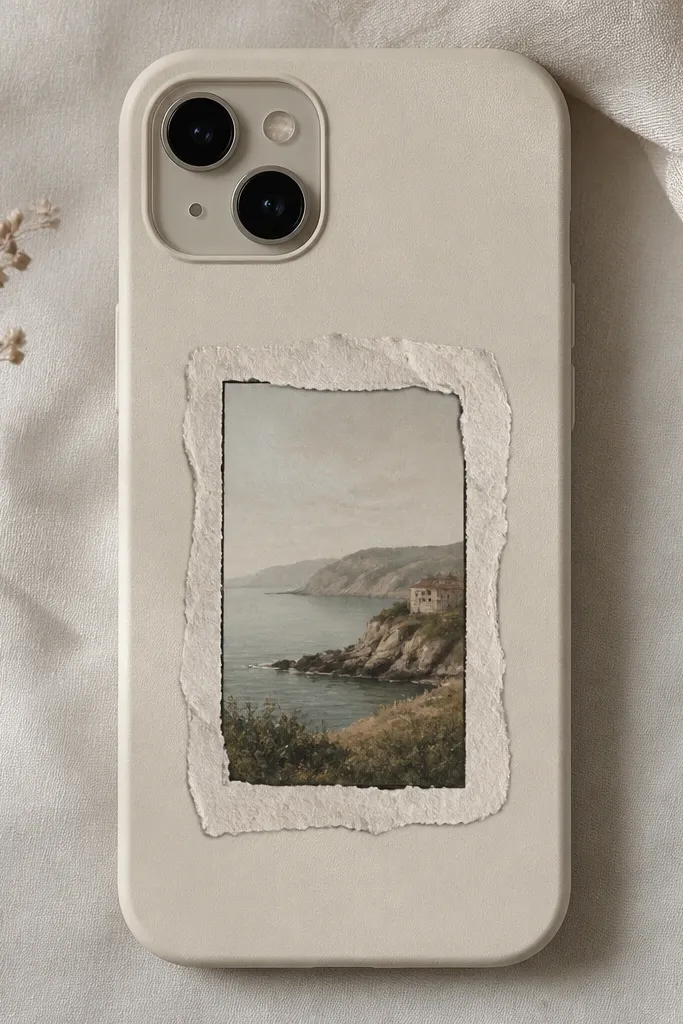
This gives a “kept forever” look without needing perfect drawing skills. Torn edges hide uneven cutting and they look textured even when the case gets scuffed. I’ve used muted postcards or printed ephemera because they don’t scream for attention — they look calm and artsy. This style flatters people who wear lots of neutrals and it looks great with small gold hoop earrings. Kids can do it too if you pre-tear the paper and help with placement.
Scuff and clean the case, then paint a light cream background. Cut a postcard rectangle and tear the edges lightly so they look natural. Brush Mod Podge on the back of the paper, press it onto the case, and cover with Mod Podge so the torn edges seal down. Add a thin dark border around the paper with a fine brush to frame it. Finish with matte Mod Podge or matte clear coat in two layers for protection.
Tear the paper after you decide the placement — moving a torn piece is harder once it’s glued.
Don’t use glossy Mod Podge — it looks plastic and cheap on paper textures.
17. Comic Pop Burst with White Halftone Dots
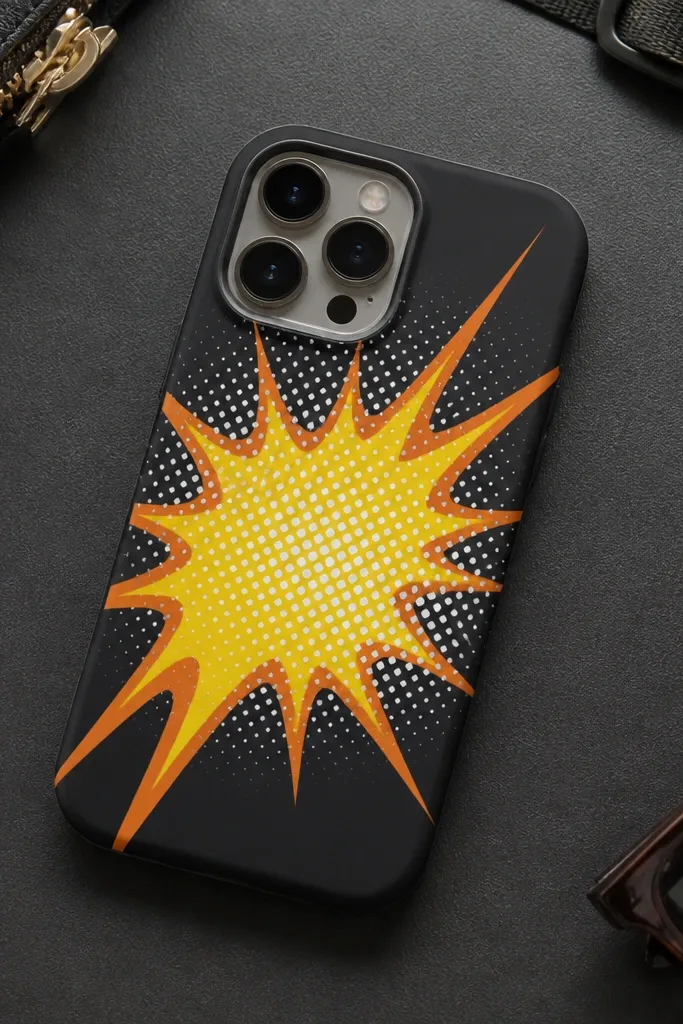
Comic bursts look energetic without needing tiny line art, and they hide wear because the halftone pattern reads as texture. The burst shape also gives you a natural focal point away from the edges where scuffs happen. I like dark base + bright burst because it stays legible and doesn’t fade into the phone background. It suits kids and adults — the vibe is fun but the shapes keep it clean. Halftone dots also cover any small paint mistakes.
Scuff and clean, then paint the case in matte black or deep navy. Tape a burst shape onto the case with painter’s tape, then paint the burst with bright yellow first, followed by orange for depth. While the paint is still slightly tacky, use a stencil or a sponge to tap on white halftone dots across the burst. If you don’t have a stencil, use a small circle sponge and dab in a grid-like pattern. Seal with satin clear coat so the halftone texture stays visible.
Quick tipUse a stencil even for imperfect bursts — the dots make it look like print design.
One warningDon’t blur the burst edges with heavy brush strokes — you want tape-sharp geometry.
18. Botanical Stamp Look with Faux Ink Pad
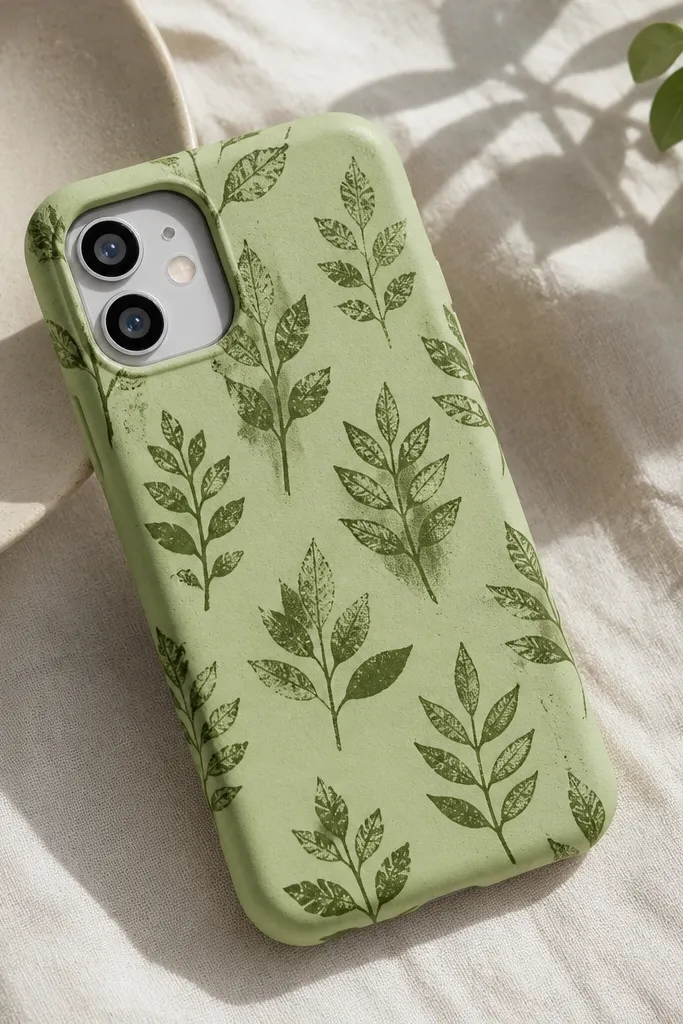
Stamp patterns stay attractive because repetition hides uneven coverage and small chips. This botanical look feels calm, and it’s low maintenance because you aren’t drawing one perfect leaf — you’re repeating a style. I used a light green base so the darker leaves show up clearly without looking harsh. It flatters neutral outfits and it looks good with both silver and gold accessories. Kids can help with stamping because it’s more about rhythm than precision.
Scuff and clean the case, then paint a light base green and let it dry fully. Make a faux ink pad by mixing acrylic paint with a tiny bit of water until it’s creamy, then dab it onto a craft sponge. Press a leaf stamp or even a cut potato half with leaf-like texture into the paint, then stamp onto the case in a grid. Keep the stamps small and leave breathing room so the pattern doesn’t feel crowded. Seal with matte clear coat in one careful layer first, then a second layer after dry.
Test ink thickness on paper first so the stamp doesn’t smear.
Don’t stamp too wet — it bleeds into a blob and ruins the leaf shape.
19. Monogram Corner with Metallic Paint Marker
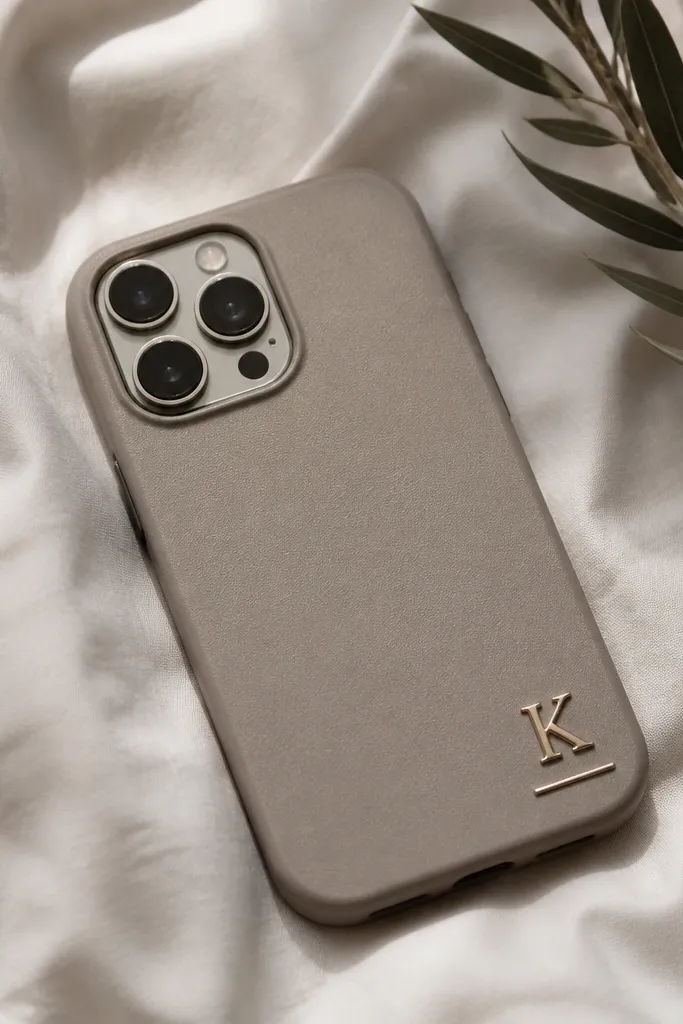
A monogram keeps the case looking clean and intentional, and it’s low maintenance because there’s only one focal area to protect. Metallic paint markers look sharp against matte backgrounds, and they hide tiny wear because the shimmer breaks up scuff lines. I like this for people who want their phone case to look “personal” without turning into a full design. It also works with any phone color because you’re painting only one area. For kids, you can use initials or a simple symbol like a star.
Scuff and clean the case, then paint a matte background color like warm white or light gray. Use a pencil to lightly mark where the monogram will sit — I keep it in the bottom-right corner with about 8-10 mm margin from edges. Trace over the pencil with a metallic paint marker, doing two thin passes for full coverage. Add a thin underline or small dot cluster if you want extra balance. Seal with a clear coat labeled compatible with metallic paint, applying in light passes to avoid dulling the shine.
Write the letter on paper first and mirror it if you’re using a stencil so it matches your phone orientation.
Don’t center the monogram — corner placement looks more balanced on phone cases.
20. Color Pop Border from Old Magazine Cutouts
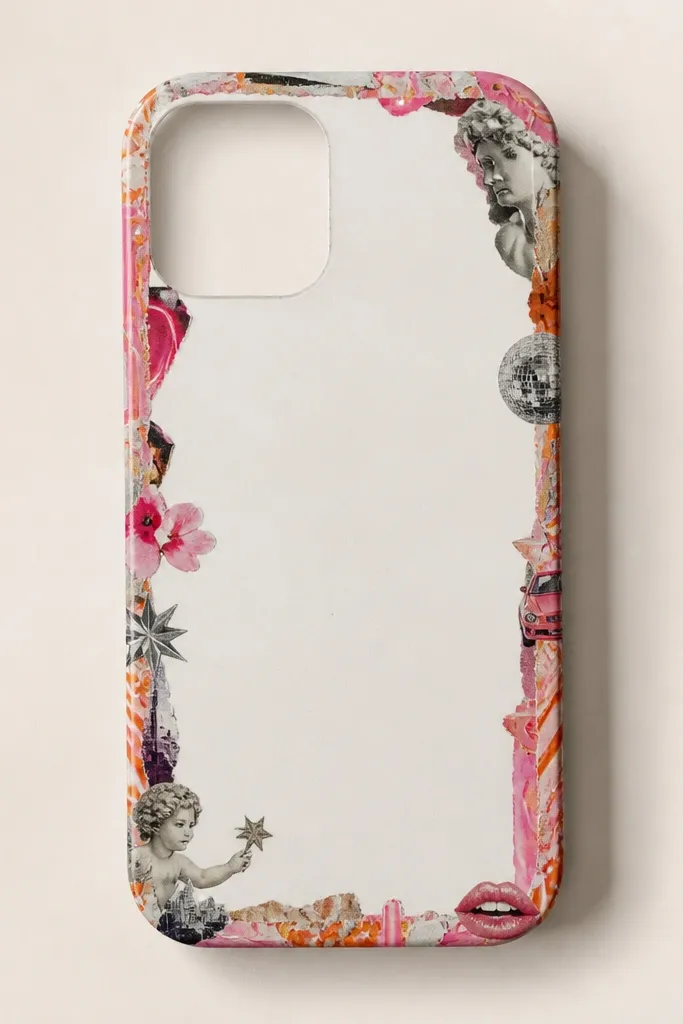
This is one of my favorite budget methods because you’re reusing scraps and the result looks layered instead of flat. The border placement is practical: the center stays smooth and less scuffed, while the busy border hides any rubbing along the edge. It also works for kids because they can pick colors and shapes without needing to paint. The cutout variety makes the case feel custom, even if the layout is simple. It looks best on light or clear cases so the colors pop.
Scuff and clean, then paint or leave the case base light. Tear or cut small magazine pieces into thin strips and tiny rectangles, then choose one side for the border, like the top edge and left side. Brush Mod Podge onto that edge area, press the cutouts in a slightly overlapping line, then seal over the top with more Mod Podge. Let dry, then apply two more thin Mod Podge layers to level the surface. Finish with a clear matte or satin topcoat depending on whether you want fingerprints to show.
Keep the border width to about 6-10 mm so it looks like design, not collage overload.
Don’t glue big glossy sections directly — they can peel at the edges under clear coat.



