
1. Strawberry Shortcake Gift Set
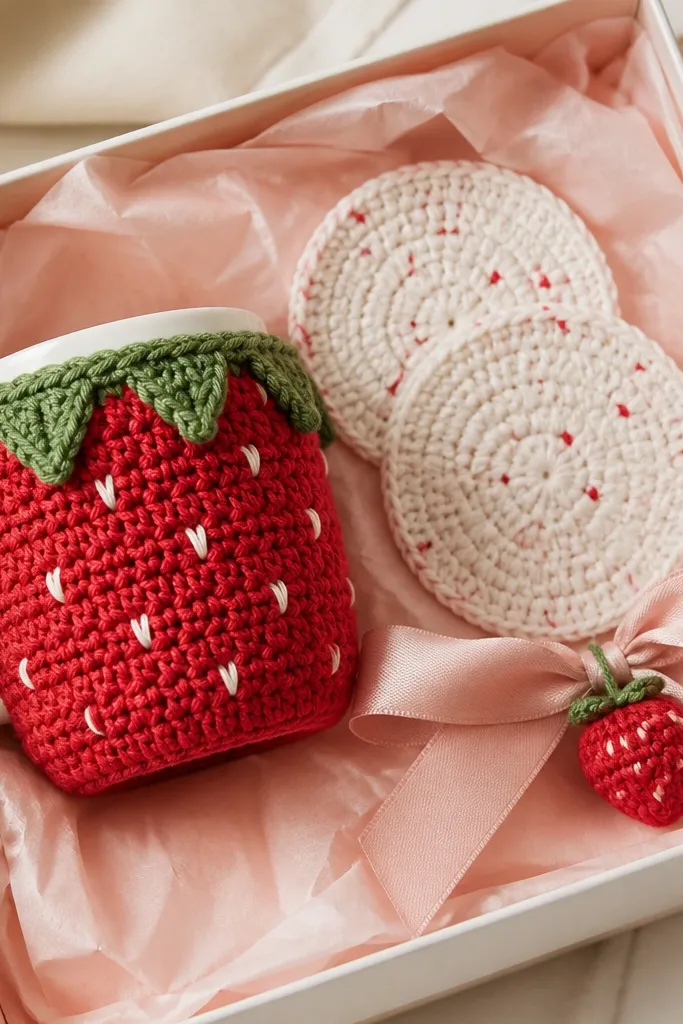
This set looks creative because it repeats the strawberry theme in three scales: the mug cozy is the main shape, the coasters echo the same red-and-green palette, and the charm ties it all together. Use worsted weight cotton for the cozy so it holds its form around the mug, then keep the coasters in cotton too for crisp edges. I like a blush pink base for the background stitches and bright red for the “seed” texture, because the contrast pops in photos. It flatters anyone — it’s sweet without being childish, and it works for adults who like cozy kitchen things. Style it for a gift by keeping the green leaves consistent in size across items.
Start by crocheting the mug cozy first: make it to fit your mug, aiming for about 3.75 inches tall, and add a green leaf panel on one side. Next, crochet two round coasters in the same red base, then add tiny off-white stitch “seeds” with duplicate stitch or duplicate-like surface crochet. Finally, make a small strawberry charm (about 2.5 inches tall) and attach it to a ribbon that runs across the box lid. Layer items so the charm sits on top, then tuck the coasters in a neat row next to the cozy.
Use a satin ribbon in deep green and tie it so the knot sits at the same spot on every box — it makes the set look shop-made.
Don’t mix three reds; pick one main red and one accent seed color so it looks intentional.
2. Cozy Coffee Date Set (Cream + Mocha Stripe)
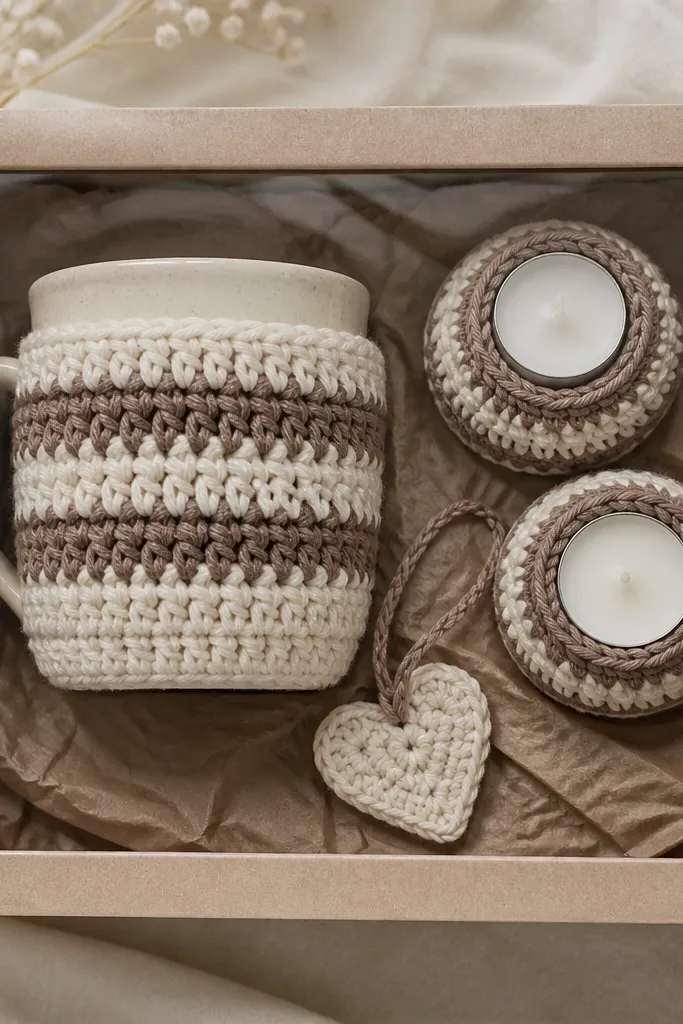
This one reads “creative” because the stripes create a clean, graphic pattern — it looks styled even when the stitches are simple. Choose cream yarn and mocha yarn in the same weight so the stripe rhythm stays consistent. The heart tag adds a soft focal point without changing the palette. I’ve gifted this to coworkers and it always lands well because it feels warm but not overly cutesy. It’s also flattering for homes with neutral decor since cream and mocha blend with almost everything.
Quick tipWrite the person’s name on the tag backing with a gel pen, but keep the font plain — handwritten block letters look best with crochet.
Start with the mug cozy: crochet in a single color block, then switch to stripes at a width you can repeat cleanly (like 2 rows cream, 2 rows mocha). Then make two small tea light cozies or mini cup warmers using the same stripe schedule, keeping them slightly shorter than the mug cozy. Next, crochet a small heart tag and stitch it to a paper-thin cardstock backing so it looks crisp in the box. Fold kraft paper around the base, place the mug cozy upright, then set the tea light cozies on either side.
One warningAvoid uneven stripe widths; stop and count rows before you switch colors.
3. Rainbow Pencil Case + Eraser Scrubby Duo
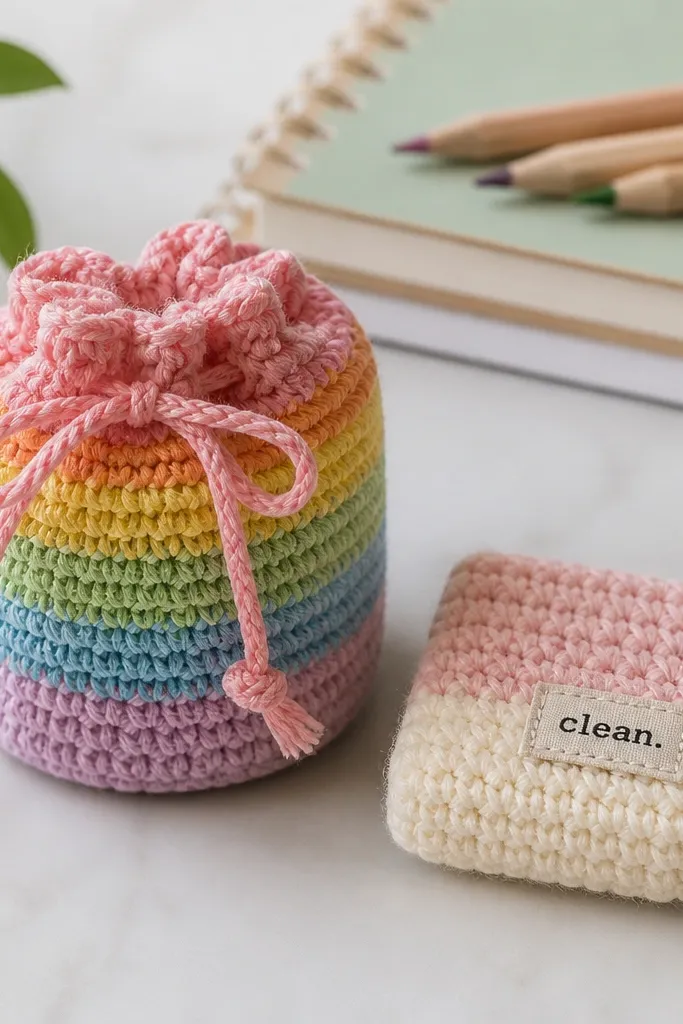
This set looks creative because it pairs an actual “kid-use” item with a playful themed accessory. The pencil case gives structure, and the eraser scrubby reads like a mini prop from a craft desk. Use acrylic or cotton-acrylic blend for the pencil case so it holds its shape, then use cotton for the scrubby for better cleaning feel. The pastel rainbow works for younger kids and tweens, and it doesn’t look childish when the stripes are thin and evenly spaced. Keep the color order the same across both items so the set feels like one design.
Quick tipUse a plastic zipper pull or a thick yarn cord for the drawstring ends; it makes the pencil case look more “finished.”
Start by crocheting a rectangular pencil case with a drawstring channel — make it about 9 inches long and 3.5 inches wide, then test it with a ruler and a couple pencils. Use thin stripes like 1 row per color so the rainbow looks neat, and add a simple single crochet edging to lock in the shape. Next, crochet an eraser scrubby: make a small rectangle, then add a border in a slightly darker pastel to mimic the rubber edges. Finally, stitch a tiny label in surface crochet, then pack the scrubby in the corner of the box so it peeks out.
One warningDon’t skip a structured edging on the pencil case — without it, the top rolls and the set looks sloppy.
4. Baby Shower Blanket Mini + Matching Bib Set
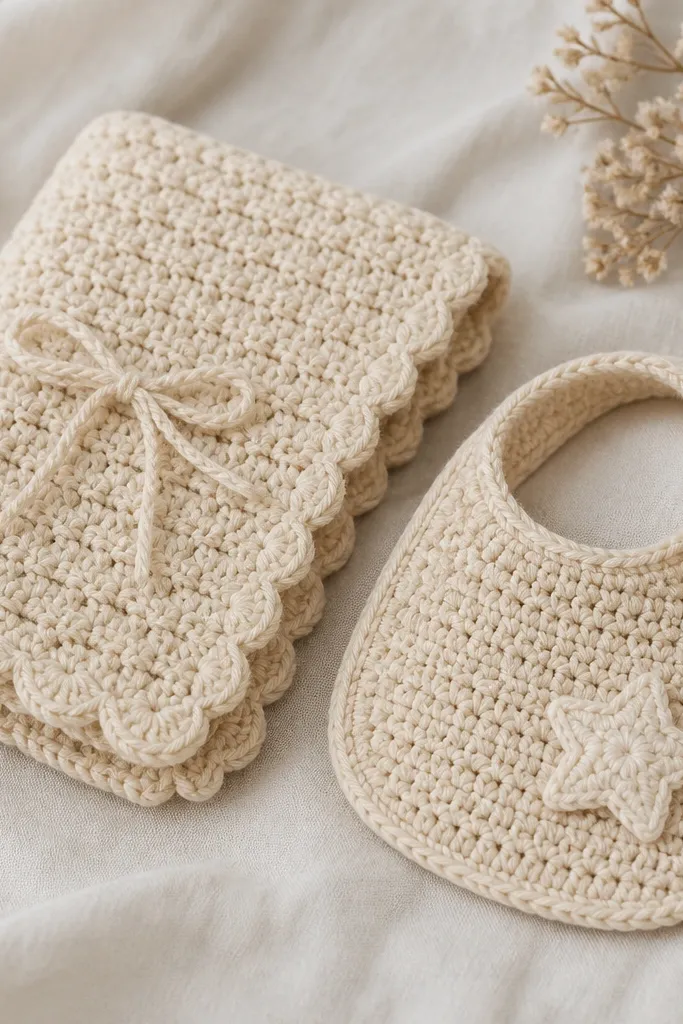
This set looks creative because it gives the gift the “wow” of a blanket, but in a manageable mini size, and it ties the design to a practical bib. Use soft baby yarn (acrylic blend or superwash merino if you already trust it) and keep the stitches airy so it feels gentle. For the blanket, a simple granny-style square with a scalloped border looks polished fast. The bib should match the border stitch so the whole set looks coordinated, and the star applique gives a focal point that doesn’t require complex shaping. This works for all skin tones because the yarn color is the main visual — pick a light neutral or pastel that matches the shower theme.
Start with the bib: crochet the front panel with a slight taper toward the neck, then add scalloped edging around the bottom edge. Make the strap with a chain and add a buttonhole segment so it adjusts; keep the button small and flat. Next, crochet a mini blanket square or small rectangle using the same yarn and the same edging style — aim for about 18 x 18 inches so it folds neatly. Finally, place the bib folded on top of the blanket, and add a small sewn-on star to the blanket corner so it’s visible when the box is opened.
Use a washable button (plastic or covered) and test it by snapping it on and off ten times before gifting.
Avoid scratchy fibers; a stiff stitch pattern on baby items feels harsh right away.
5. Garden Party Tote + Pocket Hand Towel
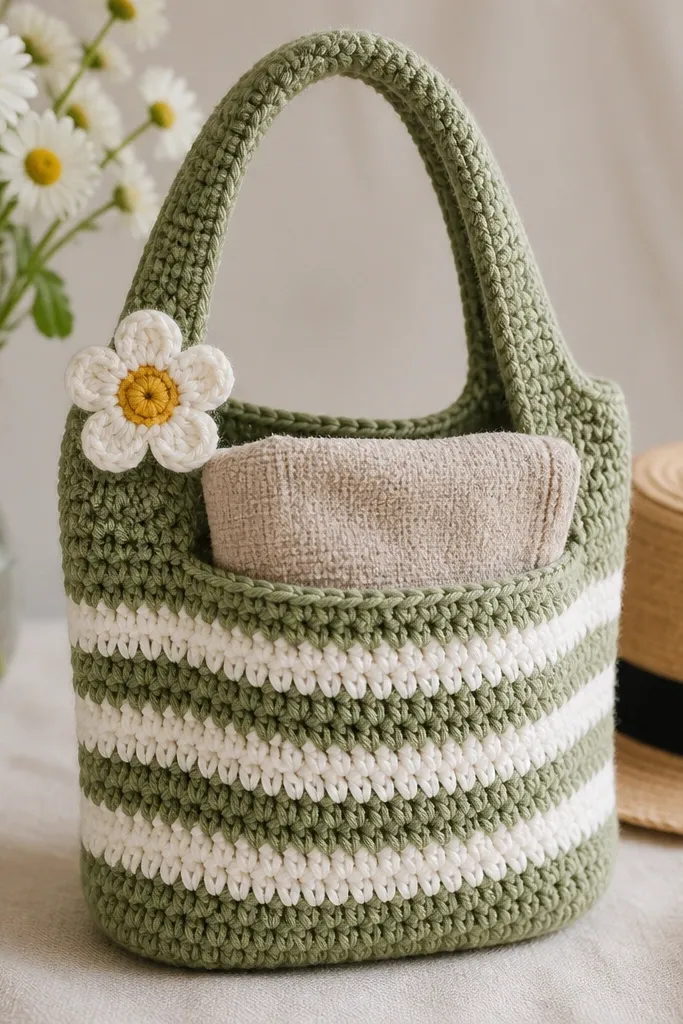
This set looks creative because it’s functional in a way crochet gifts rarely are: a tote that actually carries something, plus a matching towel that fits in the pocket. Use cotton yarn for both pieces so they stay crisp and don’t stretch out after a few uses. The sage and white stripe combination feels fresh and works for adults — it looks like a summer craft, not a kids' craft. The daisy pin adds a clear “garden party” theme without needing heavy applique work. Keep the stripe width consistent so the tote doesn’t look uneven.
Start by crocheting the tote body in a rectangle, then shape the bottom by decreasing stitches slightly at the corners so it stands up. Add a front pocket panel and stitch it to the tote front, then crochet the towel to match the pocket width (about 9 to 10 inches across) so it slides in cleanly. Next, make the handles from sturdy chains, then reinforce with single crochet rows so they don’t sag. Finally, attach the daisy pin to the strap with a yarn tail stitched through the center — pack the towel folded and visible through the pocket opening.
If your tote looks floppy, switch to a smaller hook than you think you need — it tightens the fabric fast.
Don’t use super bulky yarn for the tote; it makes the pocket gap too wide and the towel falls out.
6. Winter Night Scarf Set with Mini Hat
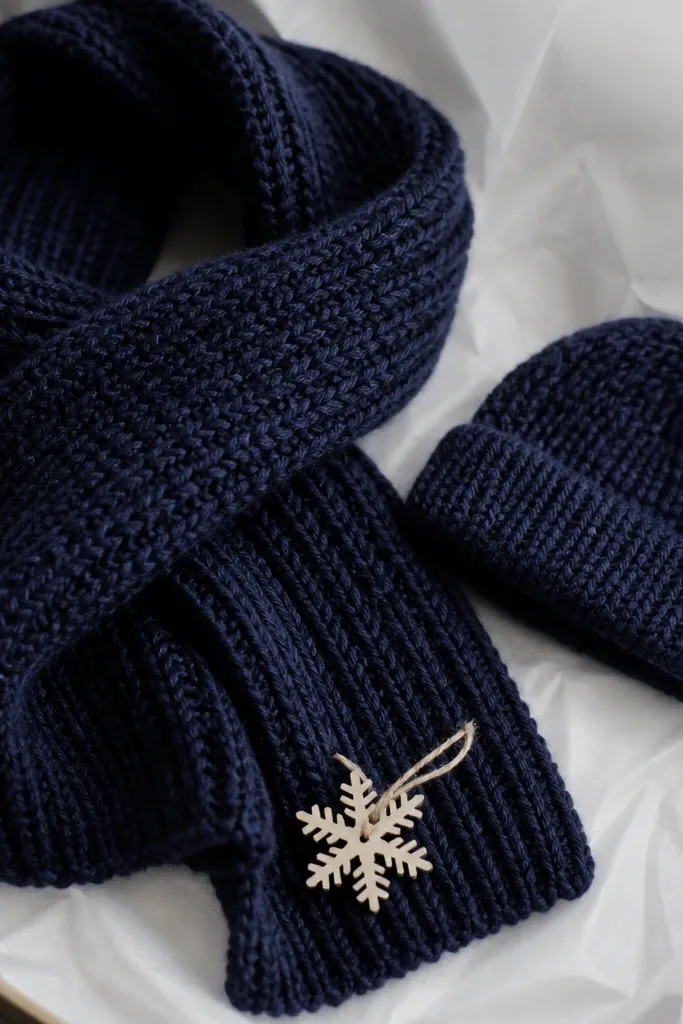
This set looks creative because the scarf does the visual work and the mini hat makes it feel like a complete outfit. Use a textured stitch like moss stitch or a simple waffle pattern so it catches light in winter photos. Navy with a light gray accent looks classy and hides the small imperfections that happen when you’re moving fast. This gift flatters people who wear neutrals and it also works for kids because the mini hat keeps it playful. The snowflake tag is small, but it makes the set feel themed rather than random.
Quick tipBlock the scarf after you finish by pinning it flat — textured stitches look sharper when they dry straight.
Start the scarf by crocheting a long rectangle using moss stitch in navy, aiming for about 6 inches wide and long enough for wrapping (around 60 inches for an adult). Add a gray stripe border on both ends so the scarf reads finished. Next, crochet a mini hat: use the same yarn and texture, then make it about 6 inches tall with a ribbed brim using front post/back post stitches. Finally, tie a snowflake tag to the scarf end and fold the scarf with the hat tucked inside.
One warningSkip the gray border if you use too many colors; one accent is enough for a clean look.
7. Dish Soap + Scrubby Matching Set (Lemon Zest)
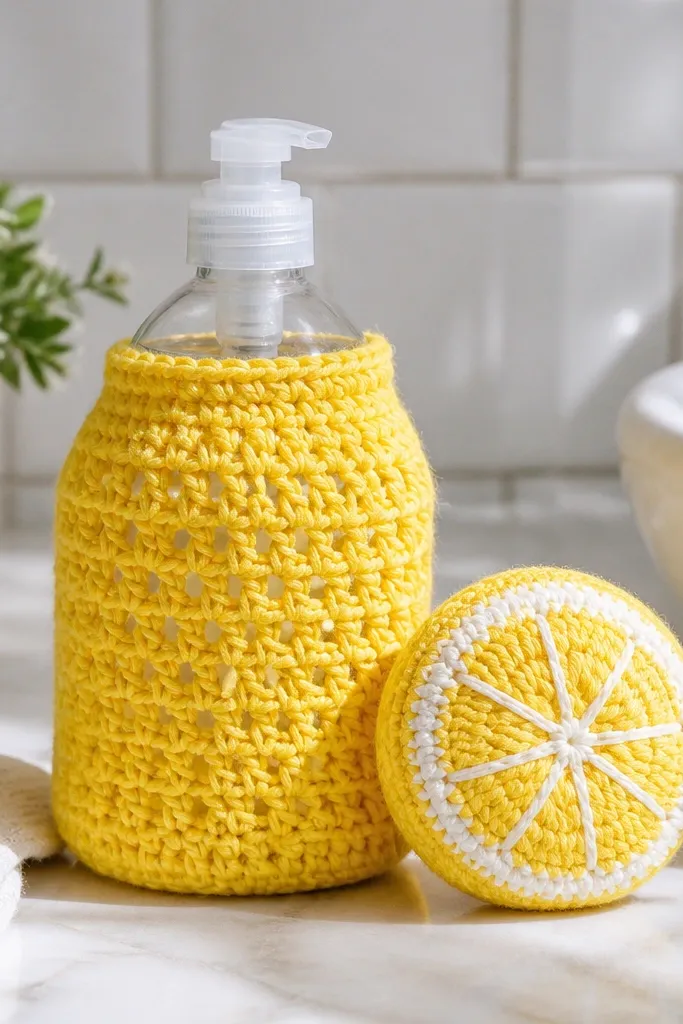
This set looks creative because it makes an everyday product look designed. A crochet soap sleeve turns a boring bottle into a kitchen accessory, and the lemon scrubby repeats the same visual cues — yellow stripes and a leaf. Use cotton yarn for the sleeve so it doesn’t stretch out and so it wipes clean. Bright yellow can be tricky, but paired with white “pith” it looks cheerful instead of harsh. This set fits well for adults who love cooking and for housewarming gifts where you want something useful.
Quick tipUse a removable button or snap for the sleeve closure so the bottle comes out for refills.
Start by measuring your soap bottle: crochet a sleeve that wraps snugly around it, leaving about 1/2 inch for overlap. Use single crochet in rounds for structure, then add thin white stripes every few rounds. Next, crochet a lemon scrubby: make a small circle with yellow, then stitch white stripes across the surface. Finally, attach a tiny green leaf charm and place the scrubby on top of the tissue next to the bottle sleeve.
One warningDon’t use fluffy yarn on scrubbers; it holds gunk and the gift looks worn fast.
8. Halloween Treat Bag + Candy Corn Coaster Duo
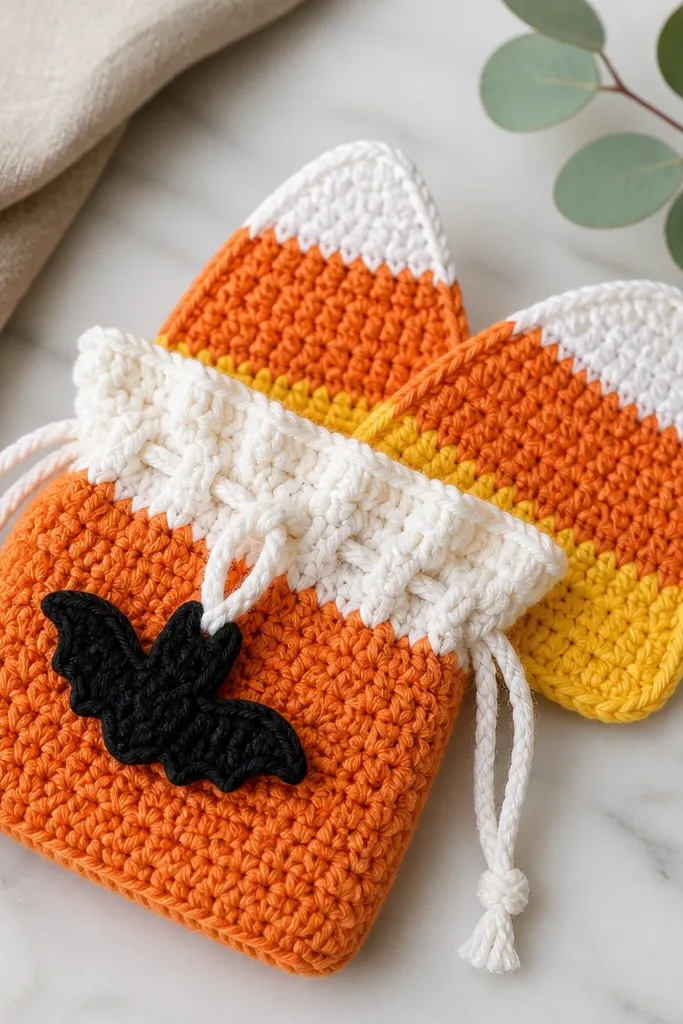
This set looks creative because it mixes a container with matching “props.” The treat bag is the main item, and the candy corn coasters make it feel like a themed bundle rather than random Halloween crafts. Use acrylic yarn for the bag so it’s light, and use cotton for the coasters so they lay flat on a table. The tri-color candy corn palette is instantly recognizable, and it works for kids and adults who like spooky decor. The bat tag is small but gives the set a signature.
Quick tipUse a contrasting drawstring color like black or deep purple so the top reads clearly in photos.
Start by crocheting the bag body in alternating stripes: orange, white, yellow, then repeat until it’s about 7 inches tall. Add a drawstring channel by crocheting a row of chain spaces, then finish with a tighter edging so the top stays open. Next, crochet two candy corn coasters: build a triangle-like shape in flat rounds, then add stitched stripes for the candy layers. Finally, pack the coasters inside the bag, then tie the bat tag to the drawstring ends.
One warningAvoid loose stitch tension on the bag; it collapses and looks cheap.
9. Valentine Tea Set Cozy + Heart Spoon Rest
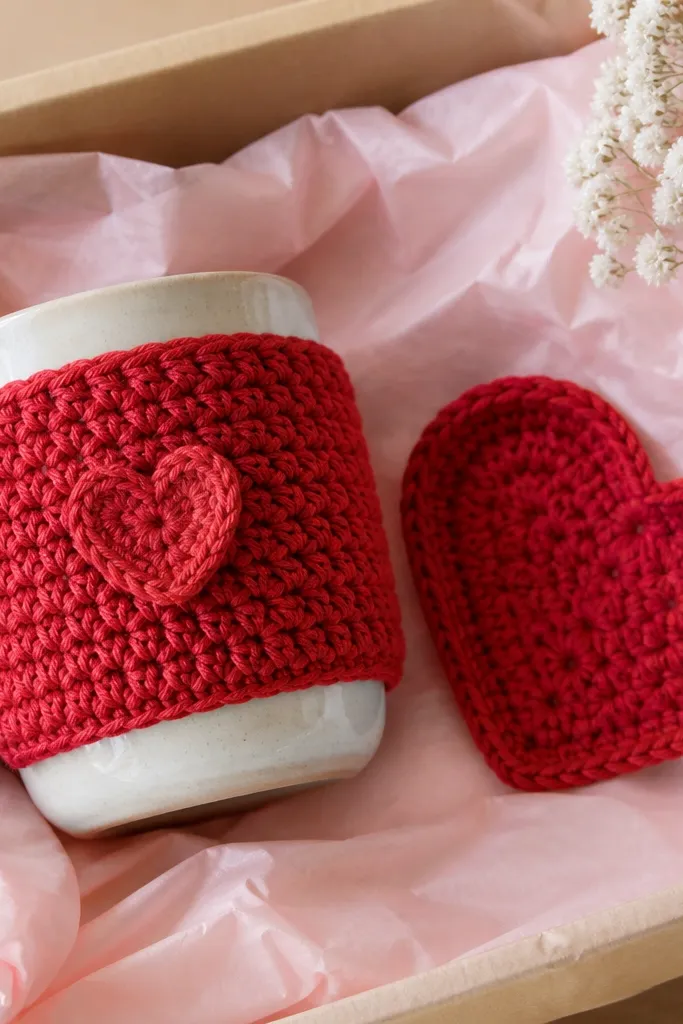
This set looks creative because it turns two kitchen items into a matching pair. The mug cozy keeps the gift practical, and the heart spoon rest adds a fun shape that makes the set look intentional. Use worsted weight cotton in red so it doesn’t stretch and it wipes clean after use. I like adding a single heart applique in a contrasting cream because it frames the theme without covering everything. This is flattering for anyone who likes classic Valentine colors, and it works for adults and older kids. The styling principle is simple: one bold color on the main pieces, one small contrast detail.
Quick tipStitch the heart applique with surface crochet so it looks raised, not flat.
Start with the mug cozy: crochet a snug sleeve that wraps around the mug, then add the heart applique on the front after the base is done. Next, crochet the spoon rest in a heart shape using double crochet for a sturdy fabric, then add a thin edging in cream to match the heart. Finally, place the spoon rest flat in the box and lean the mug cozy against it so the heart faces up. Add a small ribbon around the mug cozy handle area and tuck the ribbon ends neatly so they don’t flop.
One warningDon’t go too thin with the yarn; a floppy spoon rest slides around and ruins the tidy look.
10. Mermaid Nightlight Shade + Star Bookmark
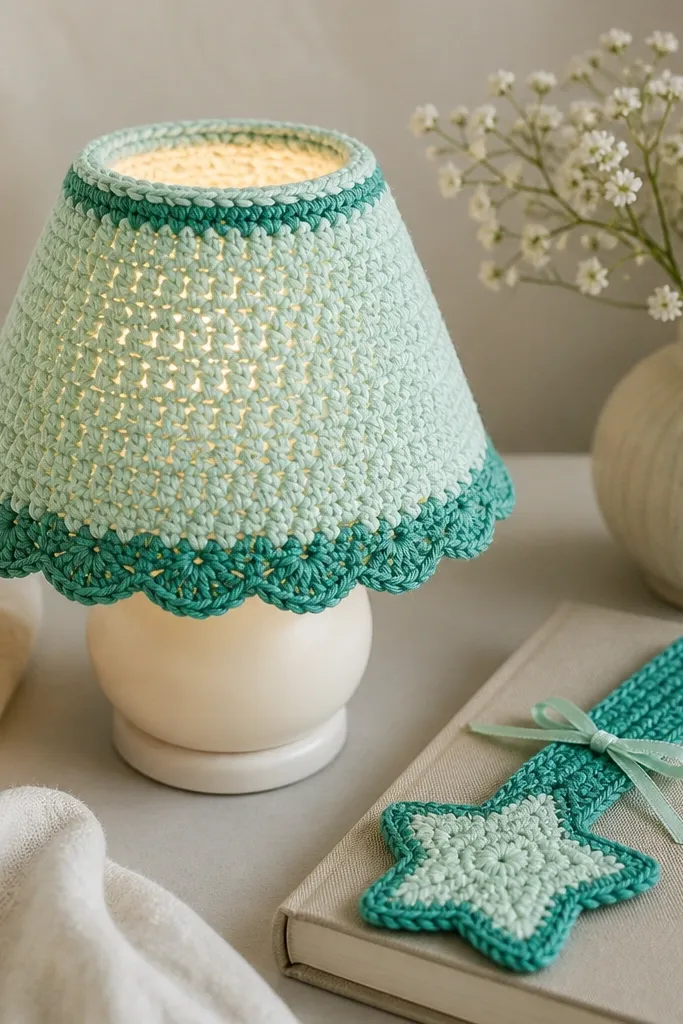
This set looks creative because it gives a room a theme without needing a full decor project. The nightlight shade creates soft color when the light turns on, and the star bookmark repeats the same color story in a smaller, usable way. Use cotton or cotton-acrylic blend so the shade fabric is stable and doesn’t droop. Seafoam and teal feel calm, and the scalloped edge looks delicate without being complicated. This fits bedrooms, reading corners, and kids' rooms where you want gentle “magic” visuals. The star bookmark adds a personal touch if the recipient reads or likes bedtime routines.
Quick tipUse a slightly tighter stitch for the shade than for the bookmark so it holds shape when lit.
Start by crocheting the nightlight shade as a simple cylinder or slightly flared tube with a scalloped top edge. Leave enough open space at the bottom for ventilation and fit — measure your nightlight base diameter before committing. Next, crochet a star bookmark by making a flat star shape with a small loop at the top for the page tab. Finally, fold tissue in seafoam, place the shade upright, then lay the bookmark across the top with the ribbon knot centered.
One warningDon’t block the shade too aggressively; too much stretch can make it fit loose around the nightlight.
11. Mothers Day Garden Bookmark Set (3 Sizes)
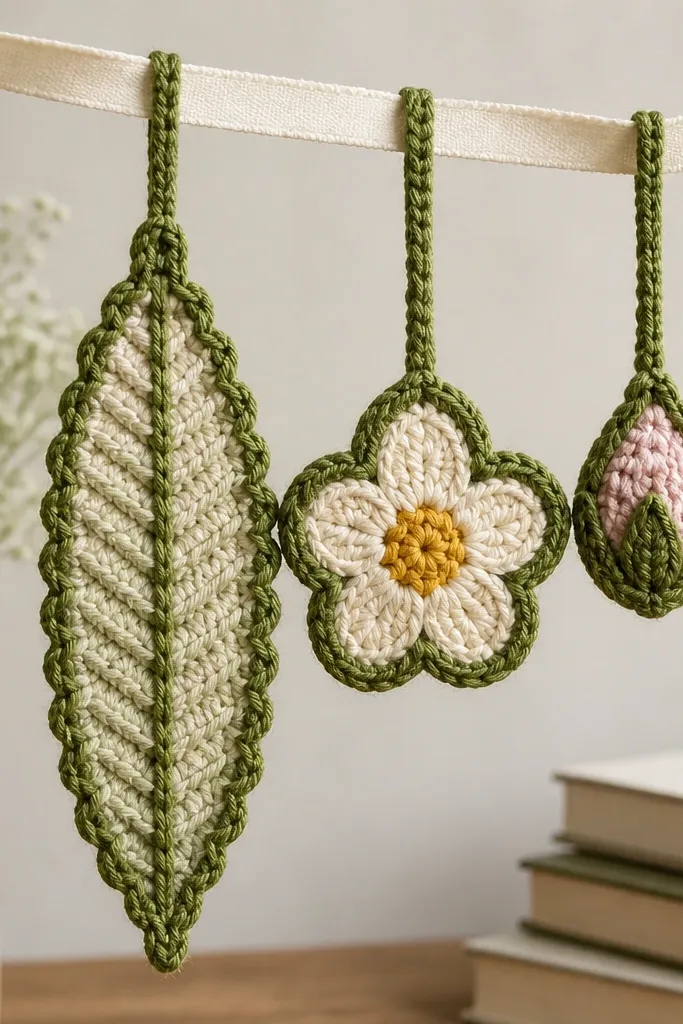
This set looks creative because it feels like a collection, not a single item. Three bookmarks in one style makes the gift feel personal and gives the recipient options for different books. Keep the base palette consistent — sage green border plus one accent color like dusty rose or sunflower yellow. I like using a leaf motif for the tallest bookmark because it frames pages and looks good even in dim light. This set flatters readers who like calm decor, and it works for kids too because bookmarks are easy to use immediately. The main styling rule is repetition: the same edging stitch and border color on all three sizes.
Quick tipAdd a tiny tassel or twisted cord only to the tallest bookmark; too many tassels looks messy.
Start by crocheting the tallest bookmark in a leaf shape, about 7 inches long, and add a single crochet border around both edges. Next, make a medium flower bookmark around 5 inches long, using the same edging and the same accent color placement. Finally, crochet a small bud bookmark around 3.5 inches long and attach it to the same ribbon as the others. Pack them by threading the ribbon through a small box window so the shapes are visible when opened.
One warningAvoid overly stretchy yarn for bookmarks; it curls and the set looks neglected.
12. Winter Sock Slouch Cozy + Hot Cocoa Packet Holder
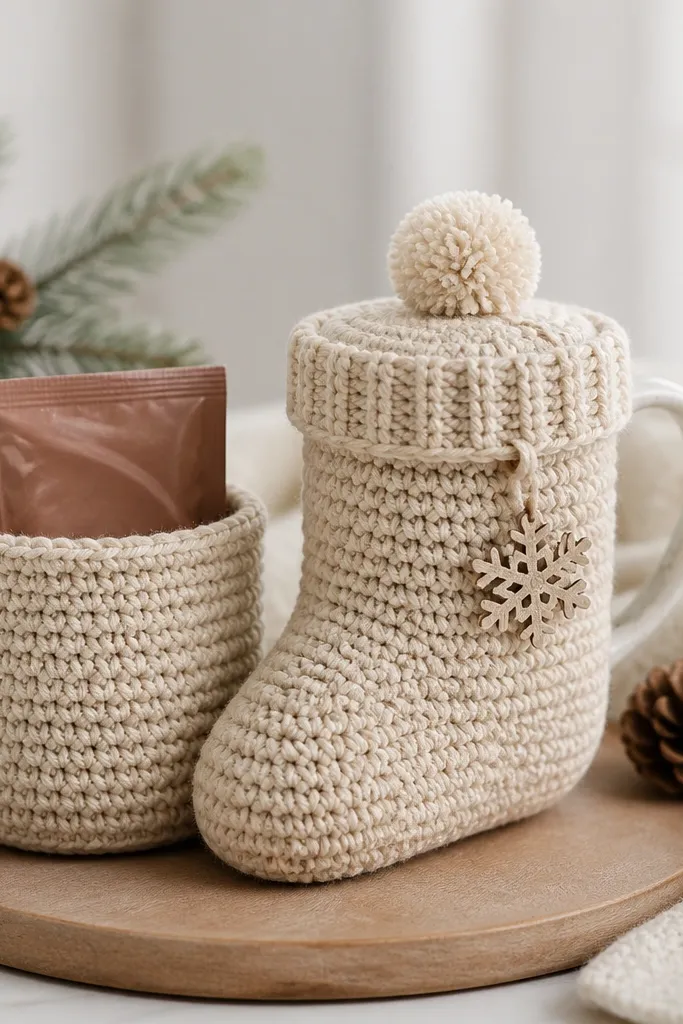
This set looks creative because it mimics a sock — a shape people instantly get — and it pairs with an actual snack item holder. Use oatmeal or light tan yarn for the cozy, and add a darker cuff so it looks like knitwear. The hot cocoa packet holder should match the cozy’s cuff design so the set reads as one outfit. This gift is flattering for anyone who likes warm, neutral winter items, and it feels extra thoughtful without needing complicated pattern work. The pom detail makes it look playful, not bulky.
Quick tipUse a yarn needle to stitch the pom base through multiple layers so it doesn’t detach in transit.
Start by crocheting the sock cozy: make a tube with decreases toward the bottom, then add a ribbed cuff using front post/back post stitches. Add a small pom at the top by sewing it on securely with extra yarn tails. Next, crochet a packet holder panel that matches the cozy width and folds around a standard hot cocoa packet, then sew the side edges so it stands upright. Finally, place the holder inside the cozy and tie the snowflake tag to the cuff so it hangs straight.
One warningDon’t make the packet holder too tight; if it stretches, the whole set looks strained.
13. Beach Day Water Bottle Sleeve + Shell Keychain
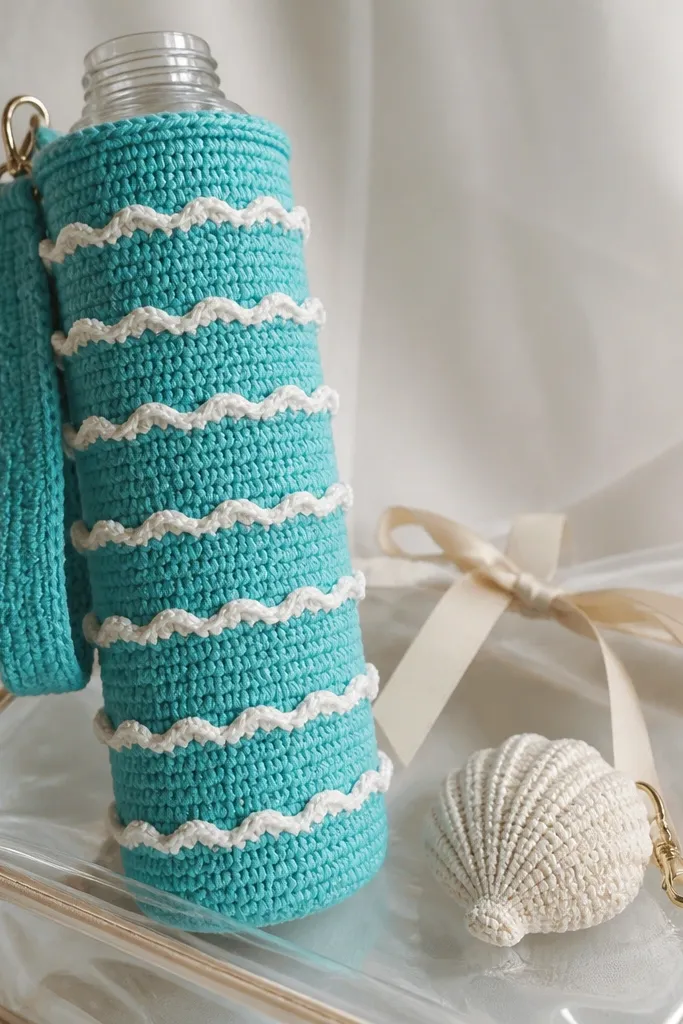
This set looks creative because it turns a plain bottle into a beach prop. The sleeve has wave-like ridges, and the shell keychain repeats the same cream-and-turquoise idea in miniature. Use cotton-acrylic blend for the sleeve so it stays snug, plus it wipes clean when it gets wet. The turquoise looks bright in summer and the cream keeps it from feeling too loud. This is great for kids and adults who carry water to sports or camps. Styling-wise, keep the ridges consistent so the sleeve looks woven, not accidental.
Quick tipIf you’re shipping, add tissue between the ridges so the sleeve doesn’t crease.
Start by crocheting the bottle sleeve to fit your bottle circumference — I aim for a snug wrap with a little stretch. Build the wave ridges by alternating rows of front post/back post stitches or simple raised increases, then finish with a tight single crochet edge at the top. Next, crochet a shell keychain: make a small shell shape in cream, then add a turquoise accent strip and a metal keyring loop. Finally, place the keychain on top of the folded sleeve in the gift bag and tie ribbon around the bag handles.
One warningAvoid loose ribbing; a floppy sleeve looks like a cover that doesn’t belong to the bottle.
14. Birthday Banner Garland Mini + Gift Tag Set
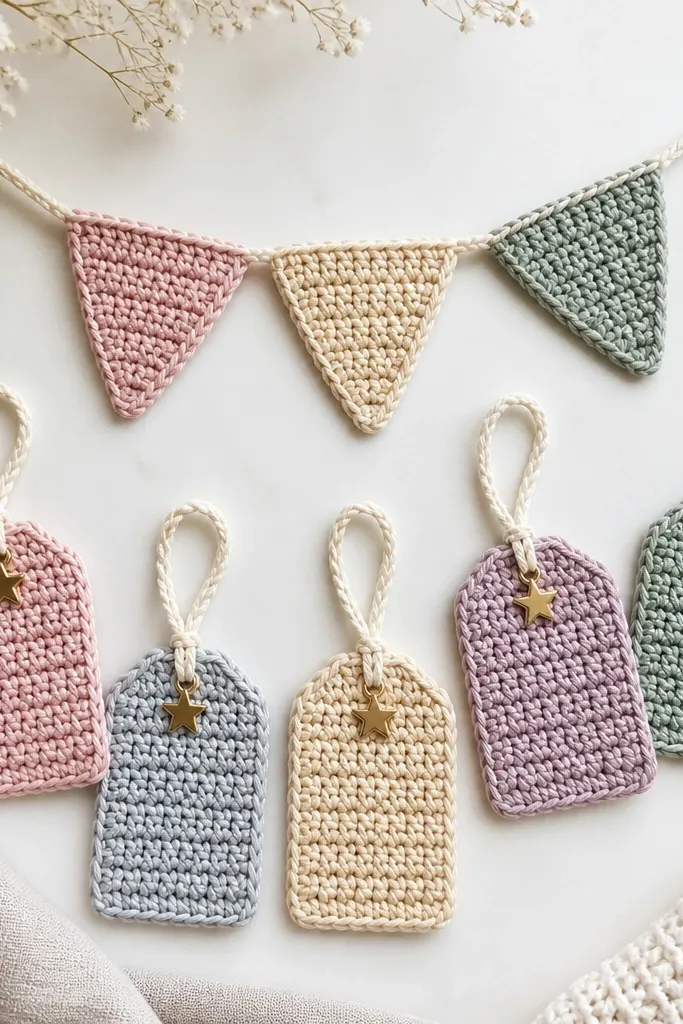
This set looks creative because it treats the gift like a party package. The garland mini gives instant celebration, and the matching tags let you wrap multiple small items without changing the theme. Use worsted weight acrylic for the pennants so they hold their shape, and use the same yarn for the tags for consistent color. Pastels feel friendly for kids' birthdays, while the pennant shape looks classic for adults too. The secret is making the tags decorative but flat so they don’t bulk up the ribbon.
Quick tipWrite the age or the recipient’s initial on the back of one tag with a fine-tip marker so it feels personal.
Start by crocheting three pennants in pastel stripes, each about 4 inches tall, and connect them with a chain that hangs straight. Add a small star applique to one pennant so there’s a focal point. Next, crochet five gift tags: each one is a small rectangle with a rounded top and a loop of chain at the corner. Finally, thread a ribbon through the tags and tie the garland mini to the ribbon so everything hangs together in one bundle.
One warningDon’t use thick yarn for tags; they look chunky and take over the ribbon.
15. Farmhouse Kitchen Set (Black + Cream Checker Coasters)
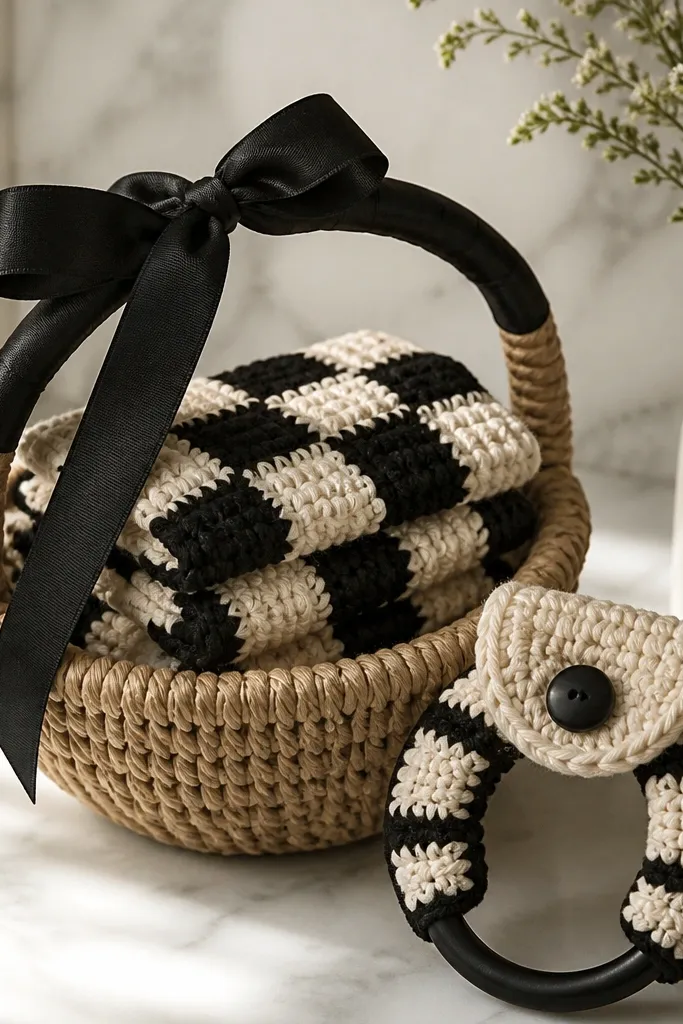
This set looks creative because the checker pattern is visual, and it looks “designed” even with basic stitches. Black and cream is the farmhouse combo that always looks good in real kitchens, and it hides minor stitch differences better than bright colors. Pair coasters with a towel ring holder so the gift feels complete and not random. Use cotton for the coasters so they stay flat, and use the same yarn for the holder so the texture matches. This flat, graphic look is perfect for adults and housewarming gifts. The styling principle is contrast control: keep the pattern limited to one accent area.
Quick tipUse a stitch marker at each color change — it keeps the checker lines straight.
Start by crocheting four square coasters using a checker method: alternate 1 row of black and 1 row of cream with tight tension. Aim for about 4.5 x 4.5 inches so they fit under mugs without overhang. Next, crochet a towel ring holder: make a small band that fits a standard towel loop, then add a short decorative panel in alternating colors. Finally, stack the coasters neatly, place the holder on top, and wrap a black ribbon around the basket or box so the pattern stays visible.
One warningAvoid uneven squares; if your coaster rounds, it won’t stack neatly.
16. Sports Team Mini Set (Team Colors + Wrist Warmers)
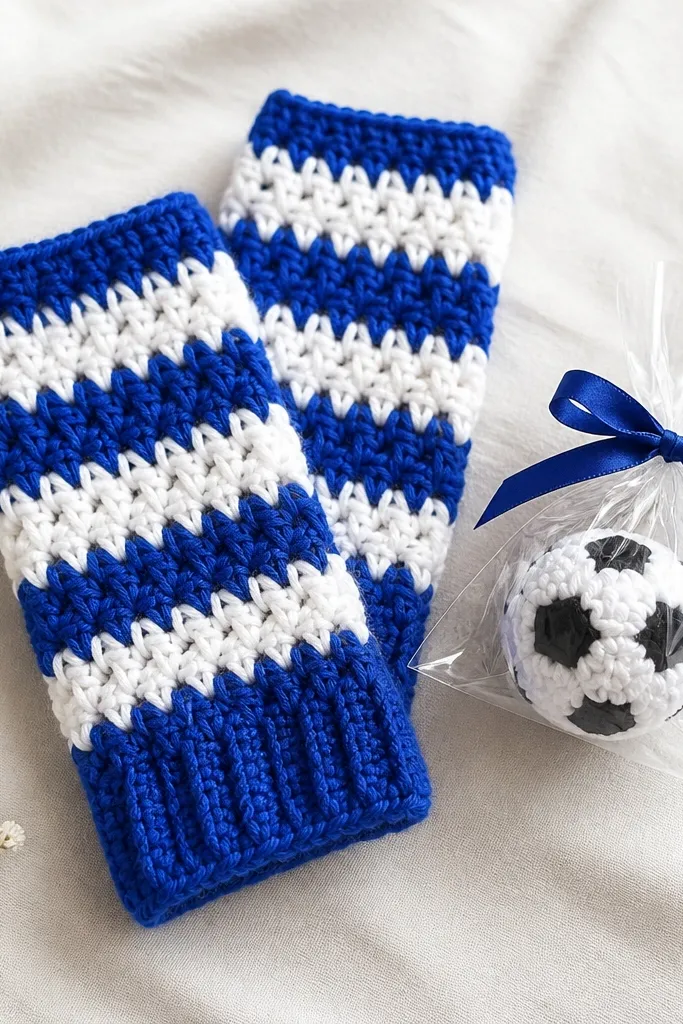
This set looks creative because it uses team colors in a wearable, practical way. Wrist warmers look great on photos because they show shape on the arm, and they’re quick compared to a full scarf. Use acrylic yarn in the team colors for durability, and keep the ribbed cuff in a contrasting shade so it reads like real knitwear. The soccer ball charm adds a theme without making the set too bulky. This is flattering for kids and adults, especially for people who wear team hoodies or jackets in the same colors. The visual system is consistent stripes or ribbing across both warmers.
Quick tipAdd a thumb hole only if the recipient wears them outdoors; it makes it look more functional than decorative.
Start by crocheting two wrist warmers with a ribbed cuff: alternate front post/back post stitches for about 3 inches, then switch to a simple stitch for the main section. Fit them by measuring around the wrist and making them snug but not tight — I usually aim for a 1/2 inch negative ease. Next, crochet a tiny soccer ball charm using black and white panels and stitch it to a small yarn cord. Finally, pack the warmers folded with the charms tucked inside a clear bag, then tie ribbon around the bag so the colors match the warmers.
One warningDon’t skip the ribbed cuff; smooth cuffs roll and look unfinished.
17. Disney-Style Enchanted Bow + Headband Set
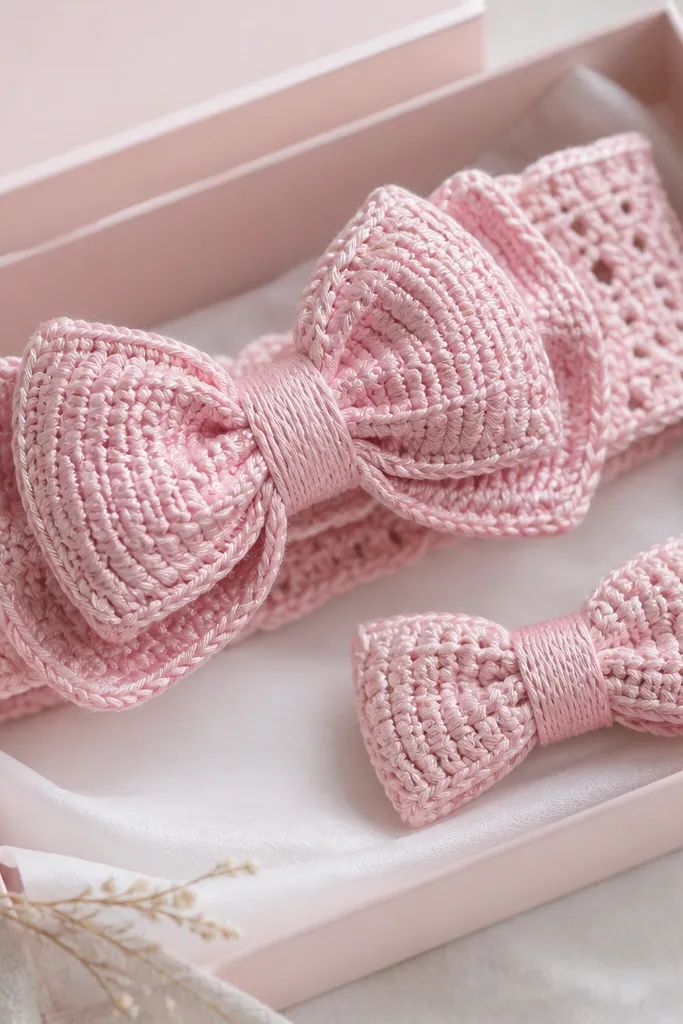
This set looks creative because the bow is layered and sculpted, not flat. A crochet layered bow gives that “enchanted” look kids love, and it’s easier to control than fabric bows when you want a consistent size. Use a medium-weight acrylic in soft pink, then add a tiny accent in white or gold for a subtle highlight. The headband keeps it practical, and the small hair clip makes the set feel like a complete kit. This is flattering for kids with a lot of hair because the bow sits forward and keeps hair tidy. Styling-wise, match the bow color and edging so it looks like one piece of design.
Quick tipUse a fabric glue dot on the clip area before stitching if the clip is slick; it prevents slipping.
Start with the headband: crochet a strip that fits the head circumference with a little stretch, then sew the ends together neatly. Add a thin border stitch around the top edge so it looks crisp. Next, crochet the bow layers: make two larger loops and one smaller center piece, then stitch them together so the top loop sits slightly higher. Finally, crochet a tiny matching clip backing and attach it to a small alligator clip, then place the headband and clip in the box with the bow facing upward.
One warningAvoid oversized bows on small heads; keep the bow width under 4 inches for a balanced look.
18. Halloween Pumpkin Soap Cozy + Mini Witch Hat Tag
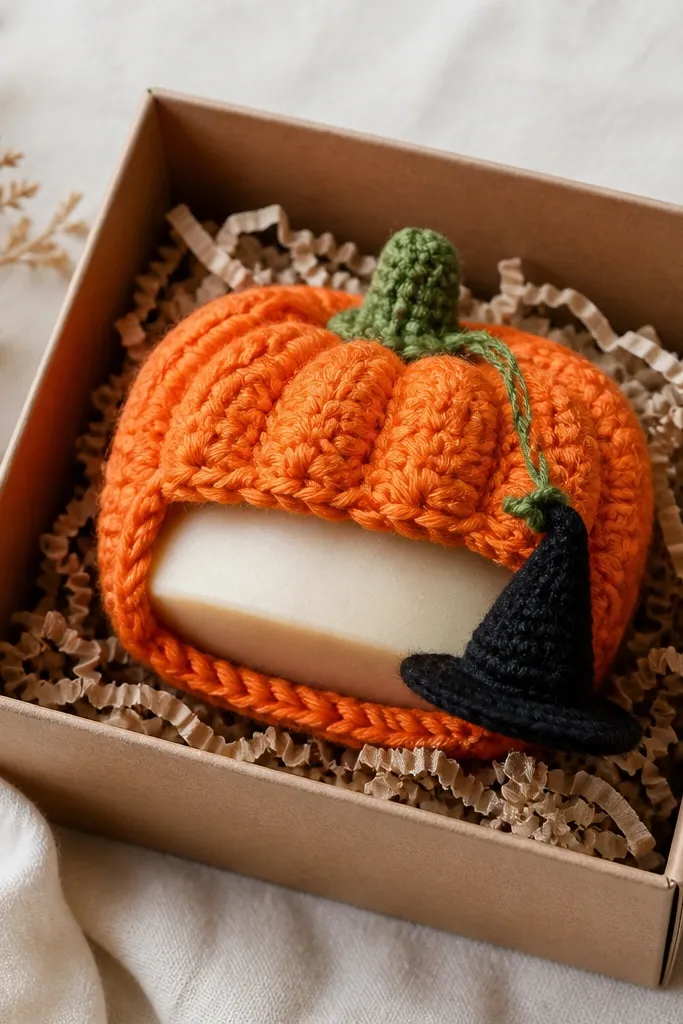
This set looks creative because it turns soap into decor and keeps the Halloween theme small and classy. A pumpkin soap cozy has ridges that look cute in close-ups, and the mini witch hat tag adds a little whimsy without covering the main item. Use cotton for the cozy so it holds shape around the soap and dries properly between uses. Orange with a muted green stem looks more “handcrafted” than bright neon. This is flattering for anyone who likes seasonal decor, and it’s a good gift for adults because it isn’t too childish. The styling principle is focus: keep one main shape (pumpkin) and one tiny accent (hat).
Start by crocheting the pumpkin cozy in panels: work an oval base, then build ridges by adding vertical stitch columns in orange. Leave a small opening for slipping the soap in, then close it with a button or a tight edge. Next, crochet a tiny green stem and attach it to the top center. Finally, make a mini witch hat tag in black and stitch it to a string loop, then tuck it into the box so it hangs above the cozy.
Cut your yarn tails short and tuck them with a needle into ridge channels so they don’t peek out.
Avoid thick bulky yarn; it makes the pumpkin look like a hat more than a cozy.
19. Monochrome Cozy Set (Gray Cable Coaster + Mug Cozy)
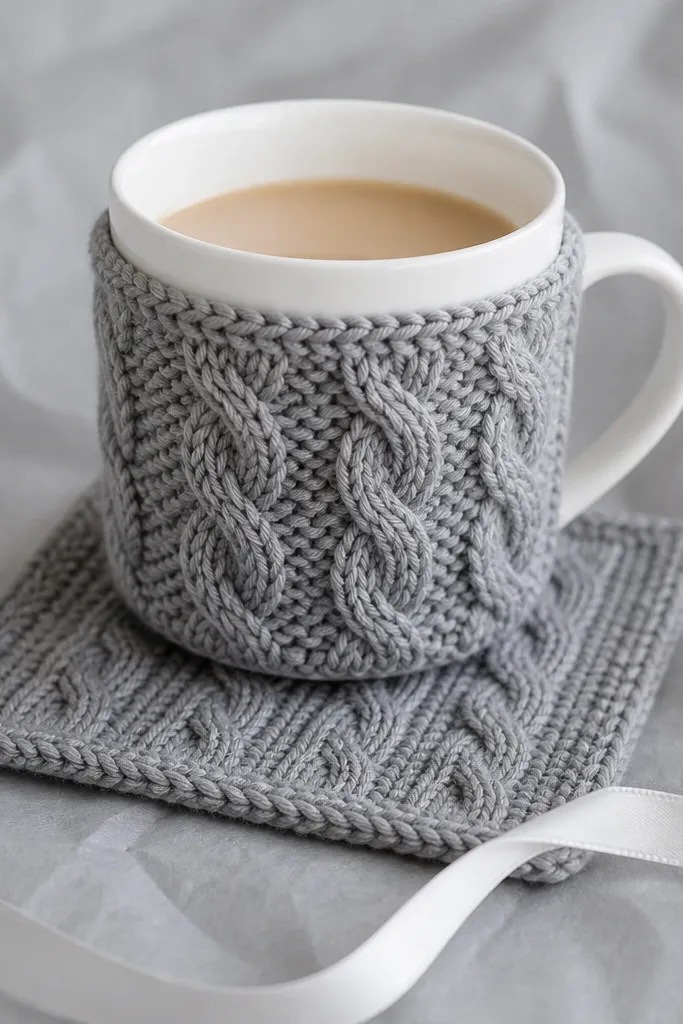
This set looks creative because cables look fancy, but you can create a simple cable effect with front post stitches and a consistent stitch rhythm. Monochrome gray feels grown-up and clean, and it works for office gifts where bright colors feel too much. Use cotton-acrylic blend for durability and a stable drape. The coaster being rectangular instead of round makes it look more custom and less like a pattern you printed yesterday. It flatters most decor styles because gray works with everything. Keep the cable pattern alignment the same on both items so the set reads like a matching set.
Start by crocheting the mug cozy: work a base of single crochet rounds, then add cable-like columns by crossing front post stitches every few rows. Make it snug around your mug, then finish with a neat edging like crab stitch. Next, crochet the coaster in the same cable pattern but smaller and rectangular, around 4 x 6 inches. Finally, stack the coaster under the mug cozy and tie a white ribbon around both so the gray-on-gray stays the main visual.
Press the cable pieces flat while drying so the stitch “twist” stays crisp.
Don’t change the stitch type mid-set; swapping between double crochet and single crochet makes the textures clash.
20. Spring Blossom Set (Pink Flower Coasters + Tea Cozy)
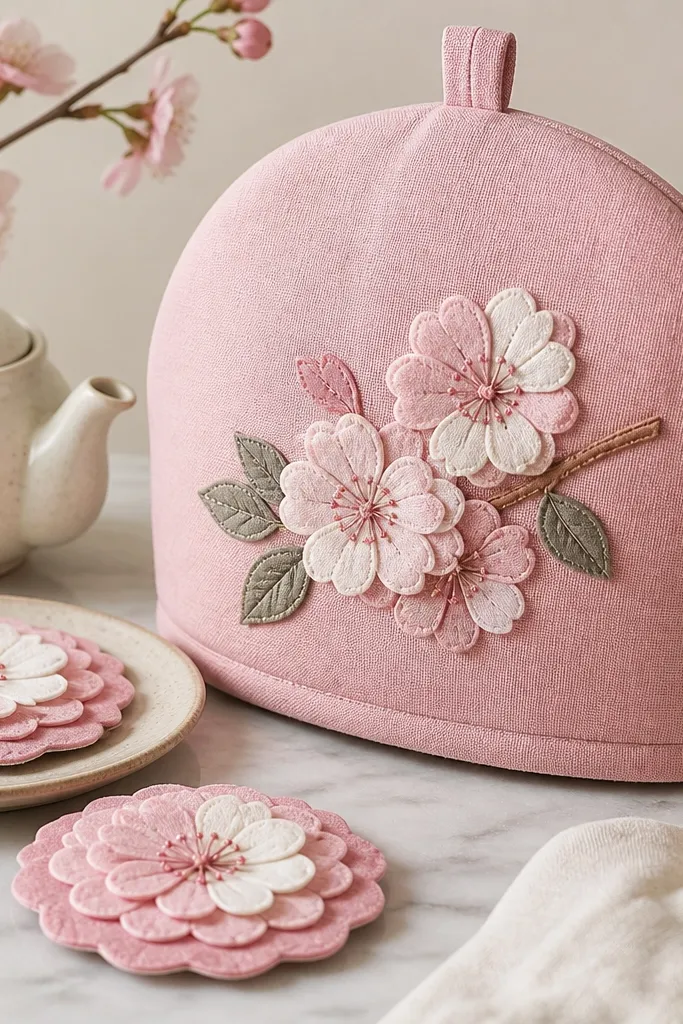
This set looks creative because it uses floral layering in a controlled way. The tea cozy is your main piece, and the coasters echo the petals so everything feels themed. Use cotton yarn in soft pink for a gentle look and add off-white petals for contrast. The leaf charm ties in a natural element and gives the seam area a “finished” feel. This suits spring birthdays and Mother’s Day gifts because it looks cheerful without being loud. Styling principle: place the applique where the viewer’s eye lands — center front on the cozy and centered on each coaster.
Start with the tea cozy: make a snug sleeve for a teapot or mug, then stitch a flower applique on the front center. Use a simple petal shape made from clusters so the petals look layered. Next, crochet two matching round coasters with a base circle and then add layered petals around the edge — keep petal count consistent. Finally, attach a tiny leaf charm near the cozy seam and pack the coasters next to the cozy so the flower faces up. Add tissue in off-white or pale pink and tuck the leaf charm so it doesn’t get crushed.
If your petals curl, block them flat with gentle steam and pins before stitching them on.
Avoid too many flower sizes; keep one flower scale across the whole set.
21. Baby Bib + Pacifier Clip Set (Neutral Starry Edition)
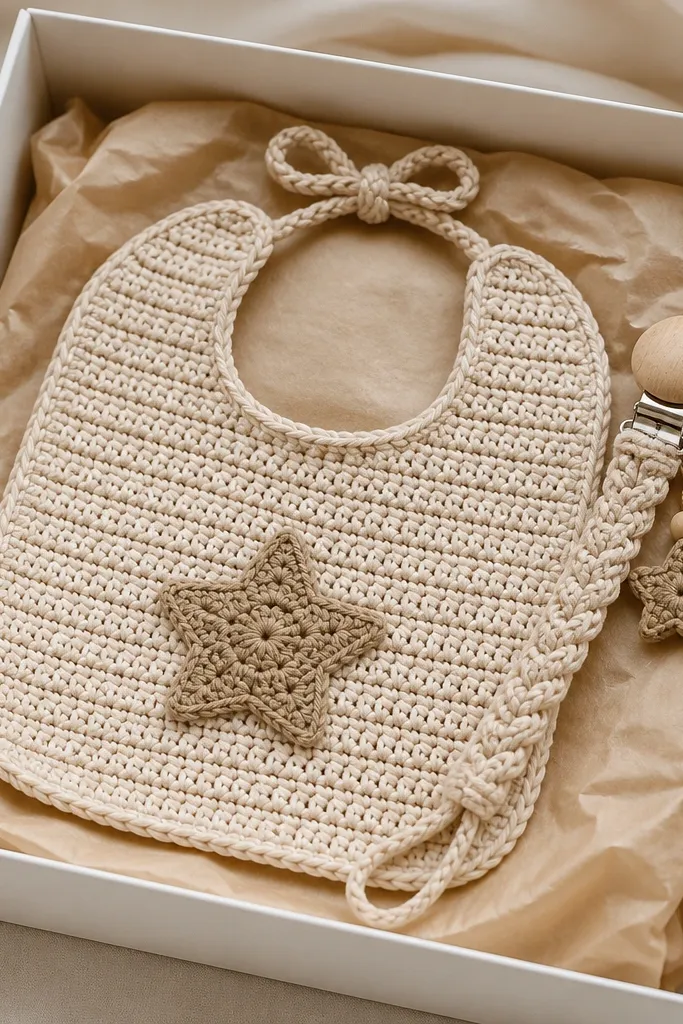
This set looks creative because it’s practical and cute at the same time, and the neutral color makes it feel timeless. A beige bib with a star applique looks calm, and the pacifier clip gives you a matching accessory that makes the gift feel complete. Use cotton yarn for the clip cord so it grips well and doesn’t feel slick, and use a soft yarn for the bib. I like one star color accent like light gray or muted navy so it pops without looking loud. This is flattering for any nursery theme and it works for both boys and girls. The styling principle is restraint: one motif, repeated, with consistent placement.
Start by crocheting the bib front with a slight curve and add scalloped or simple edging around the bottom. Stitch the star applique centered on the bib — keep it small, around 1.5 inches wide. Next, crochet a cord for the pacifier clip or a cover that fits the clip mechanism you buy, then attach the star charm to the clip end. Finally, pack the bib folded and lay the clip along the side so it doesn’t tangle, then close the box with a ribbon tied straight across the top.
Before gifting, test the clip’s grip by tugging hard — you want it secure enough for daily use.
Avoid yarn that sheds fuzz; it sticks to pacifiers and looks messy fast.
22. Cat Lover Cozy Set (Cat Face Coaster + Yarn Mouse Toy)
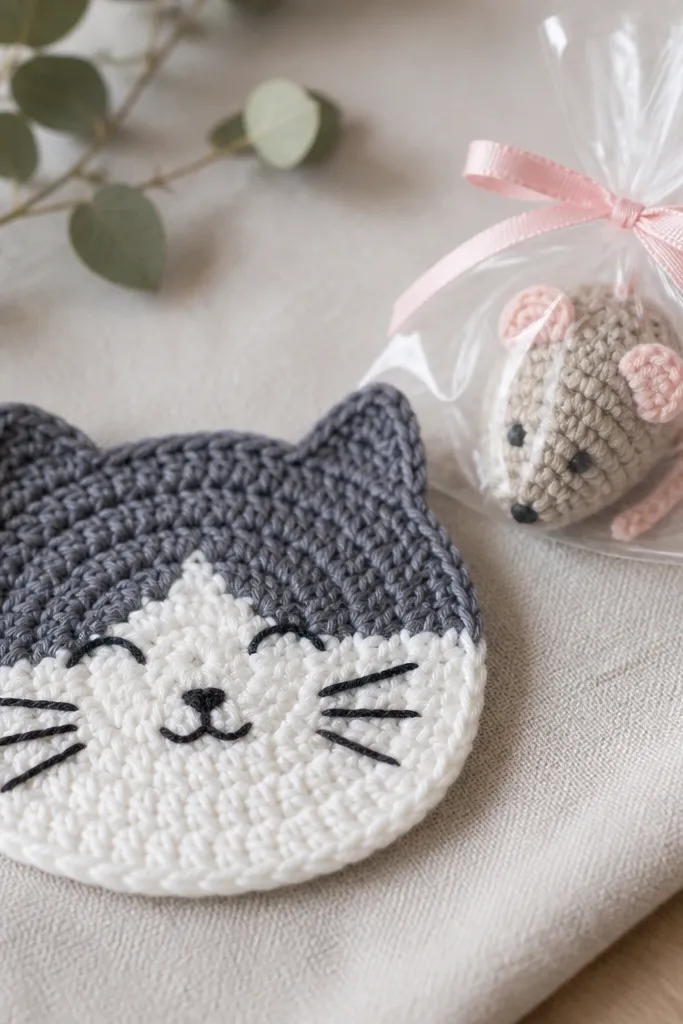
This set looks creative because it pairs a decor piece with a playful pet item. The cat face coaster is easy to recognize and looks adorable on a coffee table, while the yarn mouse toy makes the gift feel alive. Use cotton for the coaster so it stays flat and wipeable, and use acrylic for the mouse toy for softness. Gray and white look clean and don’t fight with home decor. This is flattering for cat owners who like subtle cute rather than cartoon chaos. The styling principle is face symmetry: keep the eyes and whiskers in the same spot on the coaster so it looks “designed.”
Start with the coaster: crochet a round base, then add gray for the face and white for the muzzle. Use surface crochet to stitch eyes and whiskers — keep the lines tight so they look crisp. Next, crochet a small mouse toy: make an oval body, add tiny ears, then stuff lightly and stitch a tail. Finally, pack the coaster flat in the box and place the mouse toy in a clear bag so the recipient can see it immediately when opening.
Use black embroidery thread for whiskers; it stays sharp and doesn’t look fuzzy like yarn.
Avoid overstuffing the mouse; a squishy toy collapses and the coaster looks lonely in comparison.
23. Bookish Witch Set (Potion Bottle Cozy + Bookmark Spell Page)
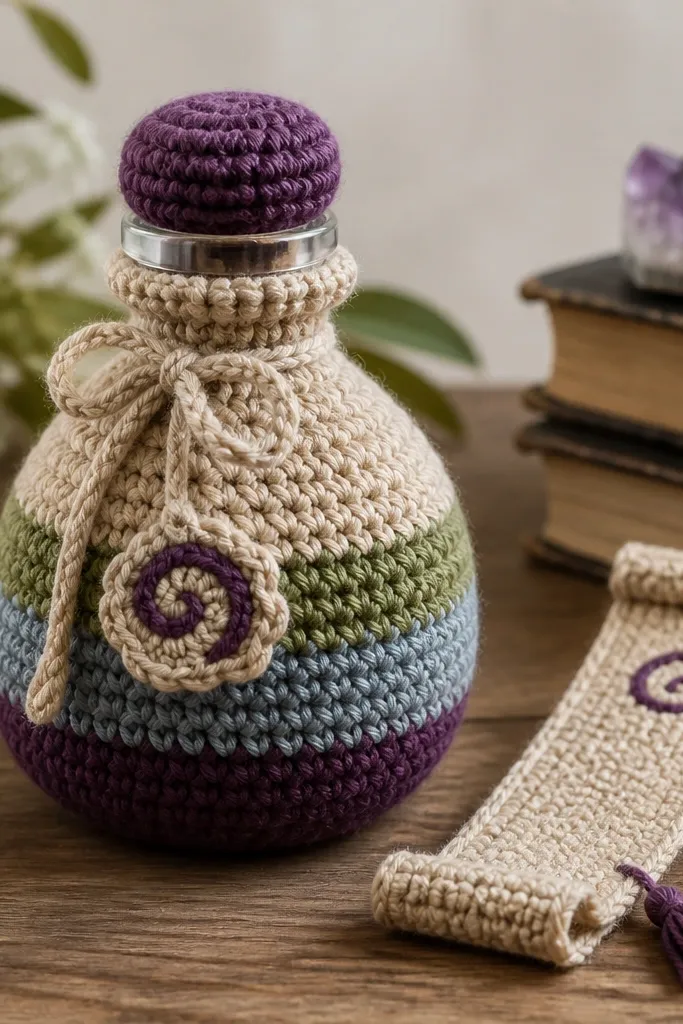
This set looks creative because it’s book-themed in a way that feels fun but still usable. The potion bottle cozy is a novelty item that still has a purpose if you use it for a bottle or jar holder, and the scroll bookmark is a direct match for the recipient’s hobbies. Use yarn in deep green and black with a gold accent stripe so it looks like potions and candlelight. This palette flatters almost everyone because it reads as moody rather than childish. The bookmark adds personality without needing a lot of extra work. The styling principle is theme consistency: same color accents and same edging stitch on both pieces.
Quick tipUse a lighter gold yarn for the label area so it reads clearly against dark green.
Start by crocheting the potion bottle cozy as a cylinder with a slightly flared base, then add a ribbed cap at the top. Add layered stripe bands in gold every few rows — keep the stripe thickness consistent. Next, crochet the scroll bookmark: make a long rectangle with rolled ends by working in back loops for a slight curl, then stitch a small label area in gold. Finally, place the bookmark beside the bottle cozy and tie a ribbon around both so the gold accent catches light in photos.
One warningAvoid mixing too many Halloween motifs; one potion theme and one scroll theme is enough.
24. Thank You Teacher Set (Pencil Topper + Lined Notepad Cover)
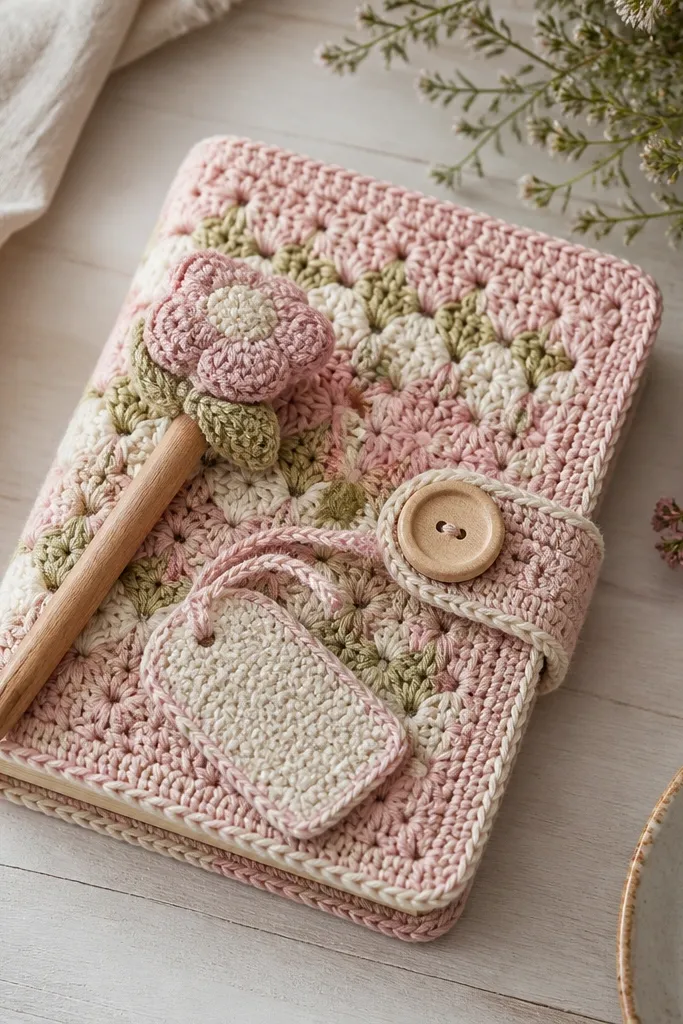
This set looks creative because it’s teacher-friendly and actually used. A notepad cover makes the gift feel practical, and a pencil topper adds a small detail that makes the whole thing look finished. Use cotton or cotton blend for the cover so it stays structured around the notebook edges. Choose a friendly color like teal with a cream border, then keep the label tag simple and stitched. This flatters most people because it looks like a handmade stationery accessory rather than a toy. The styling principle is closure: a button or loop closure makes it look like a product.
Quick tipUse a small wooden button — it adds warmth and makes the set look higher-end.
Start by crocheting the notepad cover around your notepad size: measure height and width, then add a flap that overlaps by about 1 inch. Crochet the cover using a sturdy stitch like single crochet and add a cream border so edges look clean. Next, crochet a pencil topper that fits standard pencils: make a small cylinder and shape the top into a rounded cap, then stitch a tiny label tag on the side. Finally, attach the pencil topper to the front flap with a yarn loop so it stays in place when packed.
One warningAvoid floppy cover stitch patterns; a loose cover makes the notebook look like it’s falling out.
25. Picnic Picnic Set (Coaster Set + Matching Napkin Ring Holders)
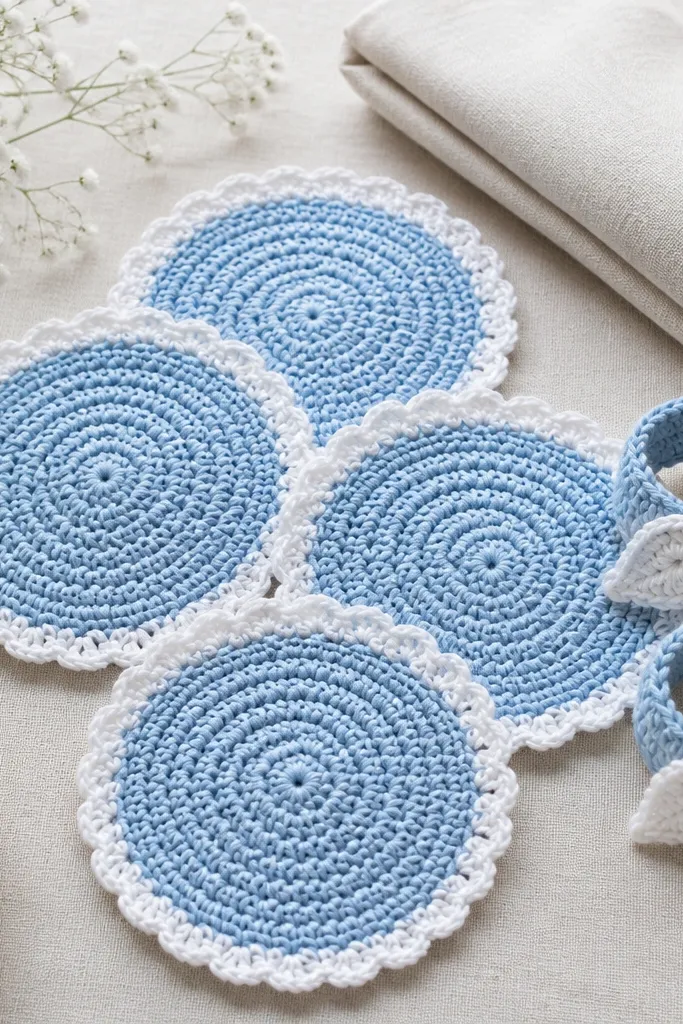
This set looks creative because it pairs table items that people use together. Coasters make the “picnic” theme obvious, and napkin ring holders make it feel like a real place setting. Use cotton yarn so the coasters and rings stay flat on table surfaces. Sky blue with white scallops looks clean and summery, and the leaf detail adds a natural cue without taking over. This gift flatters outdoor lovers and anyone who hosts — it looks like a styled table even when it’s simple. The styling principle is matching edges: keep scallops consistent across coasters and rings.
Start by crocheting four round coasters with a sky blue base and white scalloped edging at the outer edge. Make each coaster about 4.5 inches wide so it fits mugs and small cups. Next, crochet two napkin ring holders: work a small band that wraps around a folded napkin, then add a leaf applique on the front of each ring. Finally, pack them in a small box with tissue — place the coasters stacked, then set the rings on top and tuck the leaf tips so they don’t crush.
Use a stitch marker to keep scallops evenly spaced around the coaster edge.
Don’t make napkin rings too tight; if they stretch, they lose their shape and look cheap.



